9. ginlo Management Cockpit (B)
Hint
This chapter is intended for Technical administrators.
ATTENTION:
The ginlo Management Cockpit is currently being reworked.
Displayed screenshots will be adjusted after completion of the rebuild!
9.1. Order the ginlo Management Cockpit
IT administrators can find out more about ginlo Management Cockpit on the ginlo website.
You can try ginlo Business for 30 days free of charge by clicking the FREE TRIAL button. This will take you to the test form. Fill in the mandatory fields and send the form.
Hint
Ideally, you should use a neutral e-mail address for the cockpit admin account that is not directly assigned to a person - e.g. ginlo_cockpit@YourBusinessDomain.com
9.2. Register in ginlo Management Cockpit
If you have successfully sent the order form, an account will be created for you. Afterwards you will receive the email Your personal cockpit access for ginlo Business to the address you provided.
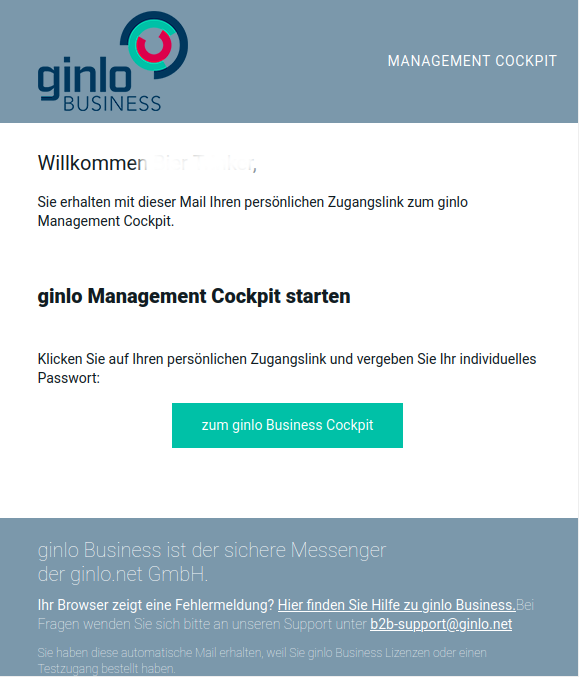
Open the link from your welcome email.
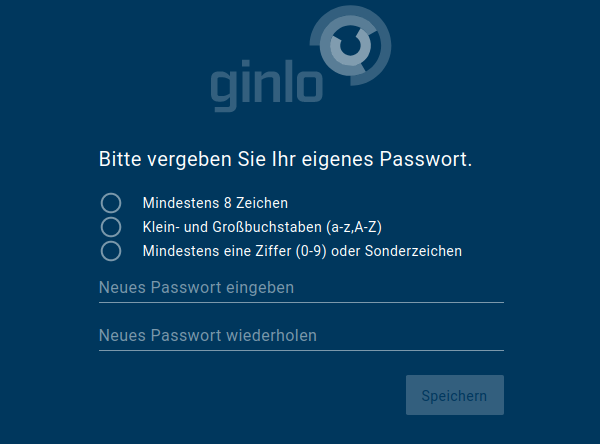
Now assign your personal login password for the ginlo Management Cockpit yourself. The password must consist of at least 8 characters. It must contain lower and upper case letters and at least one digit or special character. Save your password and remember it well!
Important
After first login you will automatically receive a recovery code by email.
Keep this safe and secure.
It is the only possibility to recover administrator account in case of loss of the regular password!
After registration, ginlo Management Cockpit can be accessed via cockpit startpage.
If you need help, please simply reply to the welcome email. With your registration, we have automatically opened a support ticket to quickly assist you with any questions.
9.3. Set up and manage cockpit
This part of the documentation provides an overview of the ginlo Management Cockpit, how to configure the app, how to ideally prepare the rollout of ginlo Business for your company’s employees and how to effectively manage the use of the messenger.
ginlo Management Cockpit allows configuration of ginlo Business app according to your compliance requirements and an intuitively simple user and license management.
Via a web interface, an IT administrator can distribute the app throughout the company and control it centrally. In addition to app functions, design can be customized and messages can be sent.
The innovative ginlo Management Cockpit has following functions, among others:
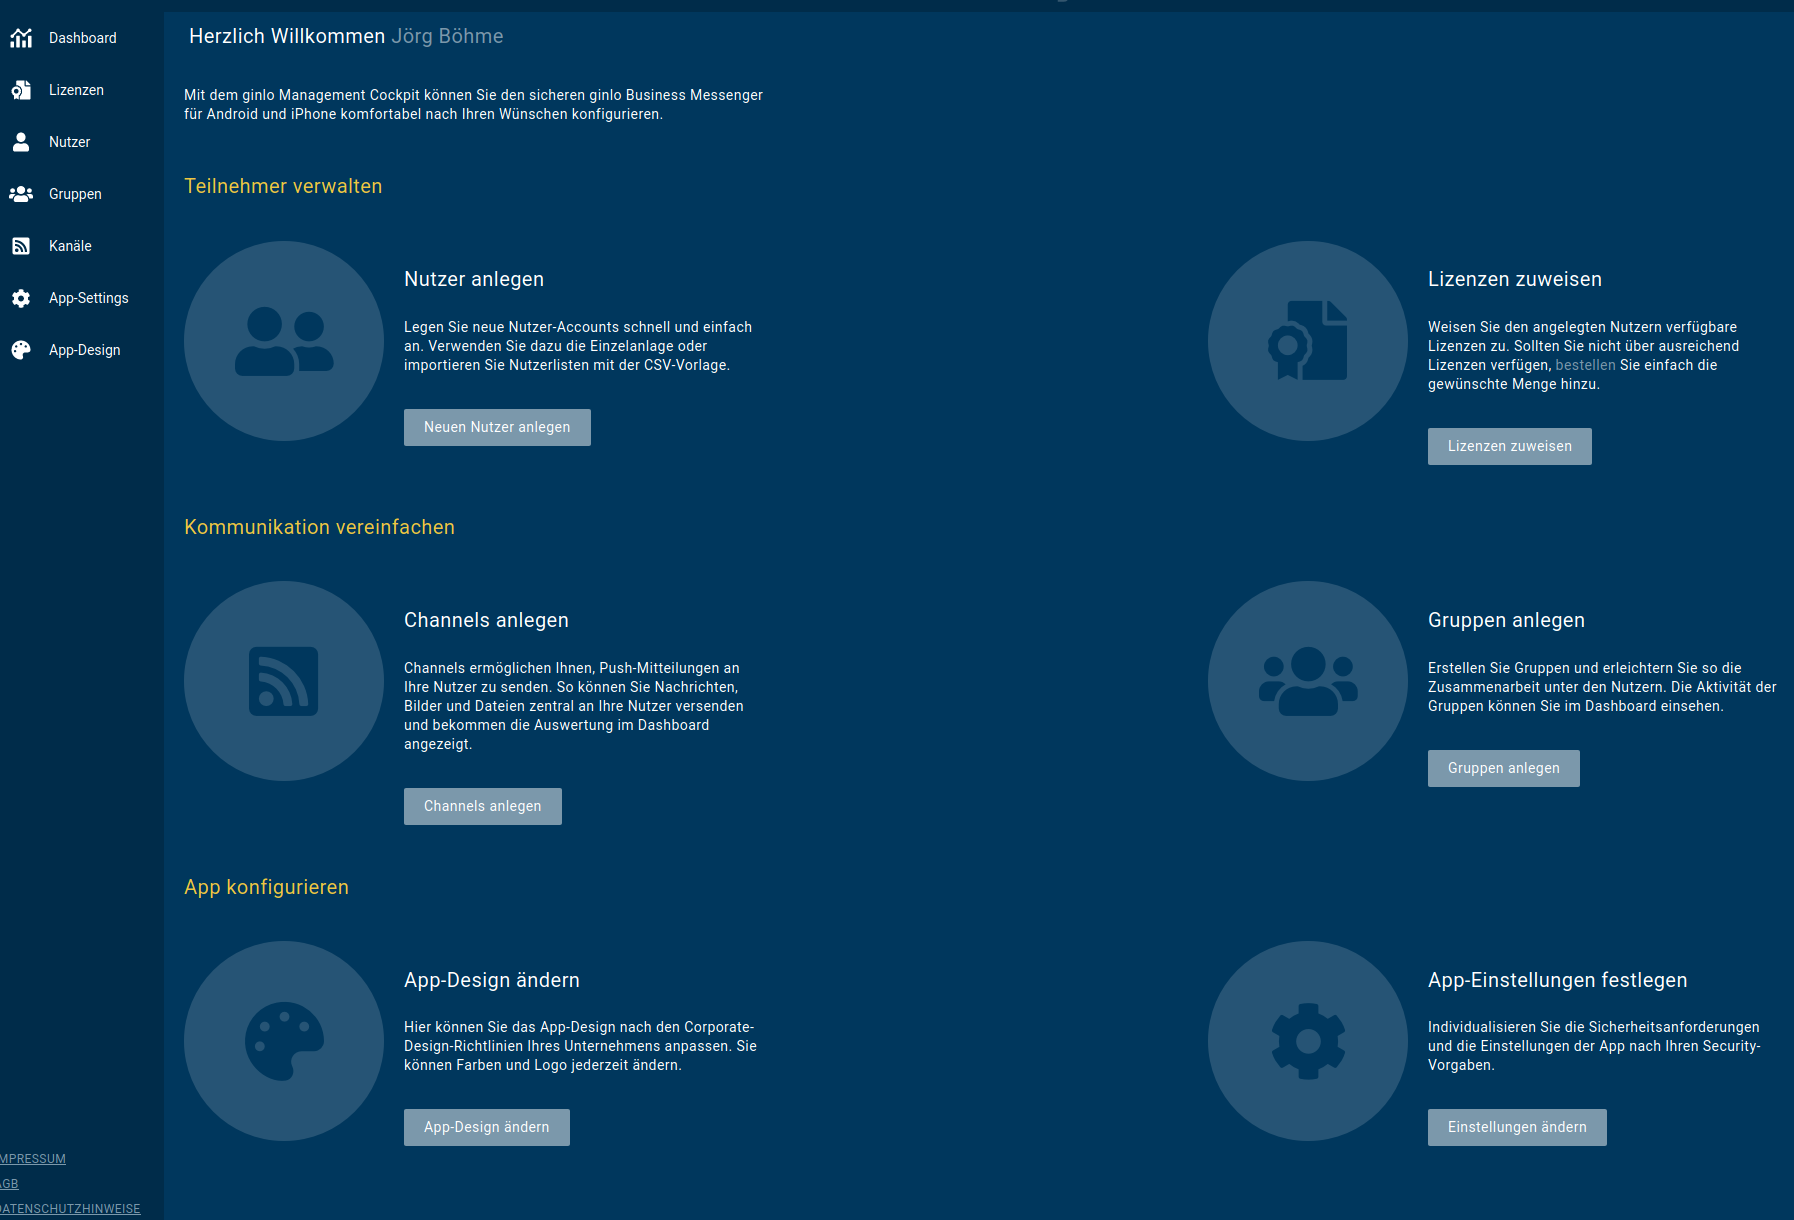
First log into your ginlo Management Cockpit with your e-mail address and pre-generated password. To do this, call up cockpit startpage.

You will be taken to the start page.
On the top right you can set the preferred language (DE for German and EN for English). To the right is the Logout button.
In the center area you can select specific sections.
The side menu takes you to the Reporting tool, the App and user management and to the Basic settings of the cockpit.
The following sections describe the basic settings of the ginlo Management Cockpit, the App and user management and the reporting tool.
9.3.1. Settings
Important
ATTENTION: Construction site!
The following sections are under revision!
Pictures and texts as well as the order of the description reflect the actual state only conditionally.
We ask for your understanding.
If you have any questions, please contact our support department by email.
In the Settings necessary information about the company, administrative details as well as user processing for larger companies are managed. You also get an overview of your purchased licenses.
9.3.1.1. Company information
Enter name and postal address of your company and complete given fields. Optionally you can upload a company picture. Two language choices are available for communication: German or English.
Your company details will be needed later by us for invoicing.
Confirm your entries by clicking the green Save button at bottom right.
9.3.1.2. Administrator
Enter your name and your first name. Additionally you can manage your access password to your ginlo Management Cockpit here. Your e-mail address and your cell phone number have been taken from your order.
Your personal data will be used for contacting our support department.
Confirm all entries or changes by clicking the green save button at bottom right.
9.3.1.3. Deputy
ginlo Management Cockpit of a company can be administered by several persons (administrators). First created administrator of ginlo Management Cockpit can create deputies for this purpose.
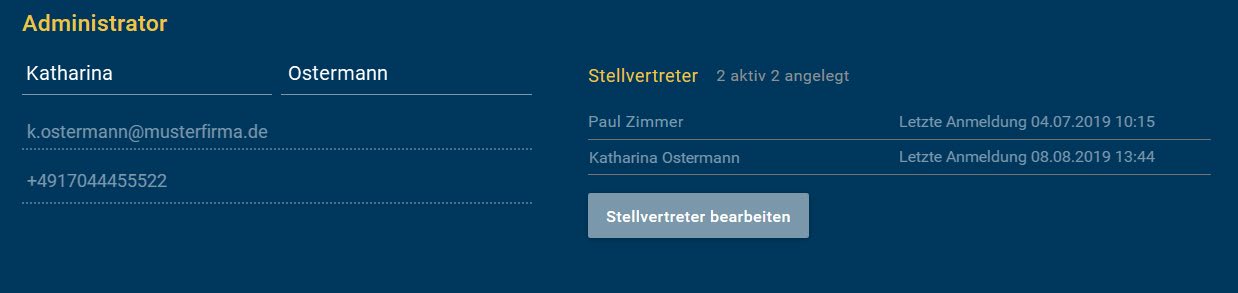
To do this, click on edit deputy and then on the green button create new deputy at bottom right. For this purpose, surname, first name, e-mail address and mobile number of deputy colleague must be stored.
This data will also only be used for contact purposes.
A deputy can also access the ginlo Management Cockpit and create, edit and delete users, groups and channels.
Hint
A deputy cannot create additional deputies.
There is no upper limit defined for the number of deputies. For practical reasons, we recommend not to name more than 3 deputies. In the deputy list overview, you can track date and time of activation and last login.
An active deputy can also be deactivated or deleted in the detailed view by the administrator of ginlo Management Cockpit. To do this, click on edit deputy and then on corresponding line in the overview. Delete button and a yellow button for deactivation appear at the top right.
In case of deactivation access to ginlo Management Cockpit will be blocked, but user data will be kept. User can be reactivated as a deputy at any time.
In case of deletion, on the other hand, deputy will be deleted from the system and marked accordingly. If he is to be appointed as a deputy again at a later date, data record must be created again and process run through once more.
Confirm all entries or changes by clicking the green Save button at the bottom right.
9.3.1.4. Order History
In the order history you can see an overview of your license orders. This can be sorted by date. You can also use the Order new licenses button at this point to request additional licenses you need. To do this, enter the required number in the relevant field in the pop-up and follow the further instructions.
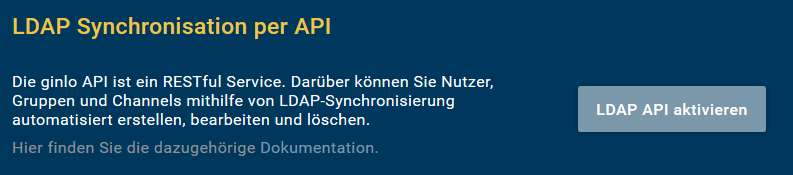
9.3.1.5. ginlo Business API
In addition to manual user creation and simplified import procedure via CSV for one-time user creation, ginlo also offers the possibility to import data into ginlo Management Cockpit via automated processes, e.g. from an LDAP directory. In contrast to the simplified process, the LDAP update automatically creates, changes or even deletes users.
Furthermore, users can be automatically assigned to groups and channels in this way. If respective groups or channels do not yet exist, these are also created in course of import.
In addition to an LDAP directory, any other system can also be used as a source system if the user data provided matches the defined data structure. The following two sections provide detailed instructions for the two-step process consisting of LDAP-Import and -Export.
A REST API is available for continuous LDAP synchronization. In addition to automated employee creation, users are also assigned licenses, groups, channels and keywords. If the assignment entities do not yet exist in the system, they are created directly through the interface.
Due to the large number of covered functions, a simpler, individualized connection of a user directory service to the ginlo Management Cockpit (e.g. LDAP, AD) is possible, which simplifies the administration of the own employee structure. At the same time, the interval for updating the data can be controlled from one’s own infrastructure.
To achieve successful authentication against the interface, it is necessary to enable the LDAP synchronization via API function.
Afterwards a certificate is generated and sent to the logged in administrator via e-mail and the certificate password via SMS. Basic authentication serves as a second authentication channel. All relevant access data can be accessed via the Settings menu item.
The following figure shows an overview of all relevant data:
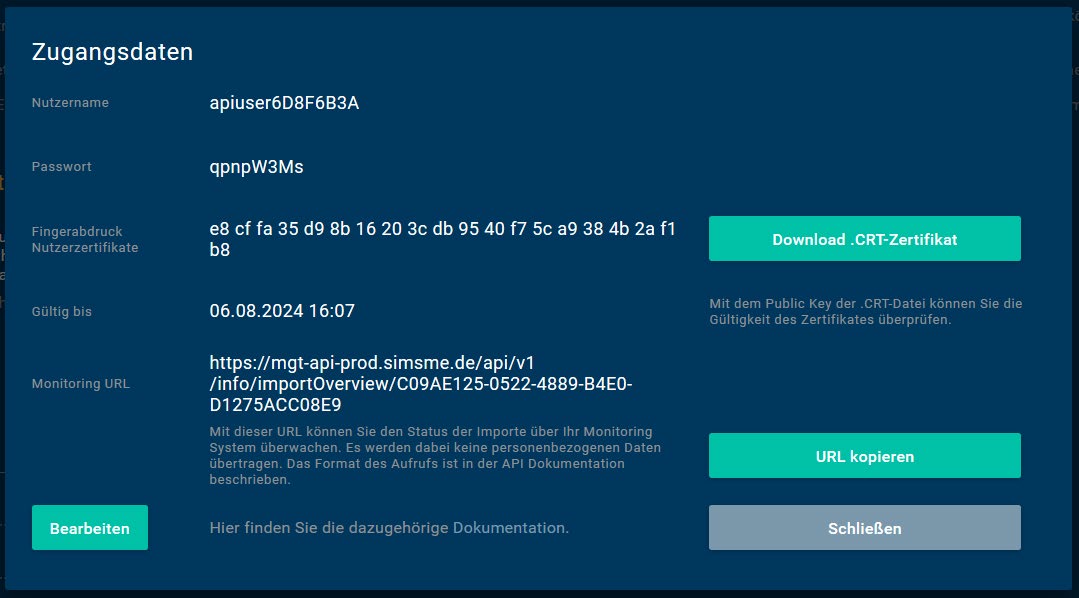
username: first component of basic authentication
password: second part of basic authentication
fingerprint user certificate: fingerprint of the public certificate to validate authenticity of the sent certificate
Valid until: End date of validity of certificate
Monitoring URL: Query the status of the last 10 imports, for which no authentication is required.
By pressing the Edit button you can
generate a new password;
send a new certificate;
generate a new URL;
Two close buttons will take you back to ginlo Management Cockpit settings.
9.3.1.5.1. LDAP Import
The creation of LDAP data is a two-step process consisting of LDAP import and cockpit export. This guide looks at the cockpit import.
For details on LDAP export, see section Interface Description.
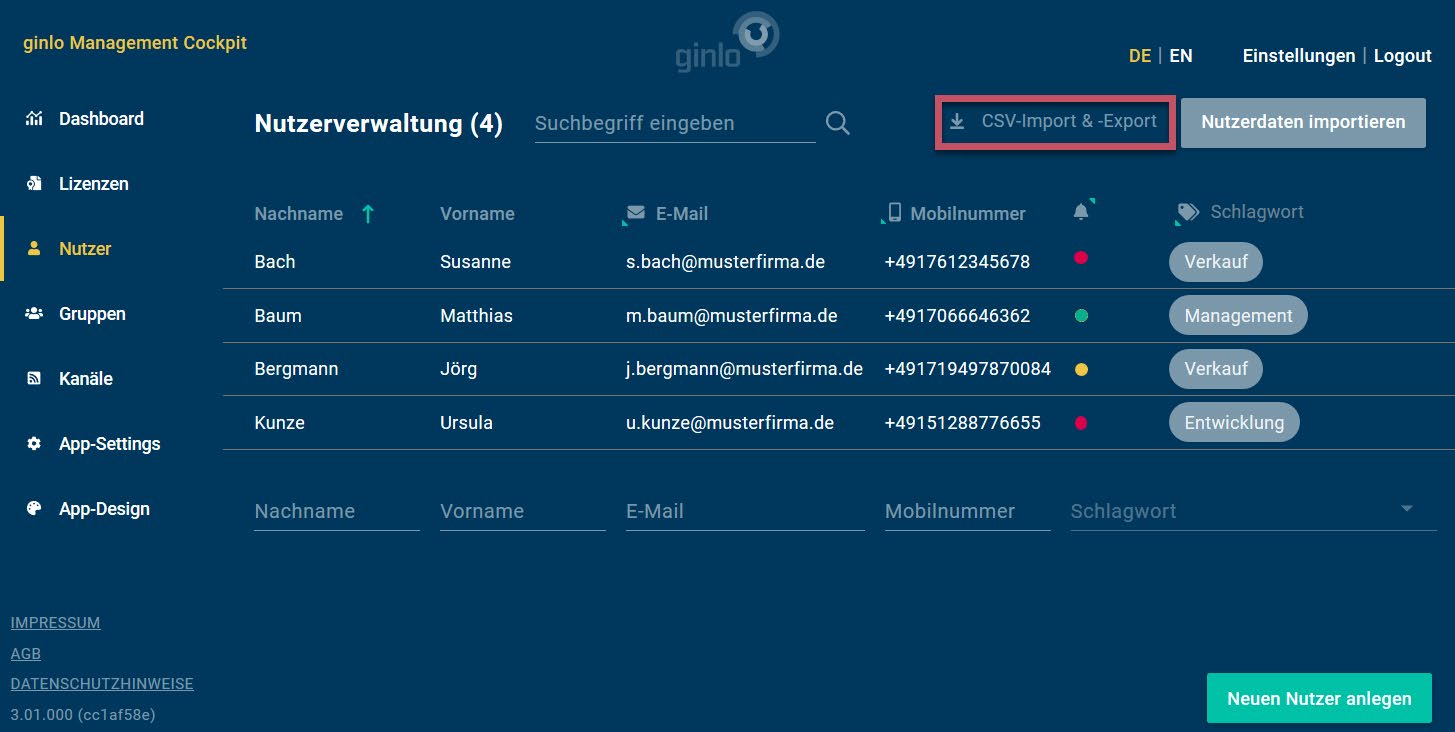
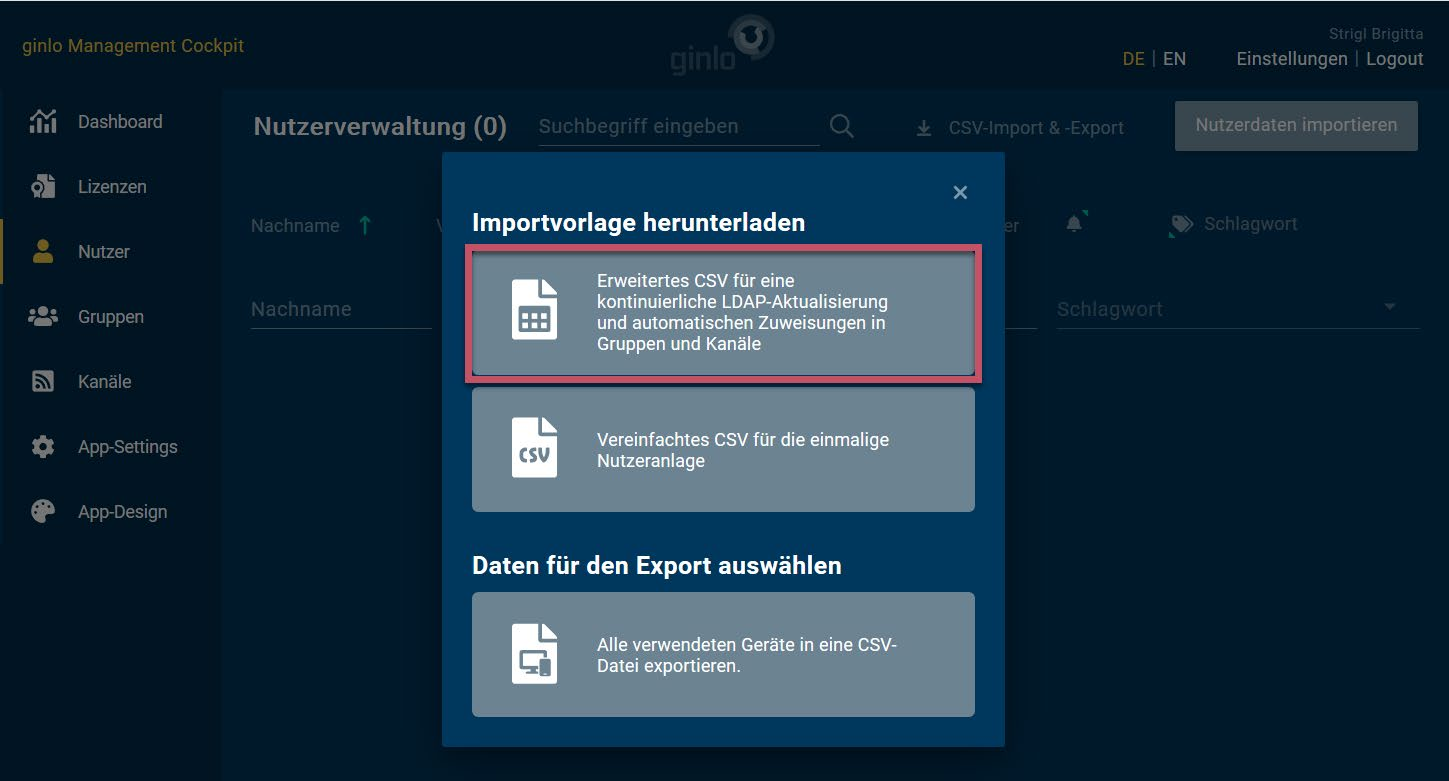
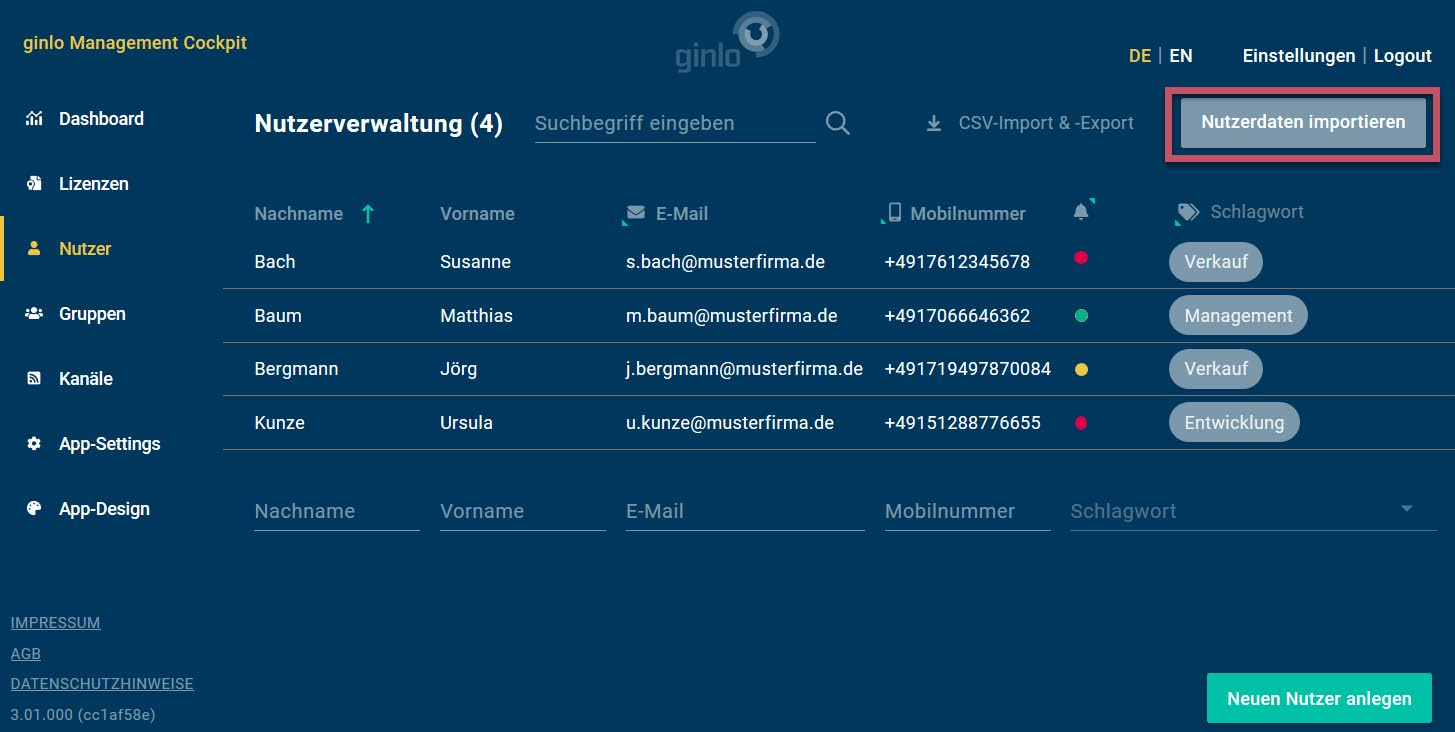
In the Users tab, click Import Template in the upper right corner.
Select Advanced CSV and populate this as described in the Interfaces section.
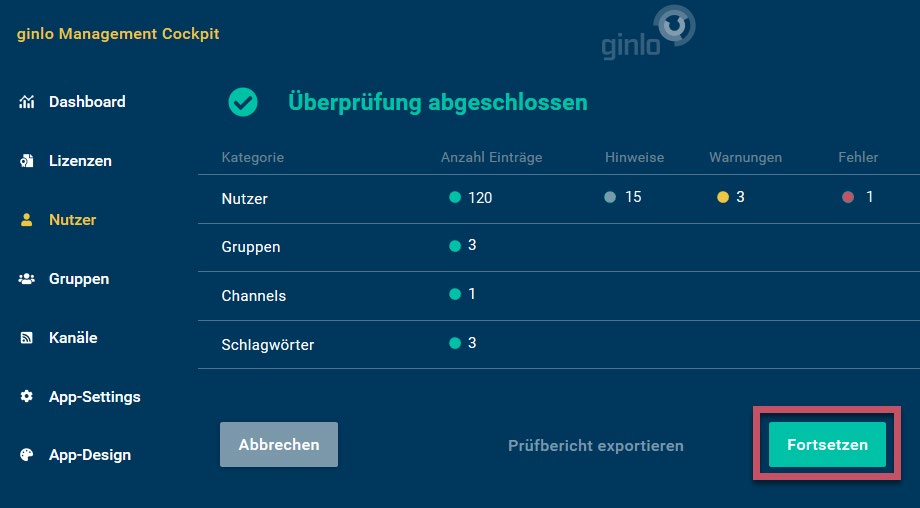
Import the filled CSV - the data will be checked first and then prepared for import.
In the preliminary test, you can export the test report for notes, warnings and errors or continue the import.
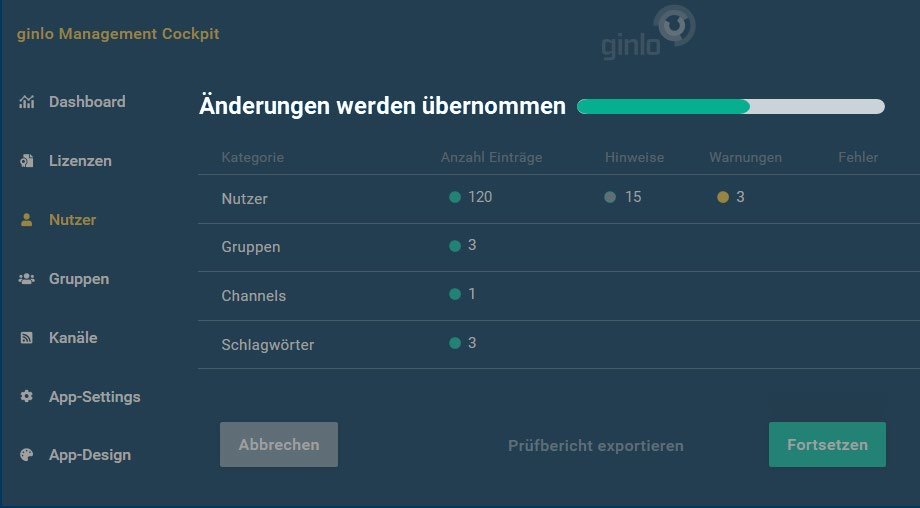
The import process may take a moment depending on the data size. The progress bar also shows the remaining time.
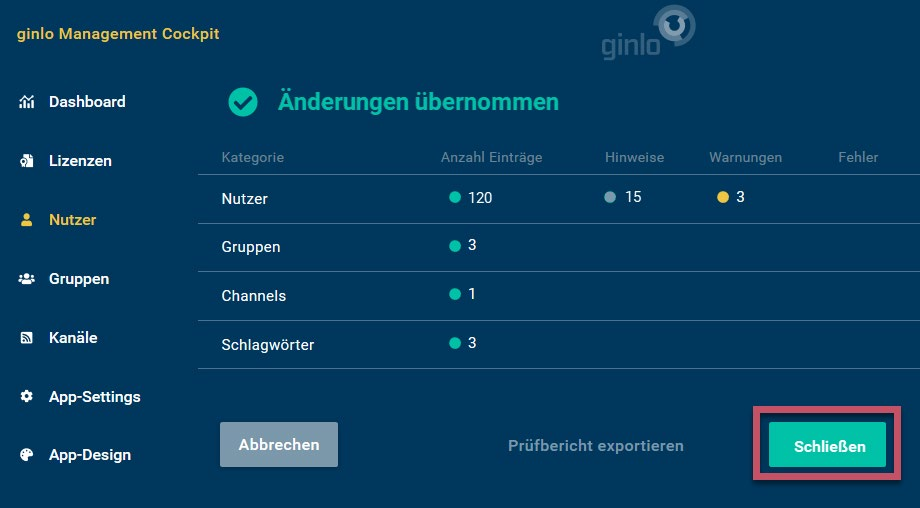
Once all changes are applied, you can also export a detailed import report or close the process.
9.3.1.5.2. LDAP interface description
TABLE OF CONTENTS
1 Field description
2 Error overview
3 CSV examples
1 Overview
2 General conditions
3 Usage
4 Static Structure
4.1 Package structure
4.2 Class structure
5 Dynamic structure
6 Configuration
6.1 Application configuration
6.2 Mapping LDAP attributes
1 Requirements
2 Cockpit REST client - sample implementation
2.1 Dependencies (packages)
2.2 Using a proxy
2.3 Verification of the connection
2.4 Using the client certificate
2.5 Using basic authentication
2.6 Reading an import file
2.7 Example of import execution
2.8 Saving the result log
2.9 Saving the import summary
2.10 Automation possibility of the LDAP importer
I Introduction
This interface description is intended for developers to enable them to provide user data for ginlo Business in an automated way.
petrol:ginlo Business provides a CSV-based interface for importing user data.
The interface allows to create, change and delete users automatically.
Furthermore, users can be assigned to ginlo groups and ginlo channels.
If the respective groups or channels do not yet exist, they will also be created in the course of the import.
This document describes the format of the CSV data structure and the associated constraints. It is the basis for implementing an export adapter of user data.
There is also an example implementation of an LDAP adapter for exporting user data from OpenLDAP or Microsoft AD LDS. The sample implementation can be used as a basis for realizing an LDAP adapter.
Independently of LDAP-based systems, any other system can also be used as a source system if the user data provided corresponds to the CSV data structure defined here.
Additionally, this document covers the description of an automatic LDAP import. Using a REST interface, the LDAP adapter data can be added to the ginlo Management Cockpit.
An explicit description of the interface is realized by means of a so-called swagger file. This description makes it possible to generate a client automatically and to adapt it for its needs.
The following information can also be found:
In Chapter II is the detailed description of the CSV data structure. It is relevant for the development of an export adapter.
In Chapter III.6.1 is described how to configure the LDAP server for the adapter.
Chapter III.6.2 defines the mapping of LDAP fields to the data structure of ginlo users.
Chapter IV describes technically the REST interface for importing LDAP data and shows with an exemplary implementation how to use it.
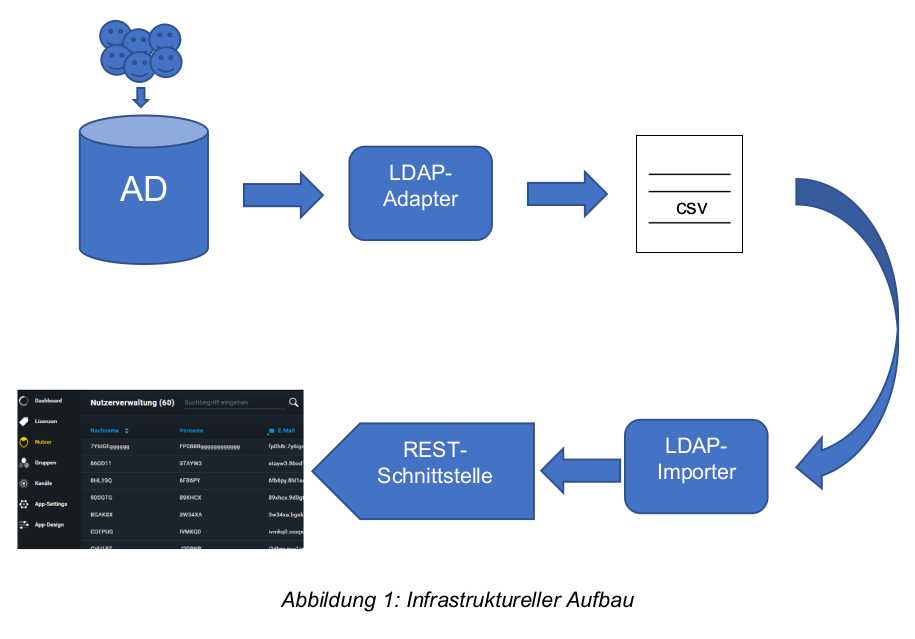
This section shows the overall structure and presents the interaction of the individual components.
The LDAP adapter is designed to read data from a Microsoft Active Directory and provide it in CSV format.
The explicit structure of the format is described in Chapter II.
The file generated by the LDAP adapter provides the basis for the LDAP importer, which can communicate with the ginlo Management Cockpit service via the REST interface provided by ginlo and can create and update users, groups, channels and keywords as well as realize mappings of these to the users.
The result of this interaction is the direct mapping of the content of the Active Directory in the ginlo Management Cockpit. The following illustration shows the process visually.
II CSV data structure
To import users into the ginlo Management Cockpit, a CSV file containing the user information must be created.
For this purpose, the CSV file must be UTF8-encoded and conform to the following format:
"ACTION";"CREATED";"MODIFIED";"USER_ID";"DEPARTMENT";"PHONE";"EMAIL";"LAST_NAME";"FIRST_NAME";"KEYWORDS";"CHANNELS";"GROUPS"
"INSERT";"2018-02-27T03:58:21";"2018-02-27T03:58:21";"BA9170A1341038489BED9BE23C0E11F4";"IT";"+4991634000002";"max.mustermann-002@myldap.localhost";"Max Mustermann-002";"Max";"myldap GmbH,Verwaltung, IT";"myldap company channel, myldap it channel, myldap employee channel";"myldap it group"
In the first line of the CSV file the above field labels must be completely present and separated exclusively with semicolons (without additional whitespaces).
In addition, the field labels must be enclosed in quotation marks.
Each subsequent line must contain the data of a user. The user data must also be enclosed in quotation marks and separated exclusively by semicolons (without additional whitespaces).
A linefeed (n) must be used for the line break.
Note
The following characters must not be used in text fields:
; “ < > { } &
Empty lines will be ignored during import.
The fields used within the CSV data structure are shown in overview in the table below.
The following chapter describes the fields and their constraints in detail.
Attribut |
Description |
|---|---|
ACTION |
Describes whether it is a new creation, modification or deletion Valid values are: INSERT, UPDATE, DELETE |
CREATED |
Date of user creation in LDAP provider Format: <YYYY>-<MM>-<DD>T<HH>:<MM>:<SS> |
MODIFIED |
Date of the last modification of the user in the LDAP provider Format: <YYYY>-<MM>-<DD>T<HH>:<MM>:<SS> |
USER_ID |
ID of the user in the LDAP provider The format is defined by the respective LDAP provider. |
DEPARTMENT |
User’s department |
PHONE |
User’s phone number |
User’s mail address |
|
LAST_NAME |
User’s surname |
FIRST_NAME |
User’s first name |
KEYWORDS |
For the user in the LDAP provider stored ginlo keywords Format: comma separated list |
CHANNELS |
Channels stored for the user in the LDAP provider Format: comma separated list |
GROUPS |
Groups stored for the user in the LDAP provider Format: comma separated list |
Table 1: CSV data structure
1 Field Description.
ACTION
defines whether a user should be created, modified or deleted. Valid values are INSERT, UPDATE and DELETE. In case a user is to be created with the action
INSERT and already exists, the action is interpreted as UPDATE;
UPDATE is to be created and does not yet exist, the action is interpreted as INSERT. If the data to be updated is identical to the entries in the import file, the action is ignored and logged.
DELETE is to be deleted and does not exist, the action is ignored and logged;
An empty value is not allowed. INSERT and UPDATE behave the same in terms of content. Only the message in the generated report differs, depending on whether the data set existed before the import or not.
This behavior can be used to perform a sanity check based on the log file.
CREATED
defines the creation time of the user in the source system. The timestamp must follow the format
<YYYY>-<MM>-<DD>T<HH>-<MM>-<SS>
format.
Currently the field is ignored in the import process. An empty value is allowed.
MODIFIED
defines the modification time of the user in the source system. The timestamp must follow the format
<YYYY>-<MM>-<DD>T<HH>-<MM>-<SS>
Currently the field is ignored in the import process. An empty value is allowed.
USER_ID
is the ID of the user in the source system. The USER_ID is stored as an external ID at the ginlo user.
The content of the field must be unique and not assigned to multiple users. If an ambiguity is identified, the user’s data will not be processed.
The maximum length of the USER_ID is 100 characters. All printable ASCII characters are allowed. Excluded are the characters < and >.
DEPARTMENT
defines the organizational unit to which the user is assigned in the source system. The organizational unit is stored as a department for the ginlo user. An empty value is allowed.
PHONE
defines the mobile phone number of the user. The mobile phone number must correspond to one of the following two formats:
+<country code><national area code><connection identifier>.
<national area code><connection identifier>.
The first one corresponds to the E.164 standard. A valid mobile number must be passed, with a maximum of 15 characters.
The mobile number is stored with the ginlo user. If no country code was given, the area code +49 is assumed. An empty value is allowed.
The content of the non-empty field must be unique and may not be assigned to multiple users. If an ambiguity is identified, the user’s data will not be processed.
EMAIL
must be a valid e-mail address. The email address will be stored with the ginlo user. An empty value is allowed.
The content of the non-empty field must be unique and not assigned to multiple users. If an ambiguity is identified, the user’s data will not be processed.
LAST_NAME
defines the last name of the user and may have a maximum length of 30 characters. The last name will be added to the ginlo user.
All printable ASCII characters are allowed. Excluded are the characters < and > and an empty string.
FIRST_NAME
Defines the first name of the user and may have a maximum length of 30 characters. The first name will be added to the ginlo user.
All printable ASCII characters are allowed. Excluded are the characters < and > and an empty string.
KEYWORDS
The KEYWORDS field is used to store ginlo specific keywords used to organize users in the ginlo Management Cockpit.
The keywords must be present in the field as a comma-separated list.
The field content may have a maximum length of 100 characters. The keywords will be added to the ginlo user.
All printable ASCII characters are allowed. Excluded are the characters < and > and an empty string.
CHANNELS
The CHANNELS field is used to store ginlo specific channels to which the user is automatically assigned during import.
If a channel does not exist at the time of import, the channel will be created automatically.
If a channel assigned to the user is no longer contained in the field, the assignment of the user to the channel will be deleted in the context of the import.
The channels must be present in the field as a comma-separated list.
The field content may have a maximum length of 100 characters. The channels will be added to the ginlo user. An empty value is allowed.
GROUPS
The GROUPS field is used to store ginlo specific groups to which the user will be automatically assigned during import.
If a group does not exist at the time of import, the group will be created automatically.
If a group assigned to the user is no longer contained in the field, the assignment of the user to the group will be deleted in the context of the import.
The groups must be present in the field as a comma-separated list.
The field content may have a maximum length of 100 characters. The groups will be added to the ginlo user. An empty value is allowed.
2 Error overview
A number of different errors can occur during import. Depending on the severity of the error, these are assigned to the error categories INFO, WARNING, ERROR and FATAL_ERROR.
Error category
Description
INFO
No actual error has occurred;
It is only an information for the administrator.
WARNING
An automatically recoverable error has occurred at the record level.
ERROR
A non-automatically recoverable error has occurred.
The record is skipped, the import continues.
FATAL_ERROR
A non-automatically recoverable error has occurred.
The import is aborted.
Table 2: Error categories
The following classification of errors is to be implemented:
ID |
Error |
Category |
Rules for automatic troubleshooting for WARNING |
|---|---|---|---|
IMP-1 |
Import file too large (max. 10 MB) |
FATAL_ERROR |
|
IMP-2 |
Empty line |
ERROR |
|
IMP-3 |
Missing mandatory field ACTION |
ERROR |
|
IMP-4 |
Missing mandatory field USER_ID |
ERROR |
|
IMP-5 |
Missing mandatory field LAST_NAME |
ERROR |
|
IMP-6 |
Missing mandatory field FIRST_NAME |
ERROR |
|
IMP-7 |
Duplicate USER_ID in import |
ERROR |
Note: Only the first import counts, each further occurrence would then be an ERROR. |
IMP-8 |
Phone number already used |
INFO |
No special treatment, but existing procedure in case of registration with an already existing tel. no. (Activate channel etc.) |
IMP-9 |
Email address already used |
INFO |
Analogous to IMP-8 - only with mail |
IMP-10 |
Freemailer - email address |
ERROR |
|
IMP-11 |
Length check for LAST_NAME failed |
WARNING |
Cut off to allowed length |
IMP-12 |
Length check for FIRST_NAME failed |
WARNING |
Cut off to allowed length |
IMP-13 |
Length check for USER_ID failed |
ERROR |
|
IMP-14 |
Length check for KEYWORDS failed |
WARNING |
Cut off to allowed length |
IMP-15 |
Length check for GROUPS failed |
WARNING |
Cut off to allowed length |
IMP-16 |
Length check for CHANNELS failed |
WARNING |
Cut off to allowed length |
IMP-17 |
Syntactically invalid e-mail address |
ERROR |
|
IMP-18 |
Syntactic invalid phone number |
ERROR |
|
IMP-19 |
Missing email address + phone number (neither of the two values is set) |
ERROR |
|
IMP-20 |
Incorrect date format CREATED |
WARNING |
Field will be ignored |
IMP-21 |
Incorrect date format MODIFIED |
WARNING |
Field will be ignored |
IMP-22 |
No license available to assign |
WARNING |
No license is assigned to the user |
IMP-23 |
Communication with ginlo failed |
FATAL_ERROR |
|
IMP-24 |
Incorrect ACTION insert |
WARNING |
Insert is changed to Update |
IMP-25 |
Incorrect ACTION Update |
WARNING |
Update is changed to Insert |
IMP-26 |
Incorrect ACTION Delete |
ERROR |
|
IMP-27 |
Invalid characters in LAST_NAME, FIRST_NAME, USER_ID |
ERROR |
|
IMP-28 |
Invalid characters in FIRST_NAME |
ERROR |
|
IMP-29 |
Invalid characters in USERID |
ERROR |
|
IMP-30 |
Wrong format of import file (e.g. wrong number of columns) |
FATAL_ERROR |
|
IMP-31 |
Duplicate phone number in import file |
ERROR |
|
IMP-32 |
Duplicate email adress in import file |
ERROR |
|
IMP-33 |
Unknown ACTION |
ERROR |
Line will not be imported |
IMP-34 |
Data set not accepted or an unexpected error has occurred |
FATAL_ERROR |
|
IMP-35 |
Assigned group name is assigned multiple times |
FATAL_ERROR |
|
IMP-36 |
Assigned channel name is assigned multiple times |
FATAL_ERROR |
Table 3: Error overview
3 CSV examples
Export example for user creation
In the example below, the CSV export file represents the creation of three new users to be created in ginlo.
"ACTION";"CREATED";"MODIFIED";"USER_ID";"DEPARTMENT";"PHONE";"EMAIL";"LAST_NAME";"FIRST_NAME";"KEYWORDS";"CHANNELS";"GROUPS""INSERT";"2020-01-27T03:58:21";"2020-02-12T03:58:21";"EF3451234";"IT";"+491627563452";"tina.schuber@mail.de";"Schuber";"Tina";"";"Sport, Vacation";"DevOps""INSERT";"2020-02-27T03:58:21";"2020-02-27T03:58:21";"AFG236464";"IT";"+491717826732";"teresa.lamau@mail.de";"Lamau";"Teresa";"Team-Lead";"Team-Leads";"News""INSERT";"2020-02-27T03:58:21";"2020-02-27T03:58:21";"672777777";"IT";"+491516173647";"simon.terfon@mail.de";"Terfon";"Simon";"";"Sport";"News"Export example for user change
In the following example, two of the previously created users are changed (user Lamau changes to group Telco, user Simon changes phone number) and another user is added.
"ACTION";"CREATED";"MODIFIED";"USER_ID";"DEPARTMENT";"PHONE";"EMAIL";"LAST_NAME";"FIRST_NAME";"KEYWORDS";"CHANNELS";"GROUPS""UPDATE";"2020-02-27T03:58:21";"2020-02-27T03:58:21";"AFG236464";"IT";"+491717826732";"teresa.lamau@mail.de";"Lamau";"Teresa";"Team-Lead";"Team-Leads";"Telco""UPDATE";"2020-02-27T03:58:21";"2020-02-27T03:58:21";"672777777";"IT";"+491832457261";"simon.terfon@mail.de";"Terfon";"Simon";"";"Sport";"News""INSERT";"2020-02-27T03:58:21";"2020-02-27T03:58:21";"648728384";"Business";"+491613458725";"norbert.meier@mail.de";"Meier";"Norbert";"";"Corporate News, Sales";"Telco, News"Export example for user deletion
In the following example, two of the previously created users are deleted again (user Lamau, user Terfon).
ACTION";"CREATED";"MODIFIED";"USER_ID";"DEPARTMENT";"PHONE";"EMAIL";"LAST_NAME";"FIRST_NAME";"KEYWORDS";"CHANNELS";"GROUPS"
"DELETE";"2020-02-27T03:58:21";"2020-02-27T03:58:21";"AFG236464";"IT";"+491717826732";"teresa.lamau@mail.de";"Lamau";"Teresa";"";"";""
"DELETE";"2020-02-27T03:58:21";"2020-02-27T03:58:21";"672777777";"IT";"+491832457261";"simon.terfon@mail.de";"Terfon";"Simon";"";"";""
Export example for incorrect user definition
In the following example, a user was exported that has the same mobile phone number as the previously exported user Norbert Meier.
As described in Chapter II.1, an ambiguous mapping is not allowed and the subsequent import would identify the entry as incorrect and not import it.
ACTION";"CREATED";"MODIFIED";"USER_ID";"DEPARTMENT";"PHONE";"EMAIL";"LAST_NAME";"FIRST_NAME";"KEYWORDS";"CHANNELS";"GROUPS"
"INSERT";"2020-02-27T03:58:21";"2020-02-27T03:58:21";"1237635";"Business";"+491613458725";"sina.kundig@mail.de";"Kundig";"Sina";"";"IT News";"Logistik"
III LDAP adapter
The so-called LDAP adapter is an exemplary implementation of an adapter between an LDAP server and the described CSV structure.
The LDAP adapter is provided by ginlo as a template, but does not receive support from ginlo.
The source code may be used in the context of a connection to ginlo and may be integrated and distributed in your software components (“open source”).
The canonical interfaces are the CSV import via the ginlo Management Cockpit and via the REST interface.
1 Overview
This chapter describes for the target group developers the provided implementation of an LDAP adapter.
The implementation is intended for connecting the LDAP providers Microsoft AD LDS and OpenLDAP. LDAP providers differing from this can also be connected. Additional implementation adaptations and possibly additional configuration elements may be necessary.
The task of the LDAP adapter is to identify the user data within the LDAP provider and to transfer it into the defined CSV structure.
Part of the identification of user data is to determine which users are to be added, which are to be changed and which are to be deleted.
The LDAP adapter is composed of the following subcomponents:
H2 database for persisting the exported data.
HTTP server for providing the services
Service implementation
The LDAP adapter is implemented in Java. The adapter is a self-contained Spring boot application and as such contains the subcomponents listed above.
The classes are implemented as Spring Beans and are configured accordingly.
2 General conditions.
To use the LDAP prototype, the following requirements must be met:
Java runtime environment version 8.
LDAP provider Microsoft AD LDS or OpenLDA
Additional features for the assignment of groups, channels and keywords must be configurable in the LDAP provider.
User data must meet the requirements of the ginlo data model for user data.
3 Usage
The export of user data is started by the following call:
<http-server>/secmes-ldap-simsme-exp/commands/exportLdapSimsMeUser
By specifying the HTTP parameter exportType=ALL all user data of the LDAP instance will be exported. The delta to the previous export is created by specifying the exportType=DIFF parameter.
The data exported from the LDAP instance is persisted in the H2 database. The HTTP response of the service is a JSON structure that identifies the concrete export.
{"exportInfo":{"id":"161BDDCE52527da12d710334469bd2e4fdc17c41dee00","ldapUrl":"ldap://secmes-
ldap:389","ldapBase":"dc=simsme,dc=dpag,dc=de","ldapUserRecordCount":11,"exportFile":"simsmeLdapUserExp
ort-20180222-141345-894---161BDDCE52527da12d710334469bd2e4fdc17c41dee00---
all.csv","exportInfoFile":"simsmeLdapUserExport-20180222-141345-894---
161BDDCE52527da12d710334469bd2e4fdc17c41dee00---all.json","exportLogFile":"simsmeLdapUserExport-
20180222-141345-894---161BDDCE52527da12d710334469bd2e4fdc17c41dee00---
all.log","exportType":"ALL","exportFileLength":2926,"startTimestamp":"2018-02-
22T14:13:45.893+00:00","endTimestamp":"2018-02-
22T14:13:45.919+00:00","error":false,"errorStacktrace":null,"message":"OK","exportRecordCount":11,
"deleteRecordCount":0,"upsertRecordCount":11}}
Exported user data is stored as a snapshot in an H2 database. When re-exporting, the delta comparison is performed via this database. This results in the action commands “INSERT”, “UPDATE” and “DELETE” for the CSV data structure.
The contained ID can be used in the following to provide the exported user data as CSV file. To do this, call the following service by specifying one of the exportIDs:
<http-server>/secmes-ldap-simsme-exp/commands/exportInfo/{exportId}/download
In this way, all exports performed so far can be provided as a CSV file.
In addition to the direct use of the service methods, the Swagger UI is also available, via which the parameterization of the calls can be made via UI.
All services offered by the LDAP adapter are available via the Swagger UI. The Swagger UI can be accessed via the following URL:
<http-server>/secmes-ldap-simsme-exp/swagger-ui.html
The access to the LDAP instance as well as the mapping of the LDAP attributes to the CSV data structure is configuratively stored in the adapter. Further information on this can be found in Chapter III.6.2.
4 Static structure
4.1 Package structure
The LDAP adapter is structured into several packages (Java Packages). The packages can be found as subpackages in the path de.dpag.simsme.ldapexport.
The following central subpackages realize the functionality of the LDAP adapter:
Adapter
implements the access to the LDAP provider and defines the mapping of the attributes.
Configuration
implements the reading of the component and LDAP provider attributes from the application’s configuration file.
Controller
provides the service interface of the component.
Domain
defines the entities of the LDAP adapter.
Processor
implements the individual commands that are triggered when the service methods are called.
Service
implements the generation of the exported data as a CSV file.
4.2 Class structure
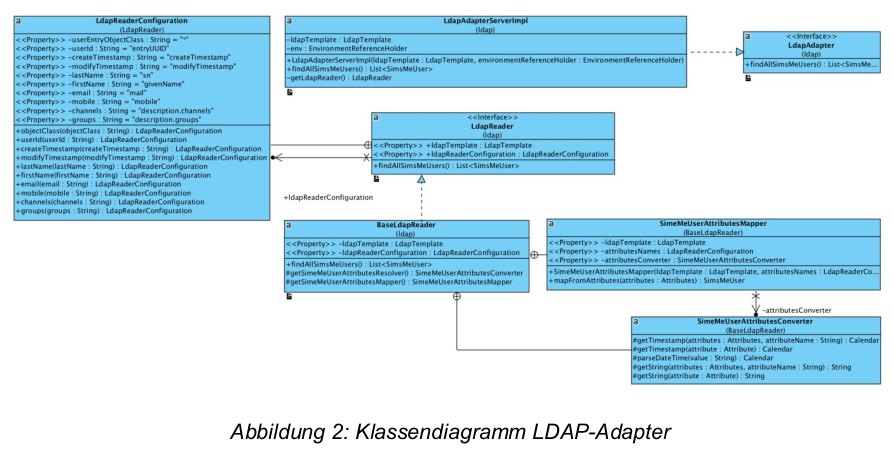
Adapter
In the package de.dpag.simsme.ldapexport.adapter.ldap the classes for the connection to the LDAP provider are realized.
The starting point is the class LdapAdapterServerImpl, which provides the method for reading the user data.
The reading of the user data takes place over the class BaseLdapReader, which implements the interface LdapReader.
Based on the configuration data to the LDAP Provider (see Kapitel III.6.1) an instance of the LdapReader in the class LdapAdapterServerImpl is created. The reading of the data is then delegated to this.
The concrete access to an LDAP provider is realized using Spring. The classes LdapTemplate, LdapQueryBuilder and SearchScope are used for this purpose.
The implementation of the LDAP adapter is independent of the LDAP provider and is bound to a concrete provider exclusively by configuration.
In this way LDAP products of different manufacturers (e.g. OpenLDAP) can be addressed.
The associated configuration information is described in Chapter III.6.1. The interrelationships of the classes can be found in the following figure.
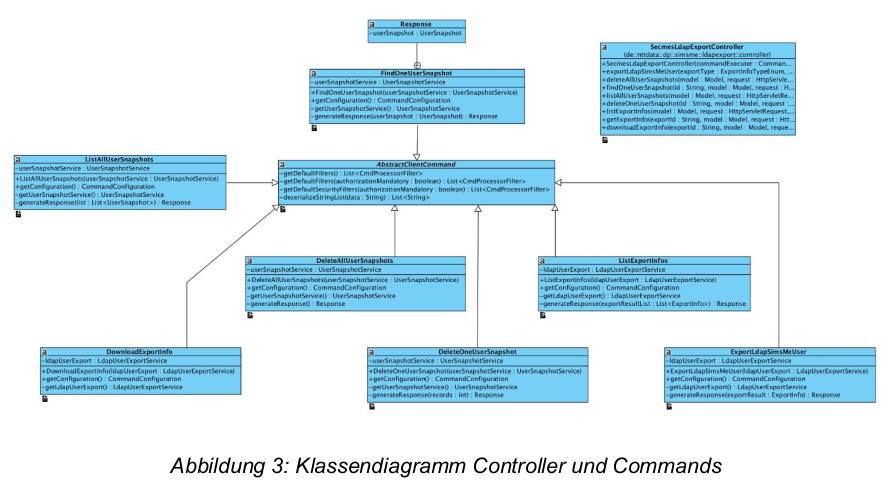
Controller and Commands
The externally available interface of the LDAP adapter is realized by classes in the package de.dpag.simsme.ldapexport.controller.
The SecmesLdapExportController class implements the externally available services based on the Command pattern. Each service corresponds to a command.
For each externally available service, there is a Command implementation that realizes the associated functionality. Each Command class (e.g. ExportLdapSimsMeUser) is derived from the AbstractClientCommand superclass.
The protocol-related handling of HTTP-based calls is abstracted in the AbstractCommandController and AbstractApplicationController superclasses. Again, the Spring framework is used for technical handling.
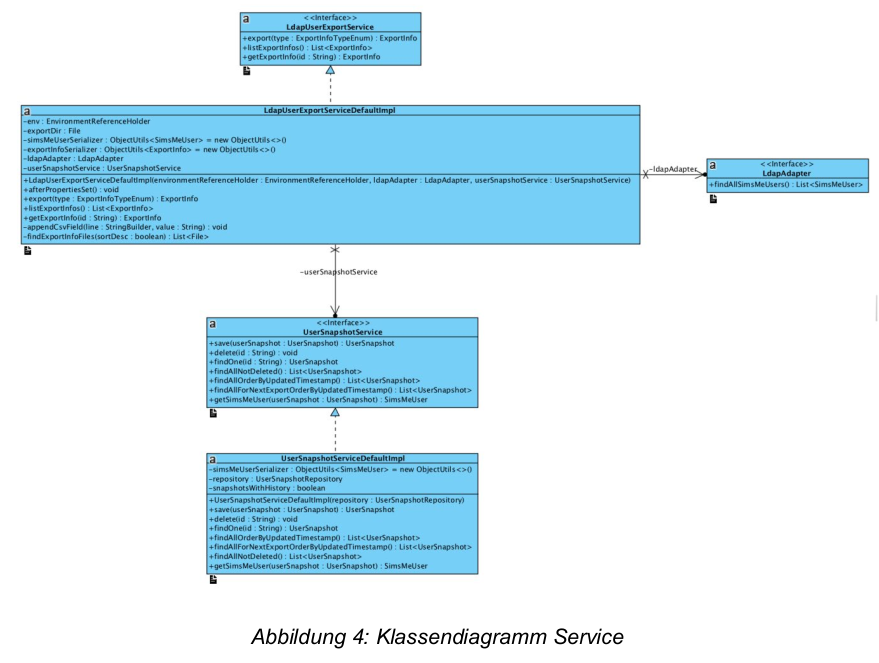
Service
The classes in the package de.dpag.simsme.ldapexport.service realize the generation of export information and files as well as the persistence of exported data into a database (in this case H2) and the access to it.
In the UserSnapshotServiceDefaultImpl class all database related persistence methods are realized. This includes storing user data from an LDAP provider as well as reading them out.
The class LdapUserExportServiceDefaultImpl uses these methods to read and generate export information (ExportInfo). However, the main task of the class is to generate a representation of user data as a CSV file.
Both implementations use the Spring mechanisms for configuration.
5 Dynamic structure
The following flow shows the call chain when exporting user data:
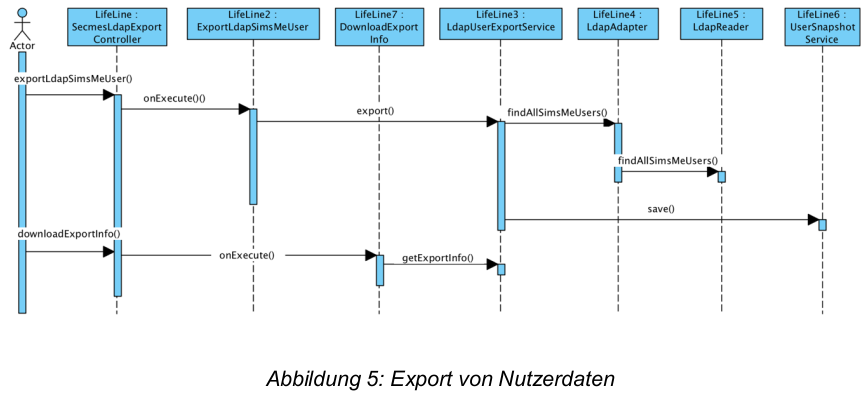
The following table explains the steps documented above in short form:
Step |
Methode |
Description |
|---|---|---|
1 |
exportLdapSimsMeUser |
Receiving the HTTP request |
2 |
onExecute |
Start of export |
3 |
export Start |
LDAP request and result file generation |
4 |
findAllSimsMeUsers |
Preparation of LDAP request |
5 |
findAllSimsMeUsers |
Reading user data from the LDAP provider |
6 |
save |
Storage of data in H2 database |
7 |
downloadExportInfo |
Receiving the HTTP request |
8 |
onExecute |
Download start |
9 |
getExportInfo |
Identification and download of the CSV file |
Table 4: Steps for exporting user data
6 Konfiguration
The LDAP prototype is adapted to the specific deployment via several configuration files.
6.1 Application Configuration.
The configuration of the Spring Beans is done in the application.yml file (YAML file).
For other environments (e.g. local development) configuration files can be created to suit the environment. The naming is done via a postfix (e.g. application-local.yml).
In the configuration file, among other things, the port of the application, logging behavior and the database are configured. Furthermore, the access information of the LDAP provider is also stored here.
An example configuration is shown below.
ldap:
url: ${LDAP_URL:ldap//secmes-ldap:389}
base: ${LDAP_BASE:dc=simsme}
user: ${LDAP_USER:cn=admin,dc=simsme}
password: ${LDAP_PASSWORD:password}
readerImplementationClass: ${LDAP_READER_IMPLEMENTATION_CLASS:}
readerConfigFile: ${LDAP_READER_CONFIG_FILE:}
exportDir: ${LDAP_EXPORT_DIR:${INSTANCE_HOME:${user.dir}}/export}
The readerConfigFile configuration element defines the configuration file in which the LDAP attribute mapping is stored.
The exportDir configuration element defines the directory where the adapter caches exported CSV files to make them available on demand.
6.2 Mapping of LDAP attributes
The mapping of the LDAP attributes to the ginlo user data is defined configuratively. The configuration is done in JSON format and is described in the LdapReaderConfiguration.json file.
In addition to the ginlo attributes, it is also defined here where the user data can be found in the data structure of the LDAP provider.
In the following an exemplary configuration is shown. By means of the features cd, dn and userEntryObjectClass it is defined which object is to be mapped to the user data:

IV LDAP Importer
Hint
This section is under revision; outdated links no longer work.
For specific questions, please email b2b-support@ginlo.net .
The LDAP Importer processes the data from the LDAP adapter and integrates it automatically into the ginlo Management Cockpit. The process can work autonomously and without additional administrator interaction.
Particularly in large companies, manual processes should be avoided in order to minimize the effort required to manage the company’s own employees.
To realize this, LDAP import files can be uploaded via the REST interface, their status can be queried and the result log can be determined.
1 Prerequisites
Authentication is required for general use of the REST interface.
On the one hand, a special user is required, which logs in against the system using basic authentication, and on the other hand, a client certificate.
The creation of such a user is done via the ginlo Management Cockpit by the administrator. For this purpose, the button Activate LDAP API can be found under the settings.
Detailed instructions on how to create an API user can be found in the ginlo Management Cockpit documentation.
Internally, a new deputy of type “apiuser” is created by the administrator. A password is created for this user and a client certificate is generated. The public client certificate is distributed on the servers in the same way as a proxy.
If an API user has been created, then the administrator can use the Show credentials function to display the credentials (username + password) and download the public client certificate to check that it is correct.
The private part of the certificate is sent to the registered administrator’s e-mail address.
With this access data, the client can address the Cockpit API. Authentication takes place via two components: The user name and password are passed as basic auth, and the client certificate serves as the second factor.
If these credentials are compromised, the administrator can generate a new password via the Cockpit interface and, if necessary, also generate a new client certificate. The existing access data thus loses its validity.
2 Cockpit REST Client - Sample Implementation
The exact specification of the REST interface provided by ginlo is recorded in a Swagger file. This can be downloaded here.
For simplified integration into the company’s own structures, automatic generation of a client using this file is possible via Swagger UI.
The following points describe a detailed usage of the client on some examples and include useful hints for customizing the generated client.
2.1 Dependencies (Packages)
In order for the Swagger generated client to be executable, some dependencies are necessary and should be added to the project. These include:
gson-2.8.1.jar
gson-fire-1.8.0.jar
logging-interceptor-2.7.5.jar
okhttp-2.7.5.jar
okio-1.6.0.jar
swagger-annotations-1.5.15.jar
threetenbp-1.3.5.jar
2.2 Use of a proxy.
Some companies provide for the use of a proxy server for inter-company communication. The generated Swagger client does not natively support the use of a proxy.
The following code shows an example of integrating your own proxy:
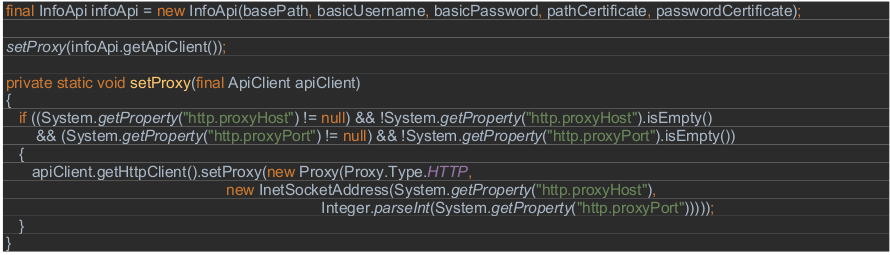
In particular, this can be solved by using runtime properties. These can then be read out as shown in the code example above.
A final call of the import client can then look like this: java -Dhttp.proxyHost=proxy.de -Dhttp.proxyPort=5555
2.3 Verification of the connection
In the Swagger file, a function called checkConnection is defined, which allows to check the connectivity to the REST interface. The main focus is to identify the reachability of the interface.
Once a connection is established using a certificate and Basic authentication, the groundwork is laid for using the other functions that require authentication.
The following sample code shows the call of the function:

2.4 Use of the client certificate.
Client certificate support is not automatically generated by Swagger UI and must be maintained.
The following code snippet shows an example of how a supplied certificate can be passed to the HTTP client with the appropriate certificate password:
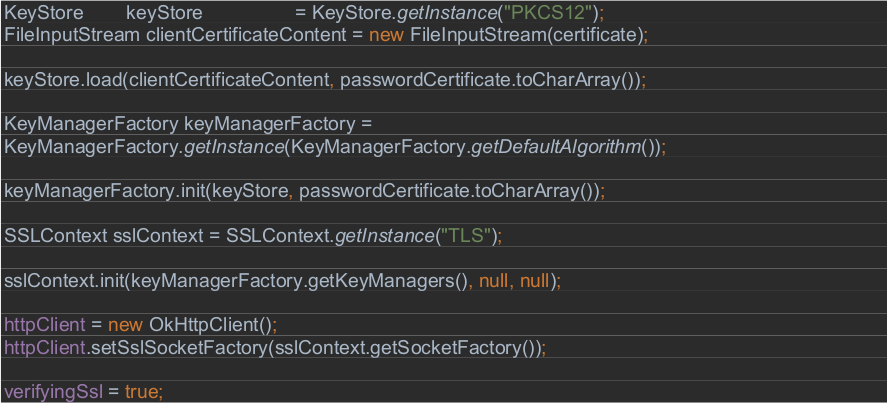
This can be realized for example in the constructor of the API client.
Since this is a PKCS12 certificate, a keystore instance is first created that loads the client certificate passed.
A KeyManagerFactory is then used to decrypt the certificate and pass it to the HTTP client.
2.5 Using Basic Authentication.
The second authentication channel is implemented using Basic authentication.
The following code snippet shows how this can be integrated into the project. Again, it is possible to include those in the constructor of the API client.
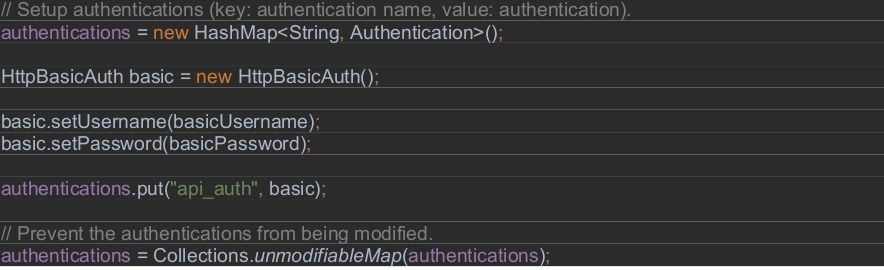
It is still important that this authentication is set as a header parameter to the corresponding request within the UserApi or InfoApi (see next excerpt).

2.6 Reading an import file
The data to be imported, coming from the LDAP adapter, can be stored at a specific location in the system. The path to the import file can also be passed as a parameter to the Swagger client and the contents of the file can be read out in the following form.

2.7 Example execution of an import.
After the data has been successfully passed to the Swagger client, the import can be started via the REST interface.
The following code example shows how to create an instance of the UserApi with the appropriate credentials, register a proxy, and start the import:

The result is represented by a CsvImportResult as described in the YAML file.

From this result the ImportId can now be extracted, which is realized by the function getImportId. The ImportId is a unique identifier of the import and can only be read by the corresponding company.

The polling of the ImportState allows to recognize the status of the import. Regular polling against the REST interface is used to interpret the completion.
If the status changes to “done”, the import is complete. In addition to the status, the ImportState also provides information about error levels that have occurred in the INFO, WARNING, ERROR, and FATAL_ERROR stages.
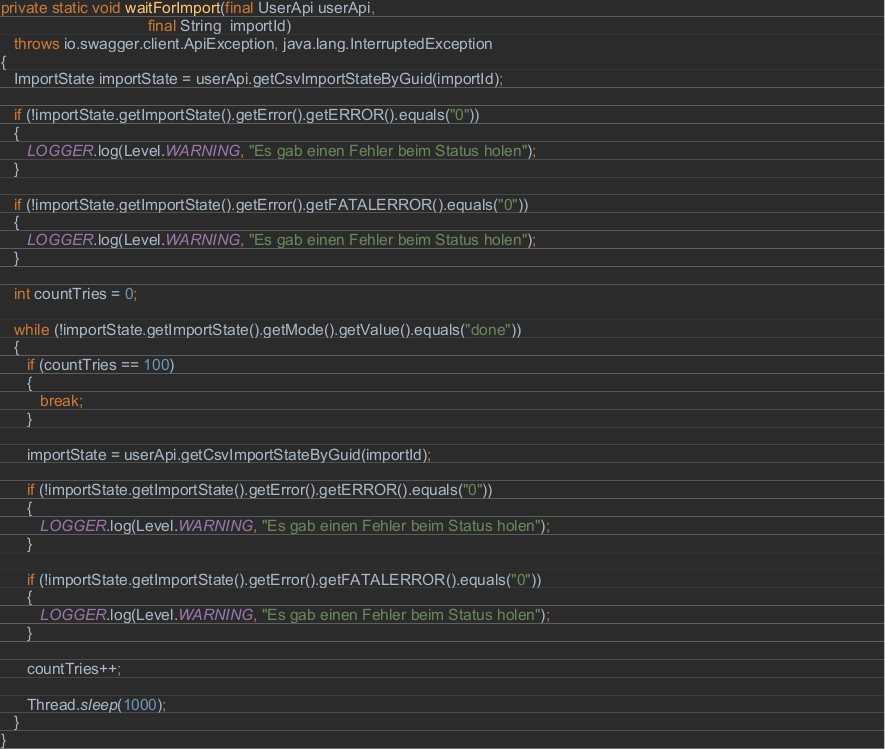
The method “waitForImport” exemplifies the use of querying the ImportState.
2.8 Saving the result log.
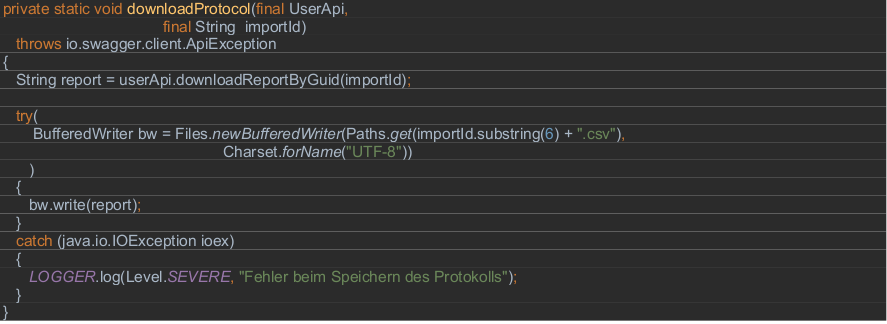
After the import is completed, the complete protocol can be downloaded. During the execution, a test report is delivered. The complete result report will be offered only after the import has assumed the status “done”.
The following code example shows how to save the result in a csv file.
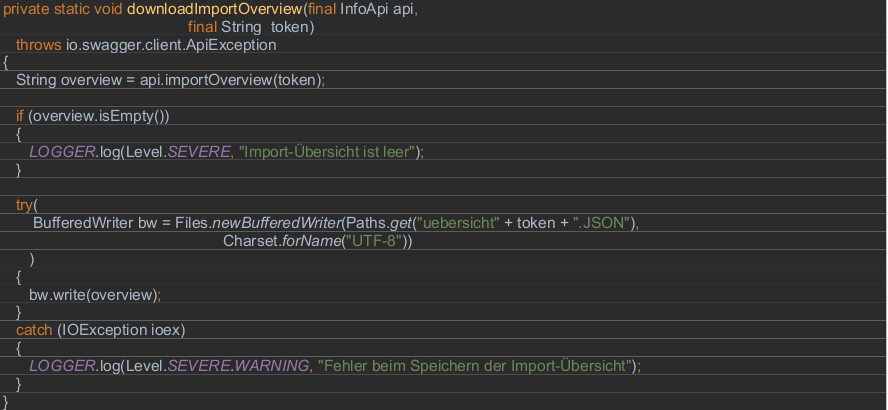
2.9 Saving the import overview
Saving the overview of an import is also possible. The example shows the query of the overview of the import via the REST API and the subsequent persistence.
2.10 Automation possibility of the LDAP importer.
With the help of a batch script the LDAP importer can be called automatically. For example, the content of the script can look like this:
SET PATH=C:\Program Files\Java\jre1.8.0_191\bin\;%PATH%;
java -Dhttp.proxyHost=unknown.proxy.com -Dhttp.proxyPort=1234 -jar
CockpitClient.jar [Basic Url Management Cockpit Api] [apiUserName]
[apiUserPasswort] [Certificate] [Certificate password] [Import file] [Authentication token]
At least Java 8 is required for the full functionality of the Swagger client.
— END of LDAP description —
Important
ATTENTION: Site under construction!
This section is under revision!
If you have any questions, please contact our support department via email.
We ask for your understanding.
9.3.1.6. EMM rollout
In addition to rolling out the app via the ginlo Management Cockpit, the application can also be distributed and registered on users’ devices via existing enterprise mobility management (EMM) solutions. Compatible EMM solutions must support the AppConfig standard and thus also Android for Work (from Android 5.0) or Managed App Configuration (from iOS 8.0).
Warning
Before the rollout, make sure that the email addresses of the users used are not already linked to a ginlo Business account elsewhere (for example, because of previous tests). This can lead to problems during the rollout!
In this case, before you start the rollout via EMM, contact ginlo Support; the best way to do this is to use your welcome email and ask for local deletion of these old accounts.
The assignment of licenses and the control of the design, groups and channels are done via the ginlo Management Cockpit. Configuration of app settings (password policy etc.) can be done either via the ginlo Management Cockpit or directly from the EMM. In doing so, app configurations made in the EMM may override the rules from the ginlo Management Cockpit if necessary.
Note
Please note that these settings should be made either in the ginlo Management Cockpit or in the EMM!
For rollout to a large number of users, automatic EMM registration via the existing EMM solution is recommended. This has the following advantages:
Rollout via the existing EMM solution into the secure EMM container on the device.
Quick registration of users with LDAP data and shortening of process steps
Reduction of error possibilities by users, e.g. rejection of team invitation and thus app management
Automatic allocation of licenses via the backend
Automatic import of user data into the ginlo Management Cockpit.
9.3.1.6.1. Short description for MobileIron
Proceed as follows for the automatic EMM rollout using MobileIron as an example:
In the settings in the ginlo Management Cockpit, activate automatic EMM registration and for a shortened rollout also force fast registration on end device.
Note
If quick registration is enabled, registration is fully automatic without administrator or user having to intervene in the process. However, do not use this feature if ginlo Business is already installed on managed endpoints in your company, otherwise already existing user accounts will be overwritten during rollout.
Furthermore, a prerequisite for the EMM rollout is that the company domain, e.g. @yourcompany.com, in ginlo Management Cockpit matches your registered domain in EMM!
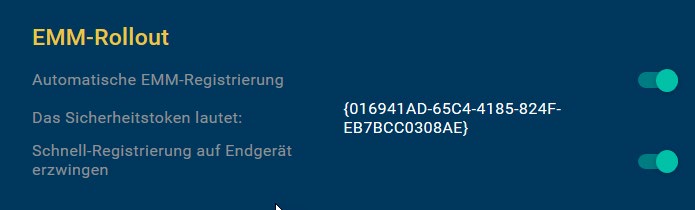
Copy the security token that is now displayed. Add the token to the EMM Rollout Plist, which can be found on our website Support Area under the Helpful Links section. Make sure that the {} brackets are also copied correctly into the string. The plist with tokens is important later and is used to map to the ginlo Management Cockpit.

Optionally, you should customize the app design in the ginlo Management Cockpit before the rollout, so that it takes effect directly from the user registration. If you want to use the default design, you can log out of the ginlo Management Cockpit now - the rollout will be done via the EMM further on.
Open your EMM and, if you have not already done so, create users based on the LDAP data with names, first names and email addresses. This data will later be used for automatic app registration and then no longer needs to be assigned and verified by the respective user.
Assign one or more labels to users so that you can distribute the app to different groups of recipients.
Create a new configuration profile under policies & configs -> configuration. Use Android Enterprise for Android or Managed App Config for iOS. Add the plist previously provided with your ginlo Business security token to the profile. Then assign the configuration profile to the label(s).
Go to apps -> app catalog, click add, and search for the ginlo Business app in Google Play or iTunes. When importing the app, you can also - if desired - define the App Configurations directly in the App Catalog, e.g. password and chat policy.
Distribute the app to the appropriate labels. The app will be rolled out in the EMM container, and users, for their part, just need to start registration by clicking on the App icon and then select Create account.
The automatic app registration accesses the LDAP data (name, first name, email address) and the security token, accepts the management by the ginlo Management Cockpit, loads the company’s email directory and assigns a valid license to the user.
Finally, if the app settings dictate, the user must assign a personal password for the app container. If no password is required, the user can skip this step and start later via the app settings.
The next time the user logs in to ginlo Management Cockpit, (only) the registered users will be automatically imported from the EMM process, and you can start creating groups and channels and assigning users.
9.3.1.6.2. Documentation für MobileIron
TABLE OF CONTENTS
II Adding users and devices in MobileIron
1 Add in browser
2 Add on iOS devices
III Manage apps with MobileIron
1 Add app
2 Add update to an app
1 Create settings
1.1 Configure Plist
1.2 Import settings under MobileIron
2 List of configuration parameters
I Components
The following components are required to use the ginlo Business App with AppConfig via MobileIron’s mobile device management platform:
MobileIron Administration Platform
a server-based console from MobileIron that enables the enterprise to automatically configure AppConfig-supported apps such as ginlo Business, deploy them across the enterprise, create policies for their use, control app functions, and, if necessary, delete the app on specific devices.
AppConfig Community
The AppConfig Community simplifies the deployment and use of enterprise mobile applications under a unified approach. The extensive configuration and security capabilities are based on the Managed App Configuration provided by Apple on iOS 8 and higher.
ginlo Business iOS App
The Business version of ginlo for iOS supports Managed App Configuration, enabling the parameter control described in this document.
The app is available from the iTunes App Store and requires a user license for use, which can be ordered from the ginlo website.
II Add users and devices in MobileIron.
1 Add in browser.
Open the MobileIron console in the browser, and log in.
To create a user, select the Devices & Users tab and click Users.

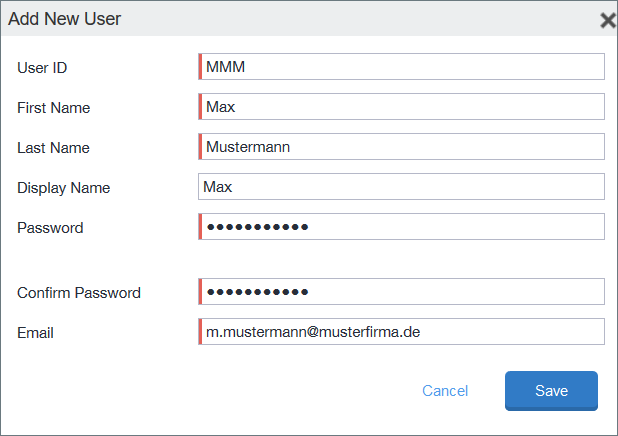
In the Users tab, click Add and Add Local User. Enter the user data and save with Save.

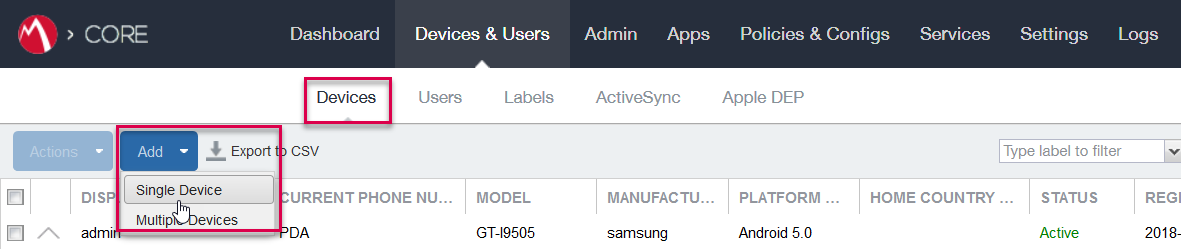
To create a device, go to the Devices tab and open Add and Single Device.
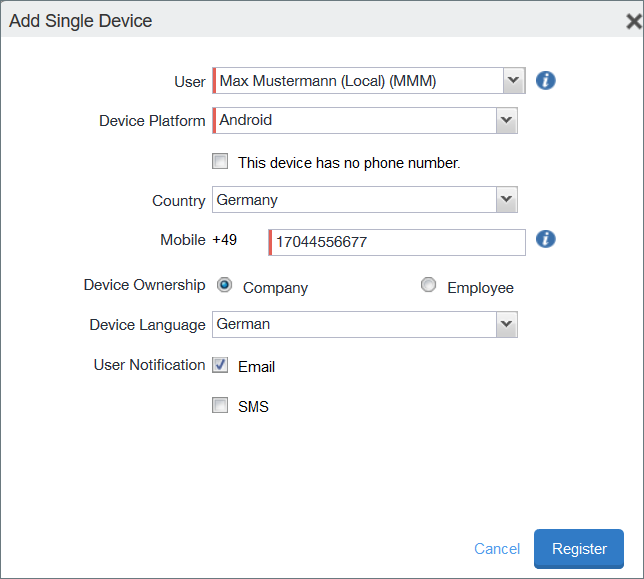
Select the desired user and the device platform in the mask and confirm with Register.
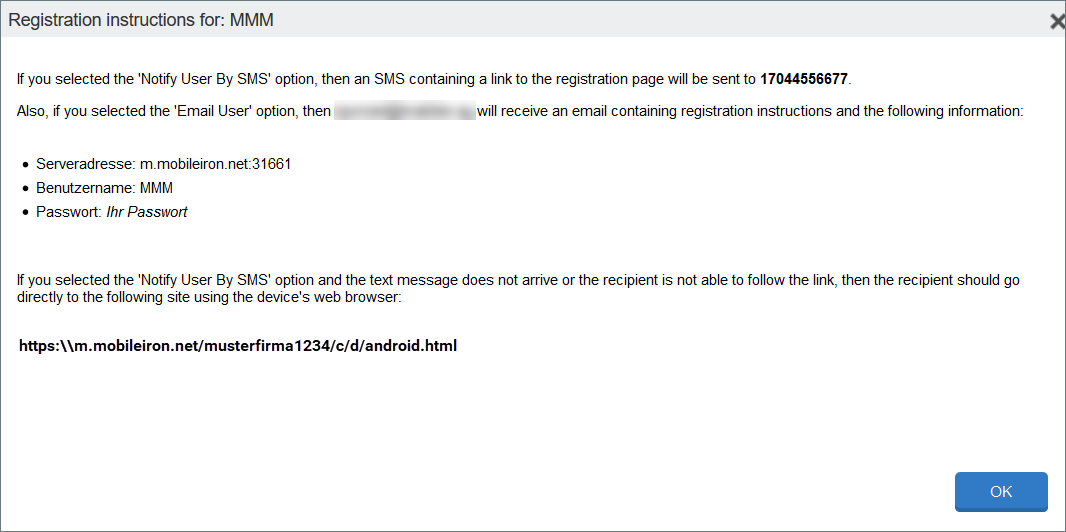
The access data will be displayed and sent to the previously specified e-mail address.
2 Add to iOS device.
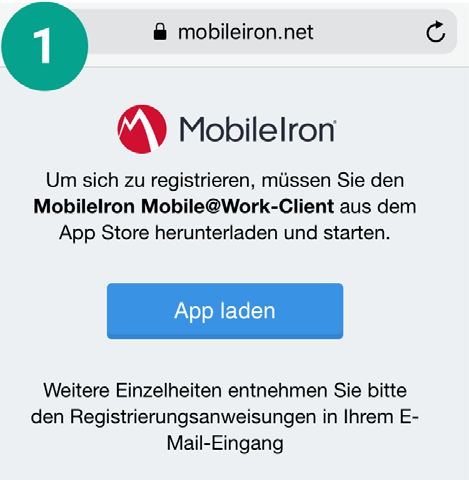
Open browser on iOS device, enter URL from email and confirm with Load app. You can also find the app :ref: here.
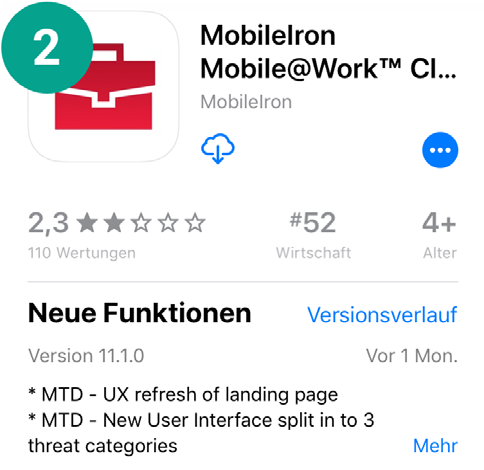
Install Mobile @ Work app from App Store
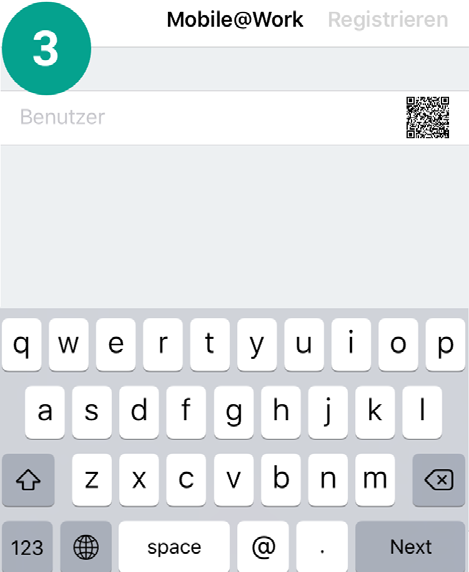
Open Mobile @ Work app and enter user name
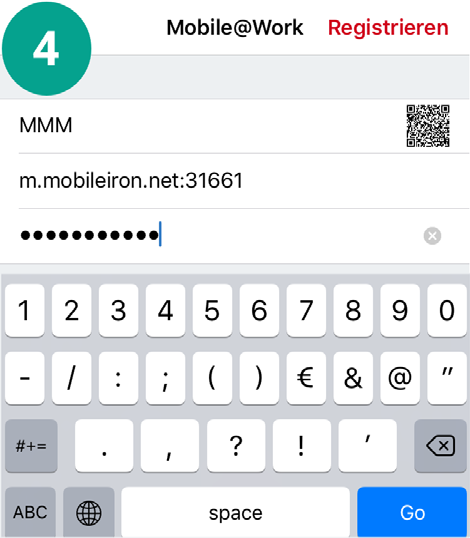
Enter server and password; then confirm with Register.
Accept privacy policy by clicking Next.
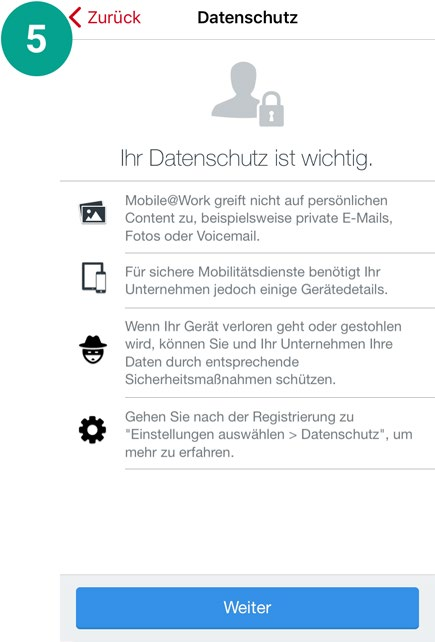
Install profile completely
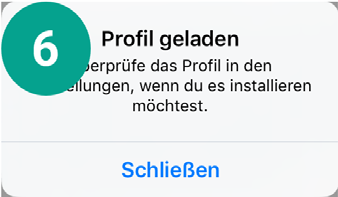
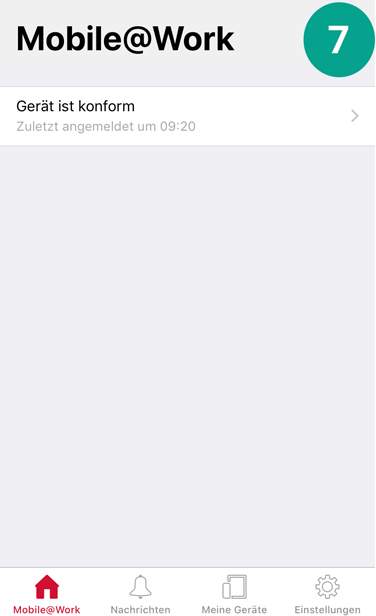
The MobileIron Mobile @ Work app is available after loading the profile on the device.
III Manage Apps with MobileIron
1 Add App.
To add ginlo Business to the MobileIron console and deploy to users’ devices, select the Apps tab in the navigation and click Add in the App Catalog.
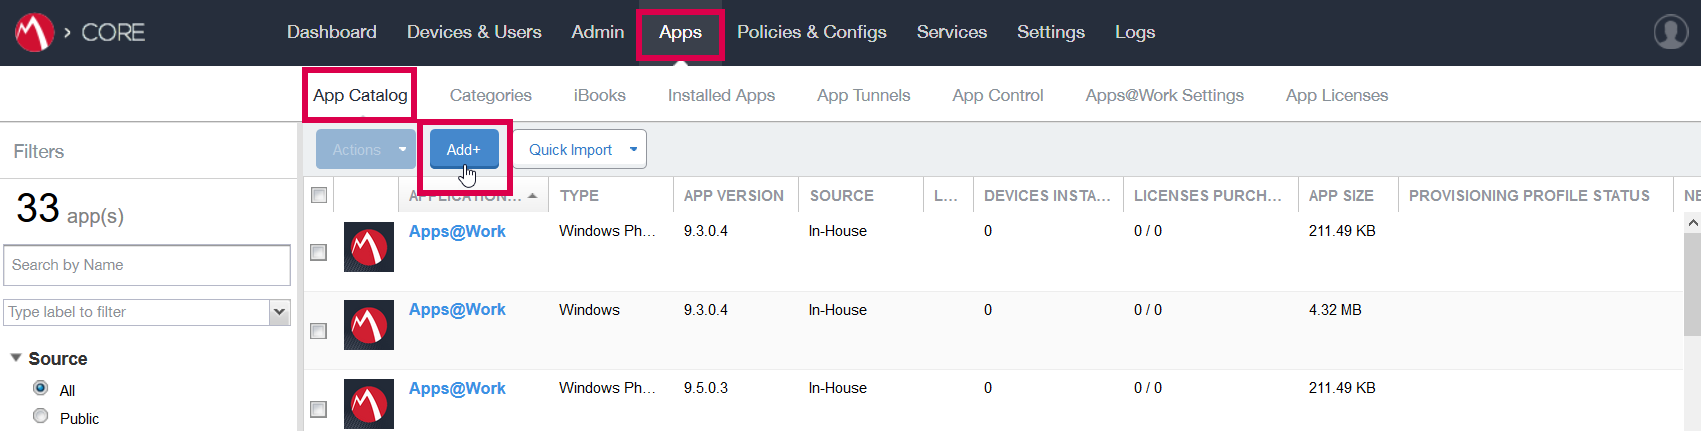
Select Apple iTunes as the source, or In-House for custom apps, if applicable.
Search for ginlo Business in the app directory.
Highlight ginlo Business in the list and then click Next.
In the following masks you can optionally configure the app, e.g. display of the app in the users’ app catalog with a featured banner.
Hint
These configuration steps are not relevant for the rollout and can also be skipped with Skip.
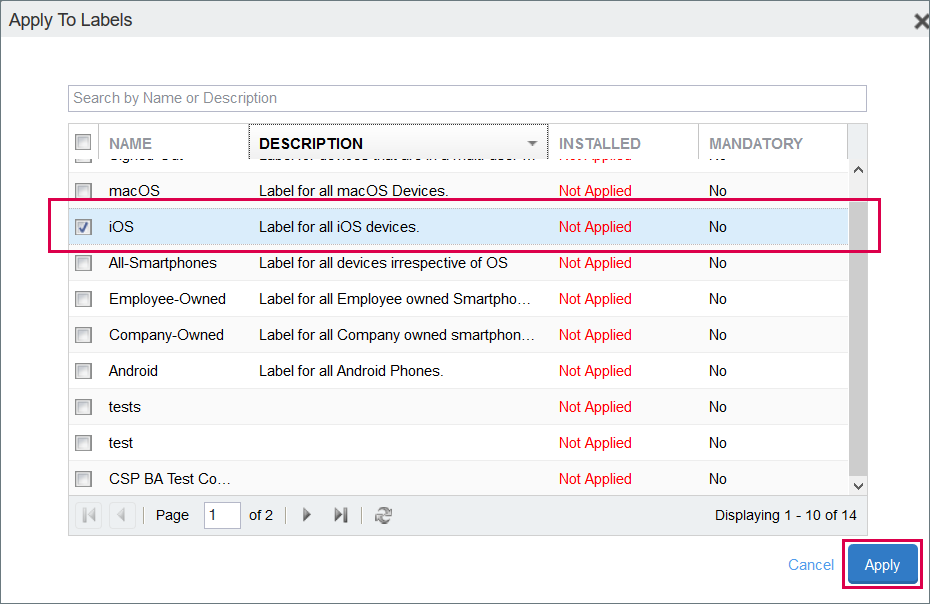
The ginlo Business App will then appear in the App Catalog. Highlight the app and select Actions and Apply To Labels.
To assign the app to a device label, select the iOS label in the list, for example, and confirm with Apply.

To distribute the ginlo Business App to users now, highlight it in the App Catalog and select Actions and Send Installation Request.
Make sure that Send request for both new installations and updates is active and confirm with Apply.
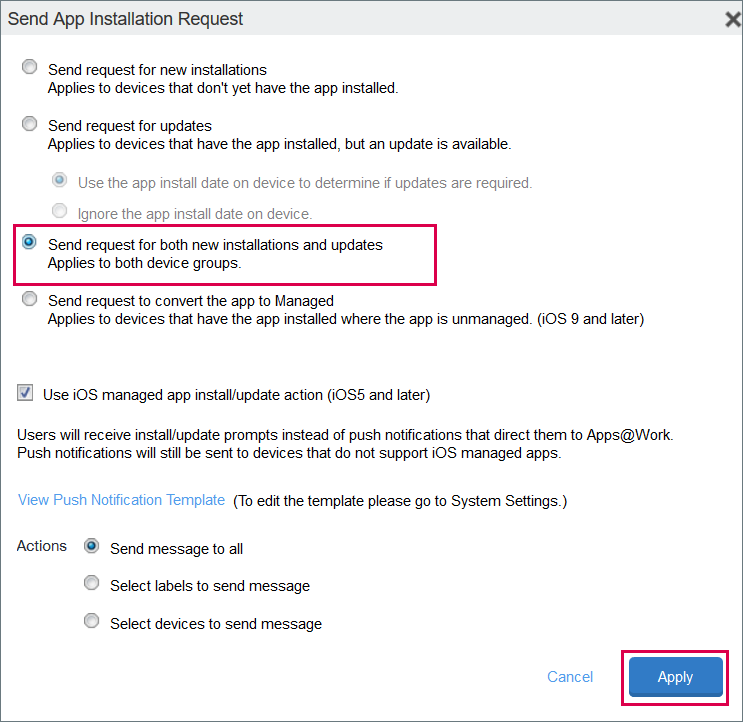
After a short time, a push message will be displayed on the assigned devices prompting to install the app.
2 Add update of an app.
For adding a new version, the process is the same as for adding a new app as described above.
If the app has the same bundle identifier and provisioning profile, sending an update request will distribute it to the devices with the appropriate label.
Uploading a new version is only possible if the version and revision number are higher than those of the existing app.
IV Configure app settings
To configure the settings of the ginlo Business App that are possible using AppConfig, the Plist (Property List) is imported into the MobileIron console.
1 Create Settings
1.1 Configure Plist
Download the template for the plist, which you can find on our website in the Support section under the heading Helpful Links.
Open the plist with a text editor.
You can now add entries to the plist with Key, Type and Value to the list and configure them according to your IT security requirements.

Details about the parameters can be found in Chapter IV.2
1.2 Import settings under MobileIron.
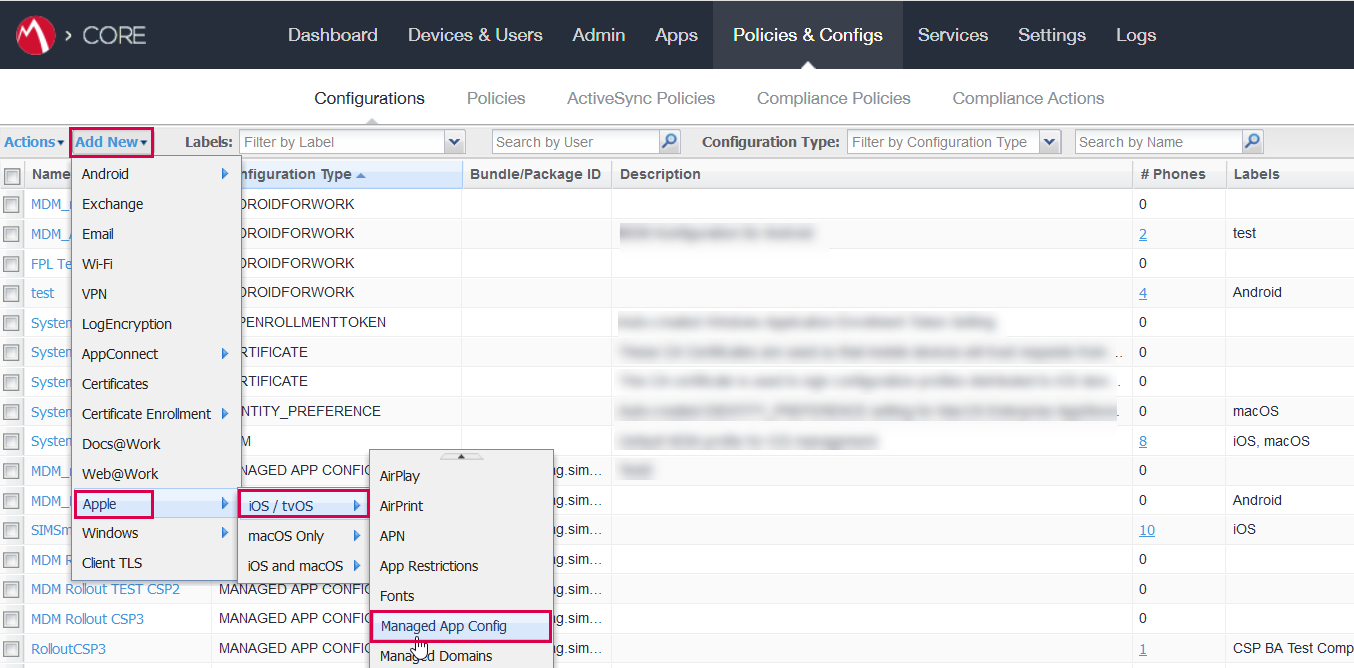
To import the configuration set via the plist into MobileIron and apply it to the app, open the Policies & Configs tab.
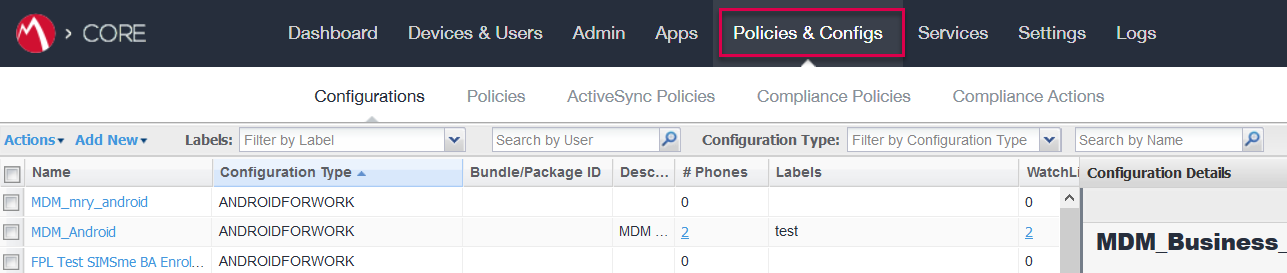
In the Configurations tab, select the Add New button. Then select Apple -> iOS / tvOS -> Managed App Config.
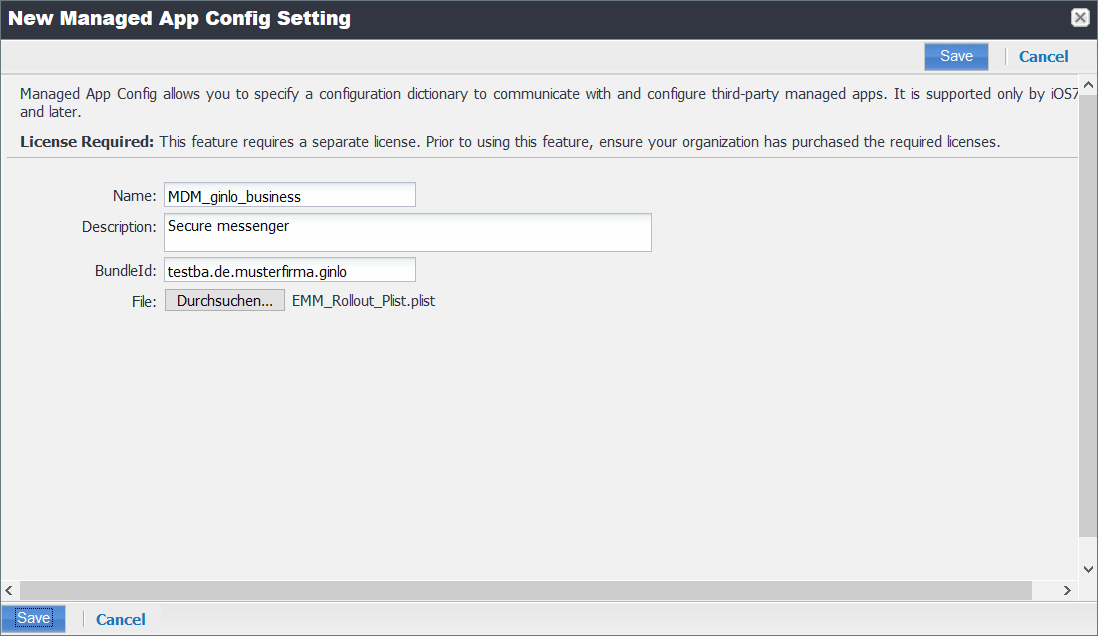
In the New Managed App Config Setting window, enter a name, e.g.MDM_ginlo_business, and the bundle ID and location of the plist.
Confirm with Save.
Select the newly created configuration and then Actions and Apply To Label.
Assign the newly created configuration to a label, e.g. iOS, and confirm with Apply.
The configuration is now effective for the label and the app and is implemented accordingly in the user interface and functions on the app side.
2 List of configuration parameters
Number |
Key |
Typ |
Value range |
Description |
|---|---|---|---|---|
1 |
disableNoPwLogin |
Boolean |
true/false |
Toggle Password prompt at start is omitted and implicitly set to true. Any keychain entries are removed, see Note 1) |
2 |
simsLockApplicationDelay |
Integer |
0-10 |
The setting is transferred 1:1 to the settings. Setting Query password after… omitted |
3 |
forceComplexPin |
Boolean |
true/false |
The toggle Simple password is omitted, see note 2) |
4 |
simsPasswordTries |
Integer |
3,5,1 |
If set, the setting Delete data is omitted |
5 |
disableSaveToCameraRoll |
Boolean |
true/false |
If set, the setting Save media is omitted |
6 |
disableSendMedia |
Boolean |
true/false |
If set, only texts can be written |
7 |
disableOpen |
Boolean |
true/false |
If set, images and videos can can no longer be saved and files can no longer be be displayed anymore |
8 |
passwordMinLength |
Integer |
0-99 |
see note 2) |
9 |
passwordMinSpecialChar |
Integer |
0-99 |
see note 2) |
10 |
passwordMinDigit |
Integer |
0-99 |
see note 2) |
11 |
passwordMinLowercase |
Integer |
0-99 |
see note 2) |
12 |
passwordMinUppercase |
Integer |
0-99 |
see note 2) |
13 |
passwordMinClasses |
Integer |
0-4 |
see note 2) |
14 |
passwordMaxDuration |
Integer |
0-65535 |
see note 3) |
15 |
passwordReuseEntries |
Integer |
0-100 |
see note 4) |
16 |
disableExportChat |
Boolean |
true/false |
If set, chats can no longer be exported to a text file. |
Simple settings are stored in the NSUserDefaults. If the MDM configuration for this changes, then the settings are transferred to the NSUserDefaults.
Note 1)
If TouchId or Start without Passwor is deactivated, then the corresponding keys in the KeyChain are also deleted.
Note 2)
If the password settings have changed, the password is requested first.
This is done regardless of whether the password is always requested at startup.
This is necessary because we store the credentials in encrypted form and do not want to provide any information about the password to an attacker.
If the user’s password no longer complies with the password policy, the user must enter a new password.
Note 3)
When changing the password, the current date and the maximum password duration are used to calculate when the password expires.
For performance reasons, the date of the device is taken first. If the setting changes, the new expiration date is calculated.
Note 4)
To implement this feature, it is necessary to hash the passwords securely on the device. For this, the password is first hashed via Bcrypt with a fixed number of rounds.
The hashed passwords are not stored directly, but encrypted via AES key. The AES key itself is encrypted with the RSA key of the device.
9.3.1.6.3. Documentation for Workspace ONE UEM
TABLE OF CONTENTS
II Add users and devices in Workspace ONE
1 Add in the browser
2 Add the VMware “Intelligent Hub app” on the user’s iOS device.
III Manage apps with Workspace ONE
1 Add an app
2 Add an update to an app
1 Create settings
2 List of configuration parameters
I Components
The following components are required to use the ginlo Business App with AppConfig via Workspace ONE UEM (formerly AirWatch), VMware’s mobile device management platform:
Workspace ONE console
a server-based console from VMware that enables the enterprise to automatically configure AppConfig-supported apps such as ginlo Business,
deploy them across the enterprise, create policies for their use, control app functions and, if necessary, delete the app on specific devices.
AppConfig Community
The AppConfig Community simplifies the deployment and use of enterprise mobile applications under a unified approach.
The extensive configuration and security capabilities are based on the Managed App Configuration provided by Apple on iOS 8 and higher.
ginlo Business iOS App
The Business version of ginlo for iOS supports Managed App Configuration, enabling the parameter control described in this document.
The app is available from the iTunes App Store and requires a user license for use, which can be ordered from the ginlo website.
II Add users and devices in Workspace ONE.
1 Add in browser.
Open the Workspace ONE console in the browser and log in.
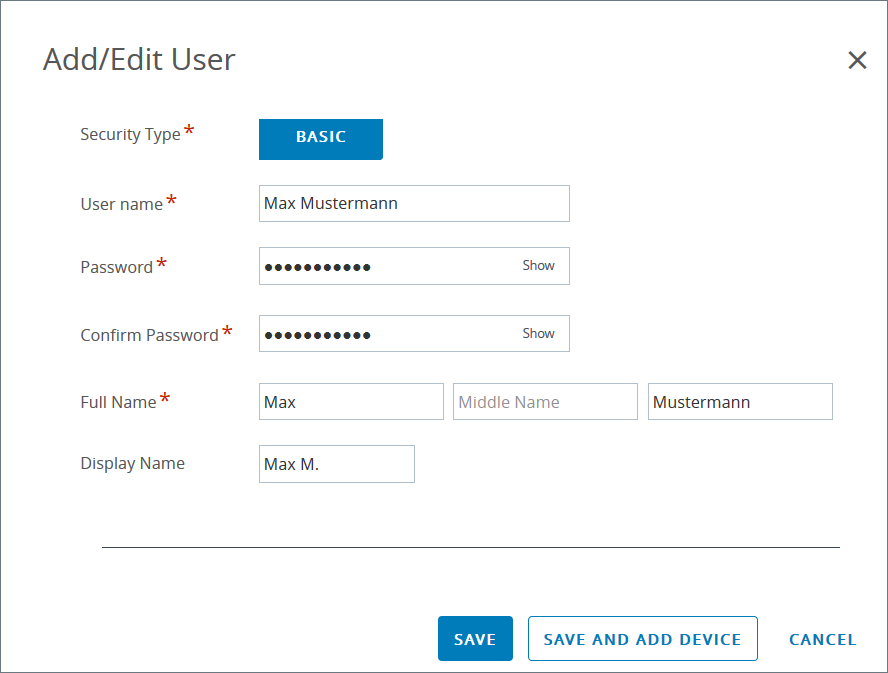
To create a user, select the Add button in the Getting Started section and click User.

In the Add/Edit User window, enter the user data and save it with Save.
To create a device, select Add and Device. In the mask, select the desired user and the device platform and confirm with Save.
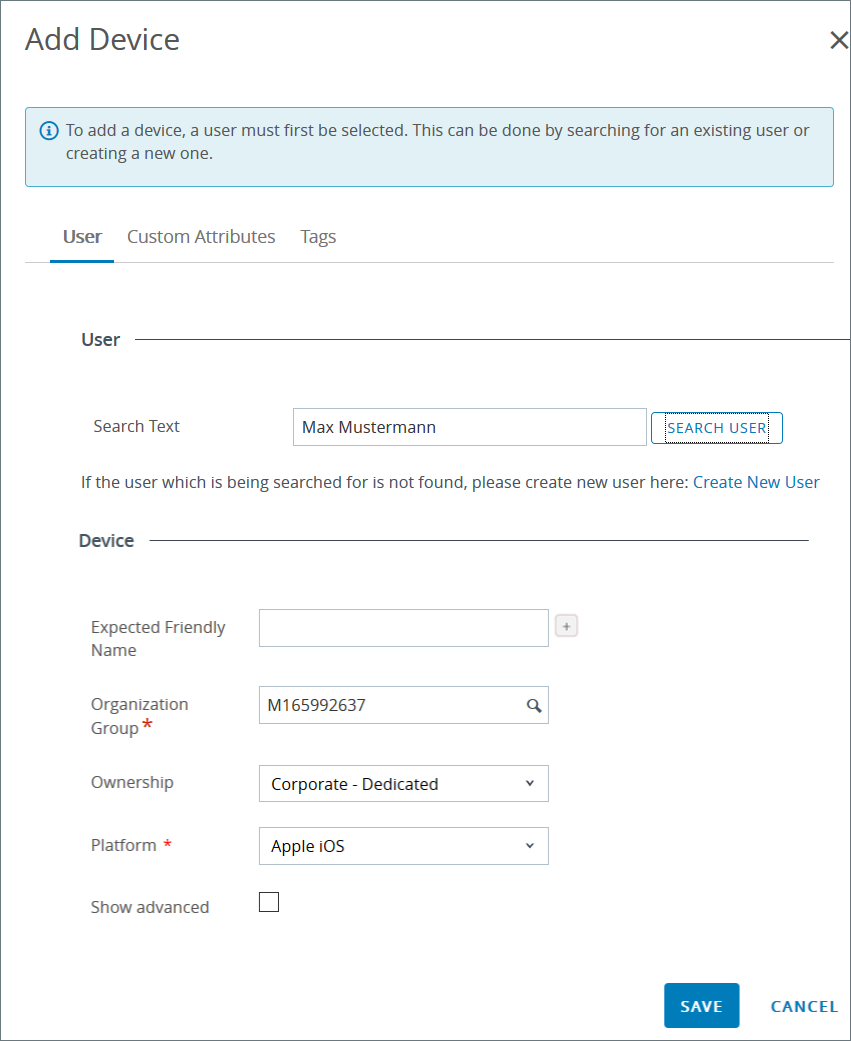
The access data will be displayed and sent to the previously specified e-mail address.
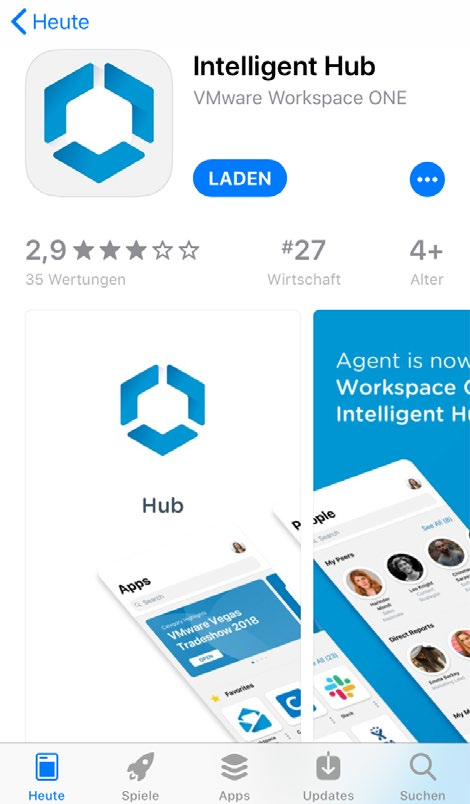
2 Add the VMware “Intelligent Hub app” to the user’s iOS device.
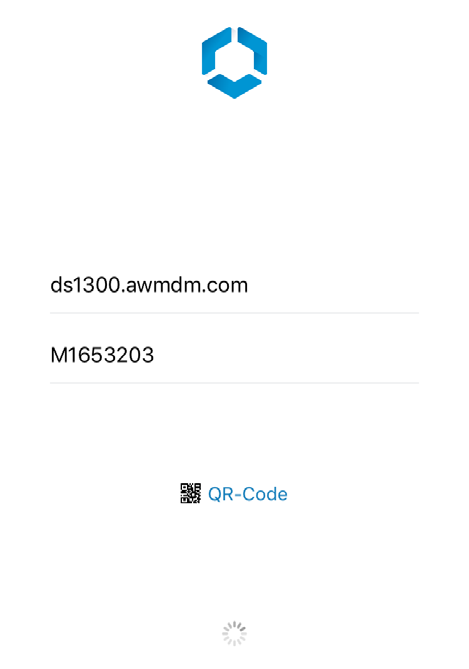
Open browser on iOS device and enter URL from email or scan QR code.
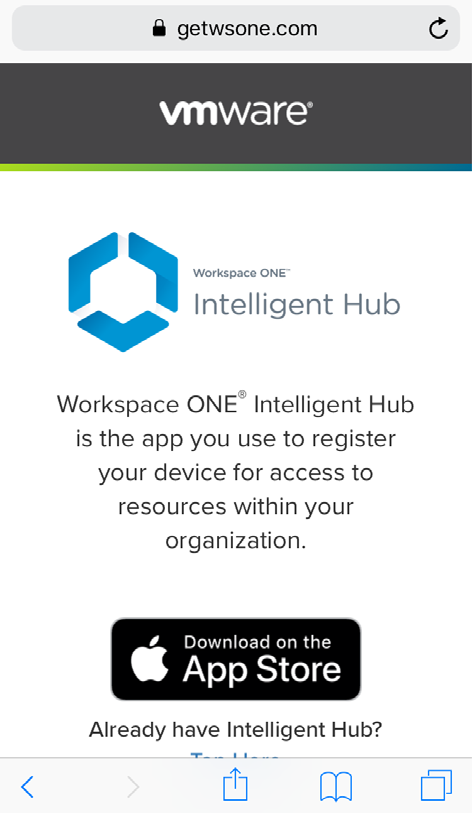
Install VMware Intelligent Hub App from App Store.
Enter server and group ID, confirm with Next.
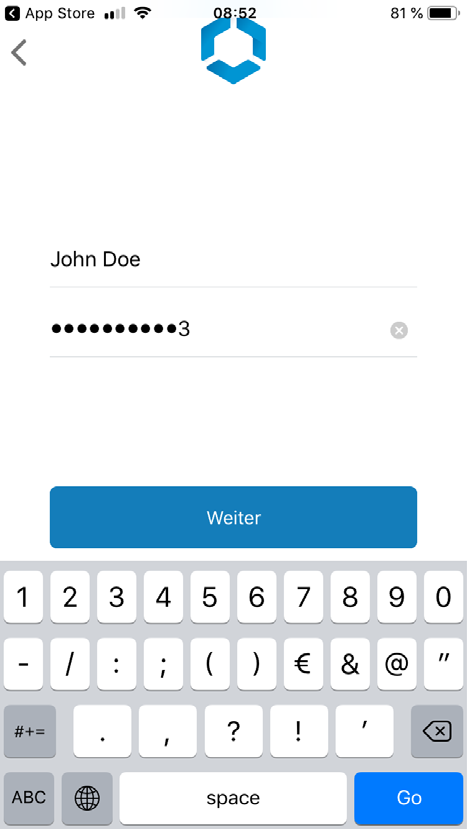
Enter user name and password, confirm with Next.
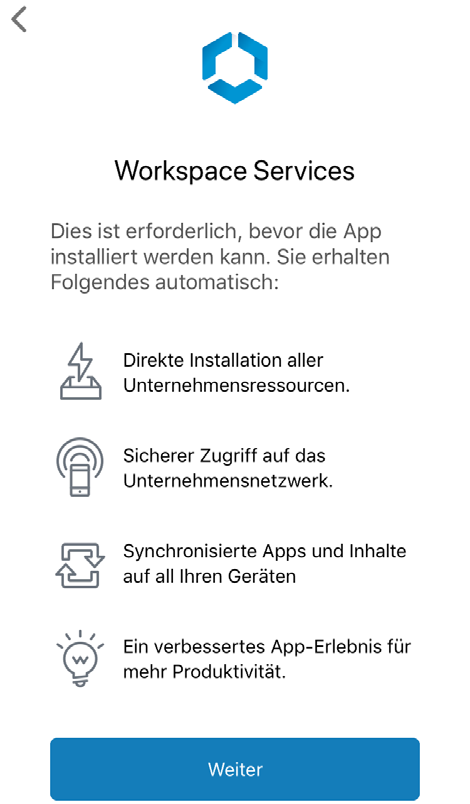
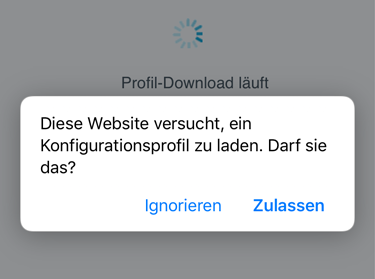
Confirm Workspace Services with Next.
Confirm loading of the configuration profile with Close.
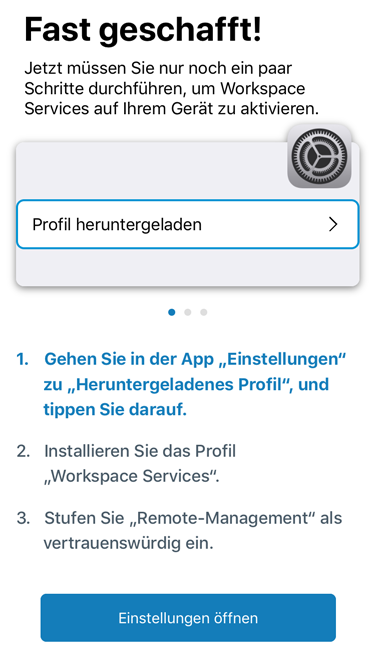
Load configuration profile via Open settings.
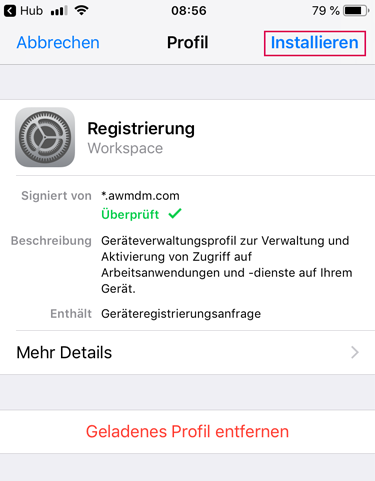
Install profile via General -> Profile-> Registration -> Install.
Almost done - now assign a passcode and agree to the privacy policy.
The user’s device is now available in the Workspace ONE console.
III Manage apps with Workspace ONE
1 Add App
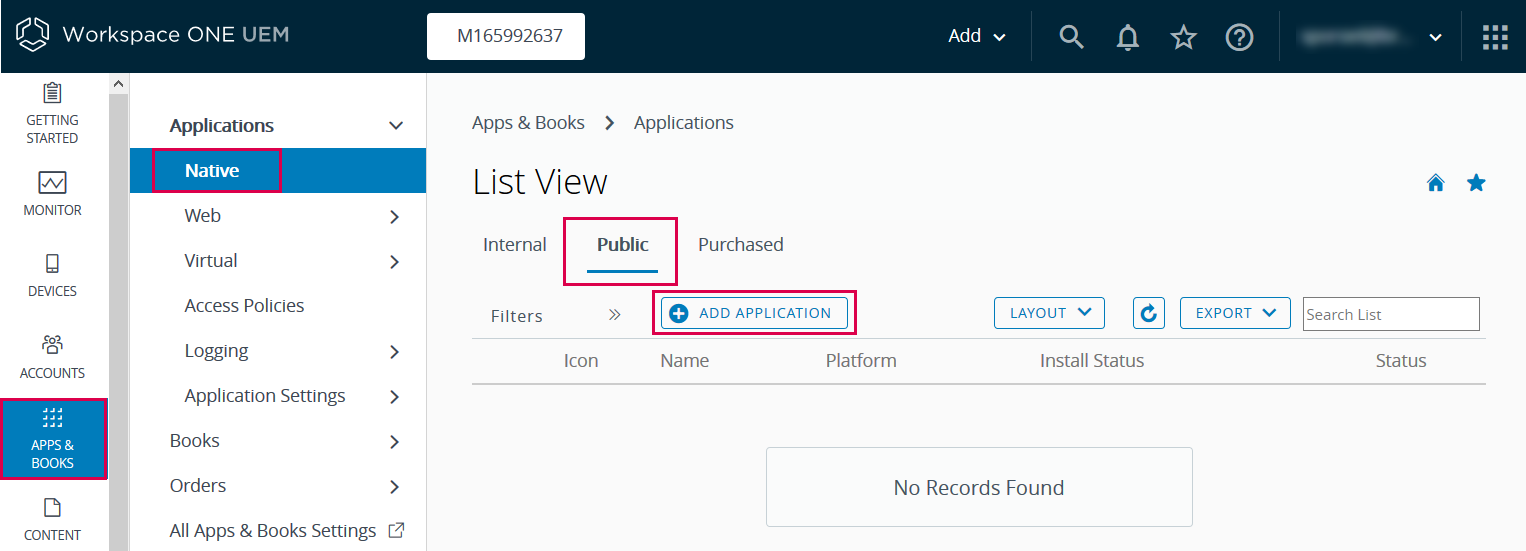
To add ginlo Business to the Workspace ONE console and deploy it to users’ devices, select Apps & Books in the navigation, then click Public and Add Application.
Select the platform, enter the name of the app and click Next.
Select the ginlo Business App by clicking on Select.
In the Add Application window, enter the name of the app and click on Save & Assign.
In the Update Assignment window, click on Add Assignment.
In the Add Assignment window, select the group and the type of distribution of the app and confirm with Add.
The new entry now appears in the list. Click on Save & Publish.
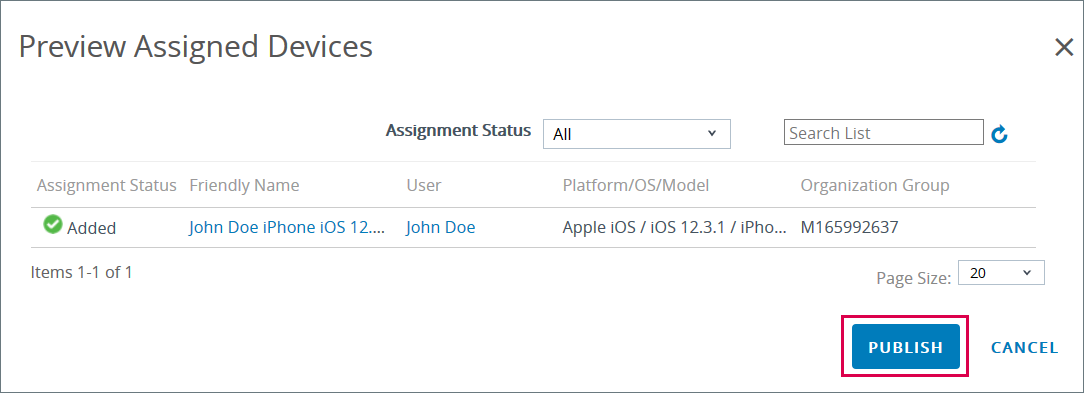
The Preview Assigned Devices window displays the users and devices to which the ginlo Business App will be distributed. Click on Publish here.
The app now appears in List View under Apps & Books.
2 Adding an update to an app.
For adding a new version, the process is the same as for adding a new app as described above.
If the app has the same bundle identifier and provisioning profile, sending an update request will distribute it to the devices with the appropriate label.
Uploading a new version is only possible if the version and revision number are higher than those of the existing app.
IV Configuring App Settings
To configure the settings of the ginlo Business App possible by means of AppConfig, Configuration Keys and corresponding Values are assigned in the Workspace ONE console.
1 Create Settings.
To make the desired settings for ginlo Business, select App & Books, switch to ginlo Business App under Public and select the Assign button there.
In the Update Assignment window, click Add Assignment and create a new assignment for the ginlo Business App.
In the upper section of the Add Assignment window, configure the desired rollout and access methods.
Then scroll down to the Application Configuration section.
Enter the desired configuration parameters here. Details can be found in Chapter IV.2.
Save your settings with Add.
In the Update Assignment window, select the assignment and click on Save and Publish.
In the next window you will see a preview for changes to the assignments.
Click Publish to distribute the created configurations to the displayed devices.
2 List of configuration parameters
Number |
Key |
Typ |
Value range |
Description |
|---|---|---|---|---|
1 |
disableNoPwLogin |
Boolean |
true/false |
Toggle Password prompt at start is omitted and implicitly set to true. Any keychain entries are removed, see Note 1) |
2 |
simsLockApplicationDelay |
Integer |
0-10 |
The setting is transferred 1:1 to the settings. Setting Query password after… omitted |
3 |
forceComplexPin |
Boolean |
true/false |
The toggle Simple password is omitted, see note 2) |
4 |
simsPasswordTries |
Integer |
3,5,1 |
If set, the setting Delete data is omitted |
5 |
disableSaveToCameraRoll |
Boolean |
true/false |
If set, the setting Save media is omitted |
6 |
disableSendMedia |
Boolean |
true/false |
If set, only texts can be written |
7 |
disableOpen |
Boolean |
true/false |
If set, images and videos can can no longer be saved and files can no longer be be displayed anymore |
8 |
passwordMinLength |
Integer |
0-99 |
see note 2) |
9 |
passwordMinSpecialChar |
Integer |
0-99 |
see note 2) |
10 |
passwordMinDigit |
Integer |
0-99 |
see note 2) |
11 |
passwordMinLowercase |
Integer |
0-99 |
see note 2) |
12 |
passwordMinUppercase |
Integer |
0-99 |
see note 2) |
13 |
passwordMinClasses |
Integer |
0-4 |
see note 2) |
14 |
passwordMaxDuration |
Integer |
0-65535 |
see note 3) |
15 |
passwordReuseEntries |
Integer |
0-100 |
see note 4) |
16 |
disableExportChat |
Boolean |
true/false |
If set, chats can no longer be exported to a text file. |
Simple settings are stored in the NSUserDefaults. If the MDM configuration for this changes, then the settings are copied to the NSUserDefaults.
Note 1)
If TouchId or Start without Passwor is disabled, then additionally the corresponding keys in the KeyChain are deleted.
Note 2)
If the password settings have changed, the password is requested first.
This is done regardless of whether the password is always prompted at startup.
This is necessary because we store the credentials in encrypted form and do not want to provide any information about the password to an attacker.
If the user’s password no longer complies with the password policy, the user must enter a new password.
note 3)
When the password is changed, the current date and the maximum password expiration time are used to calculate when the password will expire.
For performance reasons, the date of the device is taken first. If the setting changes, the new expiration date is calculated.
Note 4)
To implement this feature, it is necessary to securely hash the passwords on the device. To do this, the password is first hashed using Bcrypt with a fixed number of rounds.
The hashed passwords are not stored directly, but encrypted via AES key. The AES key itself is encrypted with the RSA key of the device.
9.3.1.6.4. Quick Start Guide for IBM MaaS360
In addition to rolling out the ginlo Business app via the ginlo Management Cockpit, the application can also be distributed and registered on users’ devices via existing enterprise mobility management (EMM) solutions.
Compatible EMM solutions must support the AppConfig standard and thus also Android for Work (from Android 5.0) or Managed App Configuration (from iOS 8.0).
The assignment of licenses and control of the design, groups and channels is then again carried out via the ginlo Management Cockpit.
The configuration of the app settings (password policy etc.) can be done either via the ginlo Management Cockpit or directly from the EMM. In doing so, app configurations made in the EMM may override the rules from the ginlo Management Cockpit if necessary.
Please note that these settings should be made either only in the ginlo Management Cockpit or only in the EMM.
For rollout to a large number of users, automatic EMM registration via the existing EMM solution is recommended.
This has the following advantages:
Rollout via the existing EMM solution into the secure EMM container on the device
Fast registration of users with LDAP data and shortening of process steps
Reduction of error possibilities by users, e.g. rejection app management
Automatic allocation of licenses via backend
Automatic import of user data into the ginlo Management Cockpit.
Proceed as follows for automatic EMM rollout via IBM MaaS360:
In the Settings in ginlo Management Cockpit, activate Automatic EMM registration and for a shortened rollout also Force fast registration on end device.
Hint
If quick registration is enabled, registration is fully automatic without the admin or users having to intervene in the process.
However, do not use this feature if your company already has ginlo Business installed on managed endpoints, otherwise existing user accounts will be overwritten during the rollout.
Furthermore, it is a prerequisite for the EMM rollout that the company domain, e.g. @yourCompanyDomain.com in ginlo Management Cockpit must match your registered domain in EMM.
Copy the security token that is now displayed. It will be needed later for assigning configurations and automatic licenses on the back end.
The rollout will be done via IBM MaaS360.
Optionally, you can also customize the app design in the ginlo Management Cockpit before the rollout, so that it takes effect directly from user registration.
If you want to use the default design, you can log out of the ginlo Management Cockpit now, the rollout will be done via IBM MaaS360.
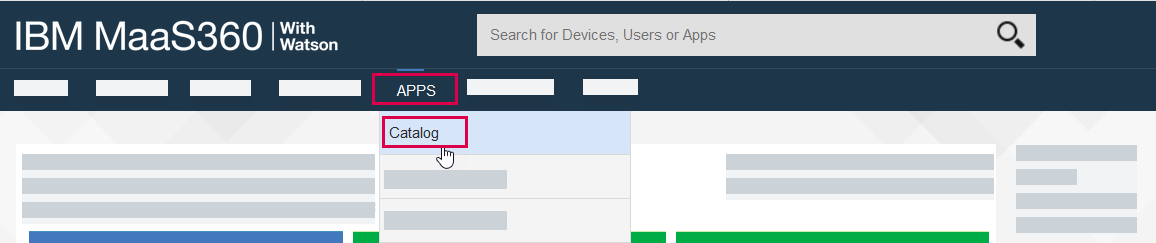
Open IBM MaaS360. Open the App management via Apps and Catalog.
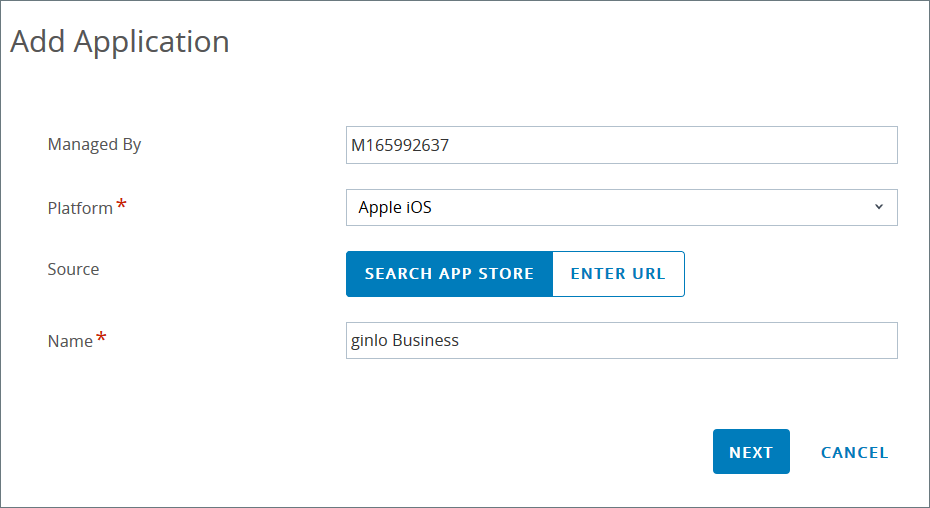
Search for the ginlo Business app via Add in the respective store (iTunes App Store App/Google Play App).
In the screen for adding the app, open the Configuration tab.
Scroll down until you see the input fields starting with Firstname.
Enter the following parameters and save them with Add:
Android
firstName: * (Here you can specify any prefix for the users, because this field must be filled only with a value - no space.)
lastName: %USERNAME% (In combination with the prefix, the display name in the Messenger app is then, for example, “* Max Mustermann”; in the case of LDAP mapping, the name is displayed without a prefix.)
emailAddress: %EMAIL%
loginCode: Security token from the ginlo Management Cockpit including {} brackets!!!
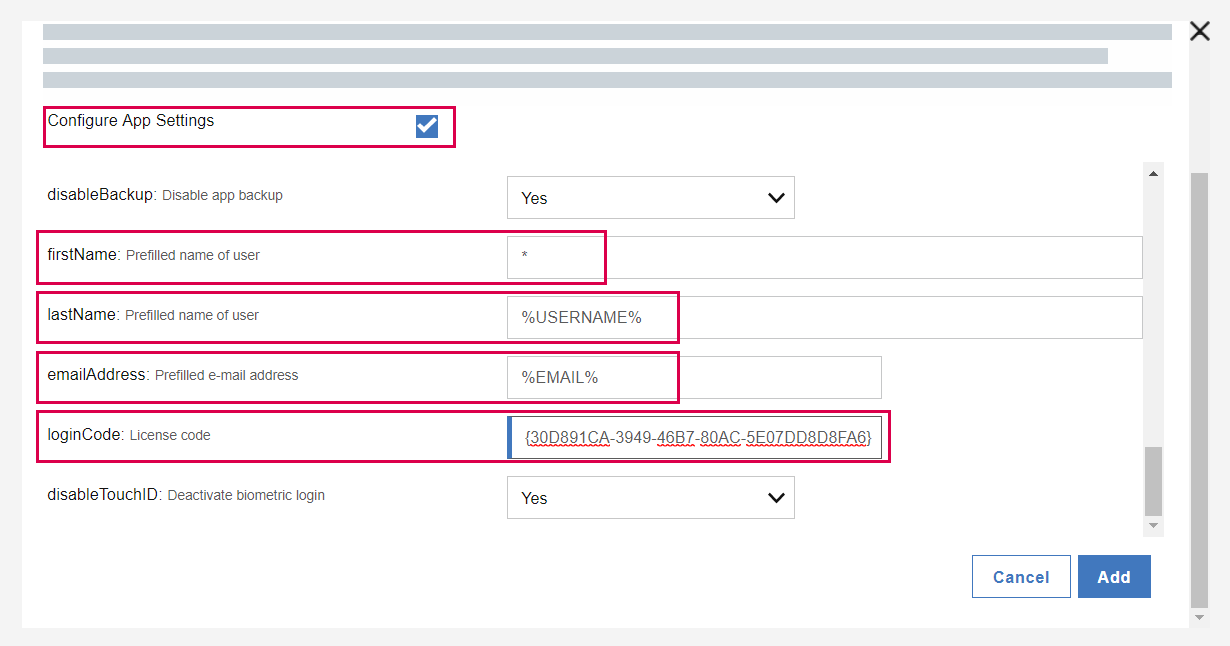
iOS
Firstname: * (Here you can specify any prefix for the users, because this field must be filled only with a value - no space.)
Lastname: %USERNAME% (In combination with the prefix, the display name in the Messenger app is then, for example, “* Max Mustermann”; in the case of LDAP mapping, the name is displayed without a prefix.)
E-Mail: %EMAIL%
Securitytoken: Security token from the ginlo Management Cockpit including {} brackets!!!

The app is now ready for rollout.
If not already done, create Devices and Users based on the LDAP data with names, first names and email addresses.
This data will be used for automatic app registration and will then no longer need to be assigned and verified by the respective user.
Assign users to one or more groups so that you can distribute the app to different groups of recipients.
From the App Catalog, you can then distribute the app to the appropriate Devices or Groups via Distribute.
Optionally, you can still enable SMS or email notification.
The app is then rolled out to the Maas360 container, and users, for their part, only need to start registration by clicking on the App icon and then selecting Register.
The automatic app registration now accesses the LDAP data (username, email address) and the security token, accepts the management by the ginlo Management Cockpit, loads company and email directory and assigns a valid license to the user.
Finally, if the app settings dictate, the user must assign a personal password for the app container.
If no password is required, the user can also skip this step and start later via the app settings.
The next time the user logs in to ginlo Management Cockpit, (only) the registered users will be automatically imported from the EMM process and you can start creating groups and channels and assigning users.
— END of EMM description —
9.3.2. App and user management
You can access the app and user administration via the page menu on the left.
9.3.2.1. App settings
To ensure that ginlo Business meets the compliance and security requirements in your company, you can set more than 30 settings for contacts policies, password policies, password complexity and chat policies in the App settings tab.
Technically, ginlo Business app settings are based on Android for Work (Android 5.0 and above) and Managed App Configuration (iOS 8.0 and above), enabling secure and fast app configuration.
9.3.2.1.1. Contact policy
In Contact policies you define the name of your company directory and determine which users are allowed to communicate with or whether access to contacts is allowed.
1. company directory name
Change here the name of the company directory that should be displayed to the users under contacts.
2. activate closed user group
If this function is enabled, users can only communicate with contacts maintained in the ginlo Management Cockpit. Chat with users outside the management is not possible.
3. prevent access to contacts
When this function is active, an employee can no longer send and receive contacts.
9.3.2.1.2. Password policy
Password policies are used to protect the application and the data it contains. You can either leave it up to the users themselves to ensure the protection of the messenger, or you can use the ginlo Management Cockpit to enforce, for example, the query of the (device) password at every app start. If, at the same time, you also set appropriate defaults for password complexity, users will have to take these criteria into account when assigning a password in the app.
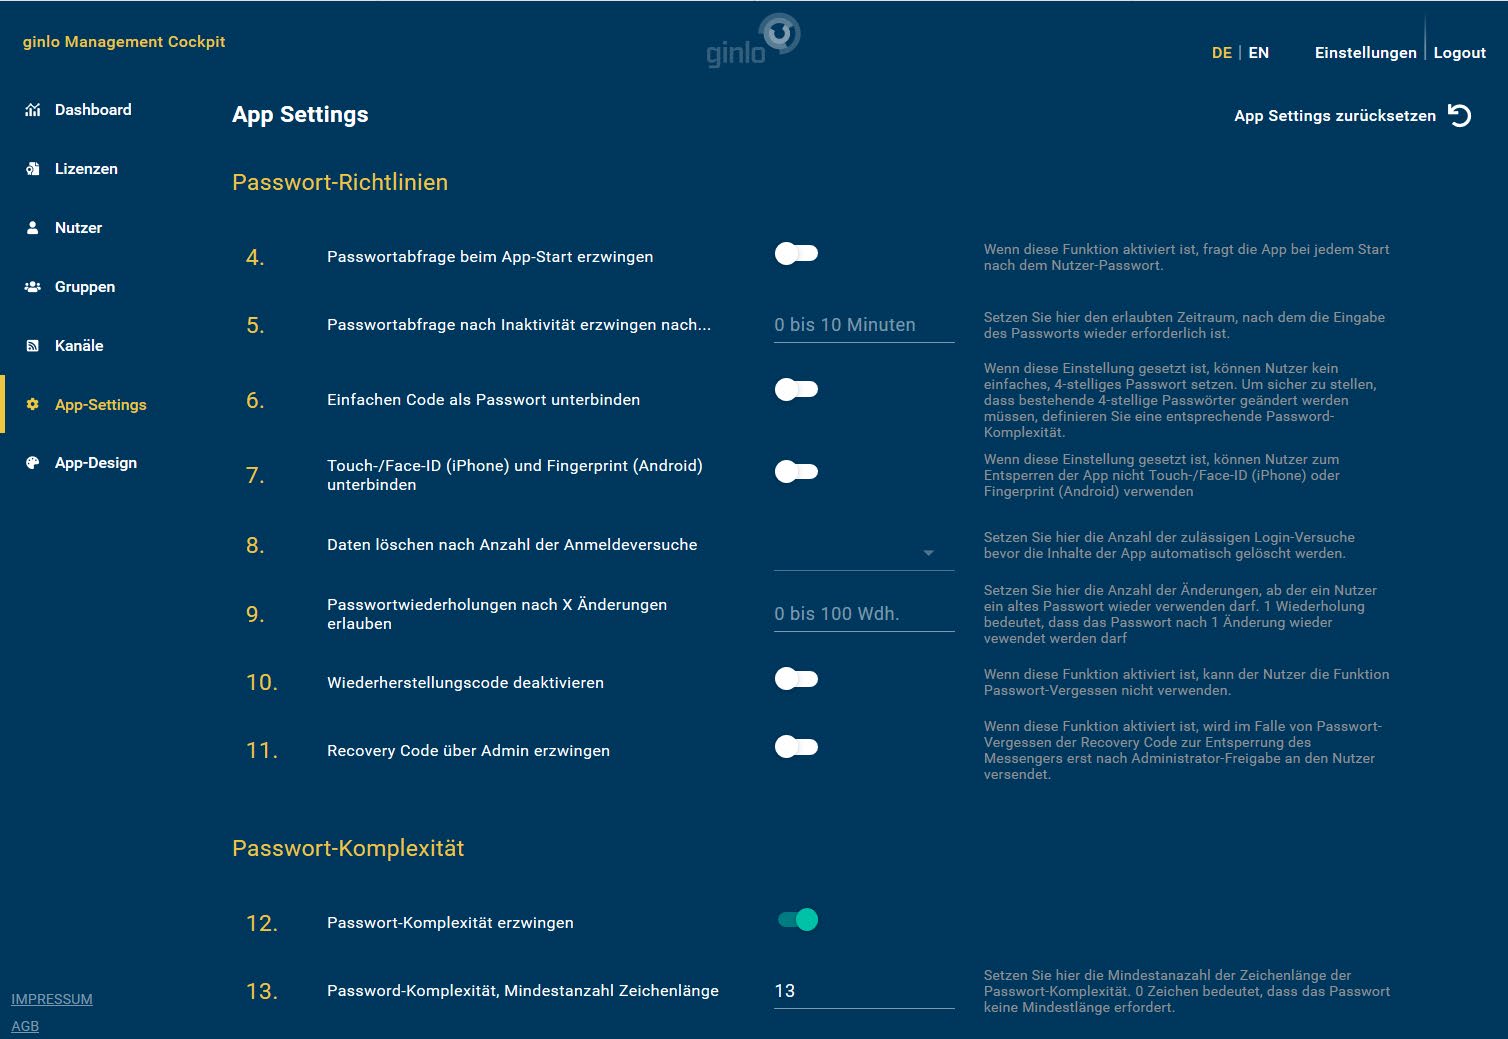
4. force password prompt at app startup.
If this feature is enabled, the app will ask for the user’s device password on every startup.
5. force password prompt after inactivity after …
Set here the allowed period ( 0 to 10 minutes) after which the password entry is required again.
6. disallow simple code as password.
If this setting is set, users cannot set a simple 4-digit password (PIN). To ensure that existing 4-digit passwords must be changed, define an appropriate password complexity.
7. disable touch/face ID (iPhone) and fingerprint (Android).
If this setting is set, users cannot use touch/face ID (iPhone) or fingerprint (Android) to unlock the app.
8. empty data by number of login attempts.
Set the number of login attempts allowed here (3, 5, or 10) before the app’s contents are automatically deleted.
9. allow password retries after x changes.
Set here the number of changes (1 to 100) above which a user is allowed to reuse an old password. 1 means that the password may be used again after one change.
10. disable recovery code
If this function is enabled, the user will not be able to use the Forgot Password function.
11. force recovery code via admin
If this feature is enabled, in case of password forgetting, the Recovery Code to unlock the messenger will be sent to the user only after administrator approval.
9.3.2.1.3. Password complexity
Under password complexity you define the minimum requirements for the users’ device password. Minimum numbers of letters, digits and special characters as well as password validity can be determined.
12 Force password complexity
With this switch you as administrator determine whether there should be requirements for the device password. Set this switch to On to select from the following requirements:
13. minimum character length
Set here the minimum number (0 to 99) of characters length of password complexity. 0 means that the password requires no minimum length.
14. minimum number of special characters
Set here the minimum number (0 to 99) of special characters, e.g. !§$%, that must be used. 0 means that no special character is required.
15. minimum number of digits
Set here the minimum number of digits (0 to 99), like 12345. 0 means that the password requires no digits.
16. minimum number of lowercase letters
Set here the minimum number (0 to 99) of lowercase letters, like abcde. 0 means that the password requires no lowercase letters.
17. minimum number of upper case letters
Set here the minimum number of upper case letters, e.g. ABCDE. 0 means that the password requires no uppercase letters.
18. password validity in days
Set the password validity in days (0 to 365) here. For example, 30 means that after 30 days the password must be changed by the user.
19. minimum complexity of the password (digits, special characters, lower or upper case letters)
With this setting you determine the minimum number ( 0 to 4) of character classes (digits, special characters, lowercase or uppercase letters) required in the password. For example, 2 means that the password must contain at least two classes (e.g. digits + lowercase letters or special characters + digits).
9.3.2.1.4. Chat policy
Chat policies are used to control local saving, sending, forwarding, exporting or sharing to other apps in communication.
Important
Settings apply only to user accounts managed by the administrator.
Users must have accepted the team invitation in the app for the settings you set to take effect.
Saved changes are usually set to productive in the clients after about 5 minutes, but at the latest after one hour.
Please note that your settings limit the functionality of the app, for example, chat policies.
20. Prevent access to the camera.
When this feature is active, an employee can no longer take and send photos and video via the camera.
21. prevent access to the microphone
When this feature is active, an employee can no longer send audio recordings.
22. disable local storage of media.
If this setting is set, save media setting is omitted in the app and images and videos can no longer be saved locally
23. disable send and forward attachments
If this setting is set, no media (pictures, videos, Ausios, contacts and files) can be sent or forwarded.
24. prevent access to geodata
If this function is active, an employee can no longer send locations.
25. disable export chat content as text file
When this setting is set, individual chats can no longer be exported to a text file from within the app.
26. disable sharing attachments via other apps
When this setting is set, images, audios and videos can no longer be saved and files can no longer be viewed.
27. prevent access to copy-paste
If this function is active, an employee can no longer copy texts and media and paste them into chats or third-party applications.
28. disable preview in push messages
If this setting is set, content of messages on mobile devices will not be displayed in the push preview. This increases security as content can only be read with the app unlocked.
29. disable app backup to iCloud/Google Drive.
If this setting is set, users cannot backup to iCloud or Google Drive or import backups from these providers. For backup, pairing with a second device is recommended.
9.3.2.2. App design
As a modern communication tool, ginlo Business can be customized according to your company’s corporate design (CD) guidelines. You can use the ginlo Management Cockpit to change the app’s color values and upload your company logo. This way you strengthen the acceptance among your employees and make the app visually your corporate messenger as well.
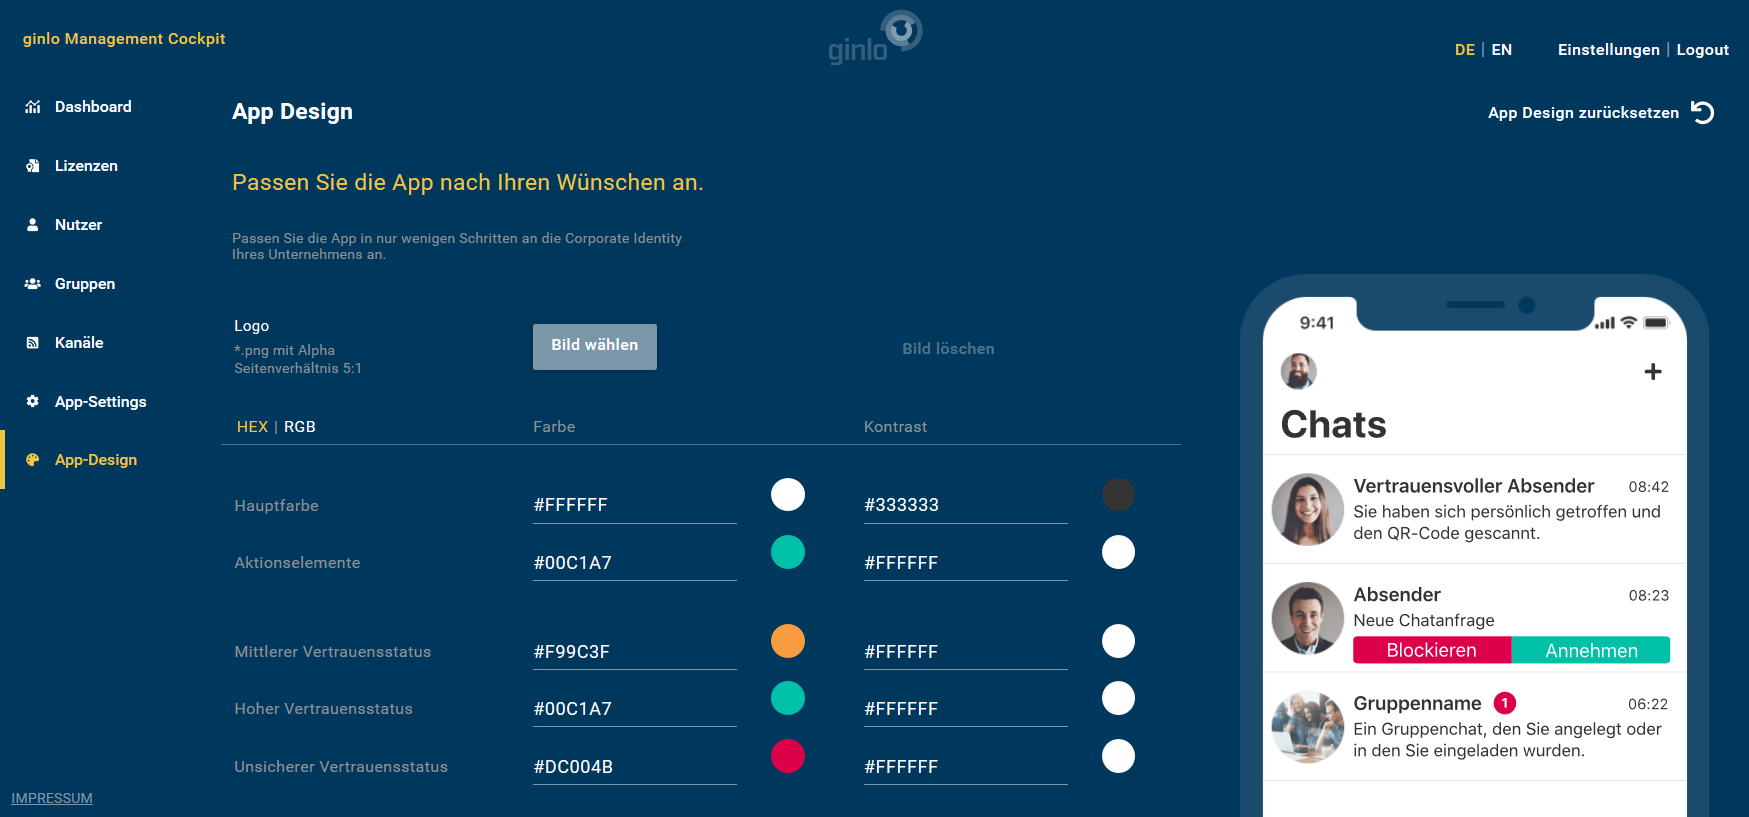
To do this, use app design tab and start the individualization of the design by uploading your company logo via the blue select image button. In the window that opens, select your logo in PNG format and click Open.
Your logo will now open in a preview. There you can use the scroll wheel of your mouse to zoom in or out and position the logo with the mouse. The blue border shows the maximum size of the logo, but it does not have to be completely filled.
After you have applied the change by clicking on the green apply button, the logo will be displayed both in the logo preview next to the image selection and in the design preview on the smartphone.
You can individualize the color values of the app in a further step. You can enter these either as RGB (red-green-blue) or hex values (hexadecimal). For exact color values for your company, check with your corporate communications department if in doubt.
Hint
Please note that by changing the color values, darkmode function may not be available because it is automatically disabled.
Note
Adjustments take effect for managed accounts. Saved changes are usually distributed to the apps after about 5 minutes, but at the latest after one hour, and are visible after closing and restarting the app.
9.3.2.3. User
ginlo Business can be rolled out and managed on users’ devices in different ways. The ginlo Management Cockpit can be used as a management instance through which users can be created and licenses assigned manually or automatically.
Hint
ginlo.net GmbH has basically no access or insight into the data of the created users!
In this section we deal with manual creation, while in the section ginlo Business API we showed how existing data systems can be integrated for automatic creation.
In addition, organizations with enterprise mobility management (EMM) solutions can also automate the rollout using the existing EMM.
First step to manual rollout via the ginlo Management Cockpit is the creation of users, to whom licenses are assigned in a further step.
Create single users
In user tab, click on create new user and in the window that opens, enter first name, last name, e-mail address and/or mobile number, and optionally the user’s department. This data will later be visible in the profiles of the users.
You can assign keywords to optionally assign a user to another functional area. These keywords can be helpful later for the search function.
Save your entries!
After each creation of a user, a dialog opens to assign a license to the user directly. You can always do this later, as described in the section ‘Licenses’_.
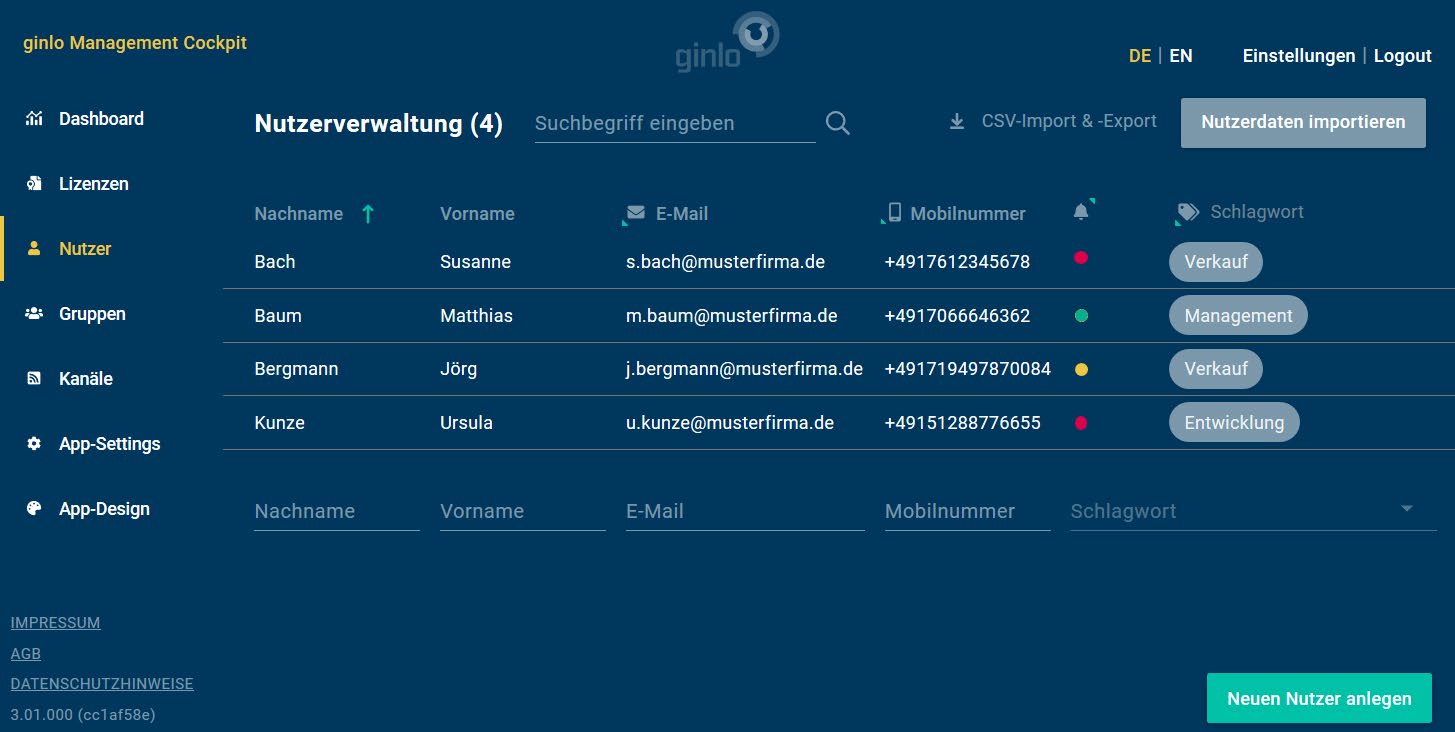
Create multiple users
For the creation of multiple users you can also use the quick creation: To do this, click in the overview of the user administration in the last line in the respective empty cells, enter the data, switch the cells with the Tab key, assign one of the already defined keywords and save the entry.
Create users via a .csv file
Using the link import user data you can upload a whole directory of users to the ginlo Management Cockpit. To do this, please first use the CSV import template, which you can also find in the overview at the top right under the link Import template. Then click Simplified CSV for one-time user creation to download it.
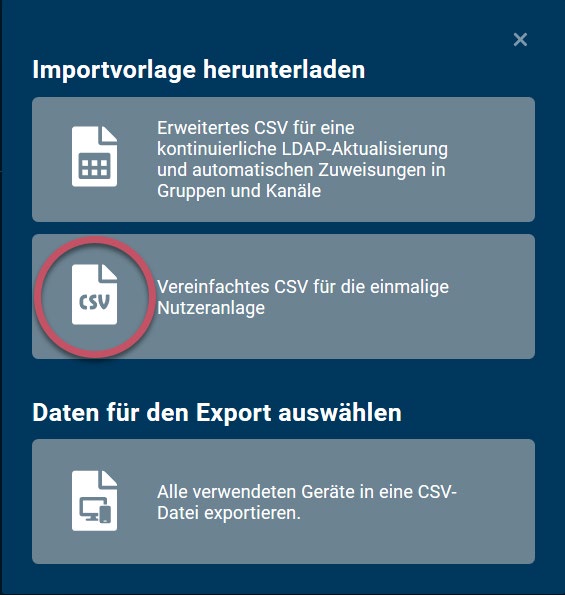
After creation, you can edit individual users by clicking on the respective entry in the user list.
Important
Please consider the comma separated format for the import template:
“Last name,First name,Email address,Mobile phone number,[Keyword],[Department]”.
The fields keyword and department are optional and can be used for better assignment.
After creation, you can edit individual users by clicking on the respective entry in the user list.
Each user has an 8-digit ginlo ID for identification purposes, which consists of letters and numbers.
User’s communication data such as mobile number and / or email address can be changed at any time, but must then be verified by the user in Messenger.
In user editing, you can assign a department as well as keywords. While the department is visible to all users in the Messenger profile, keywords are used for internal assignment and better management via the ginlo Management Cockpit.
Below the keywords, after activation, you will find the list of used devices of the user and their respective details.
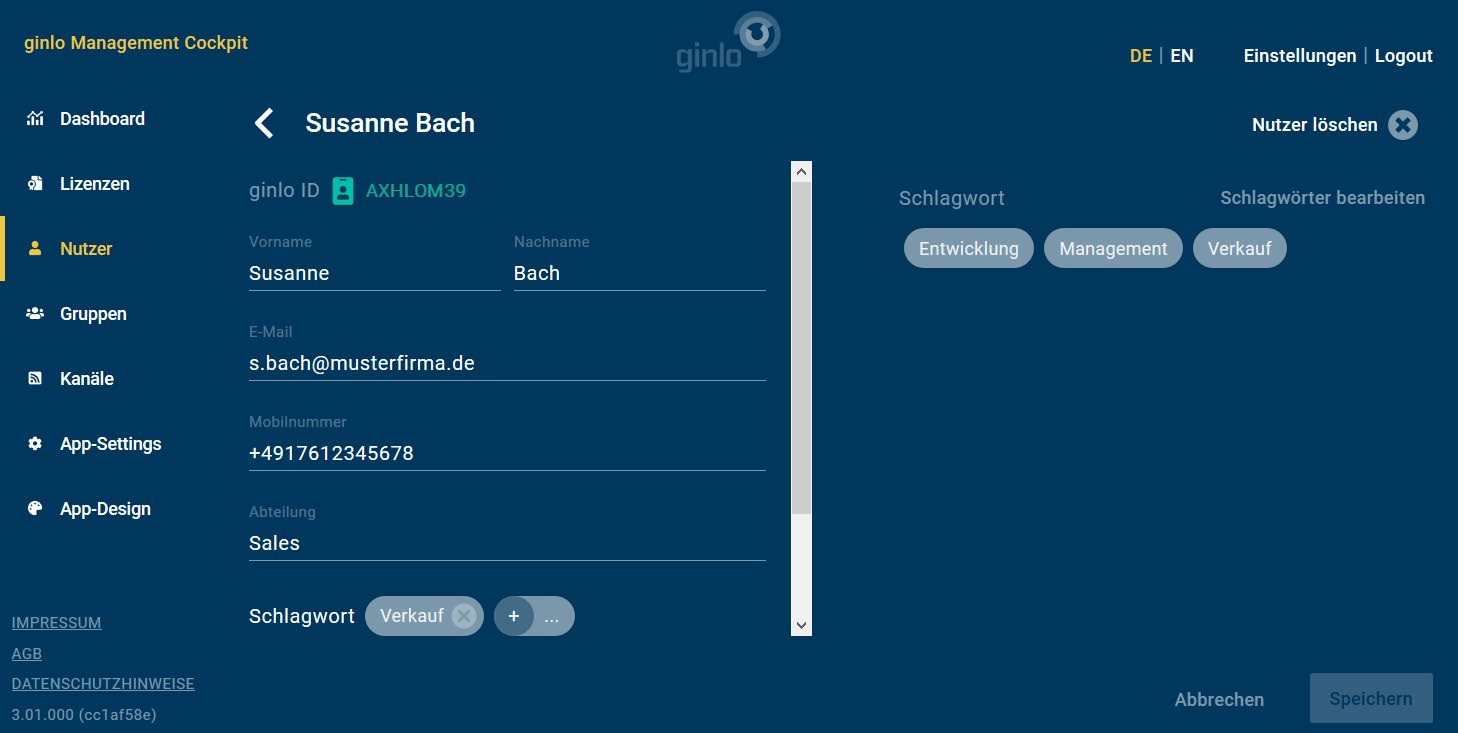
Important
Users that have already been imported will not be overwritten. Consequently, only new entries of users from the import template will be imported.
Users can be completely deleted in the user editing via the Delete user button in the upper right corner.
If a user is deleted by the administrator - for example, if the user has left the company - the entire account is deleted. Any existing backup of the user will be rendered useless. The user’s license is immediately blocked and the data record in the backend is deleted. The user thus no longer has access to his communication. The Messenger app resets itself to the registration screen, and a data backup by the user is no longer possible.
9.3.2.4. Licenses
The License management area is divided into two parts:
The already used and free licenses and their number are displayed in an overview.
New licenses can be ordered and free licenses can be assigned in both areas. To do this, use the grey button at the top right or the green button at the bottom right.
Hint
Alternatively, you can also order licenses in the Order history under Settings.
After creating individual users - but also at any later point in time - you can assign free licenses to the users.
To do this, click on the green button Assign licenses in the License management at the bottom right. A two-column overview opens:
On the left you will find the free licenses with the corresponding expiry date and on the right the available users and their status.
Now select the users via the checkbox, mark the desired licenses and assign them via the green button assign licenses at the bottom right.
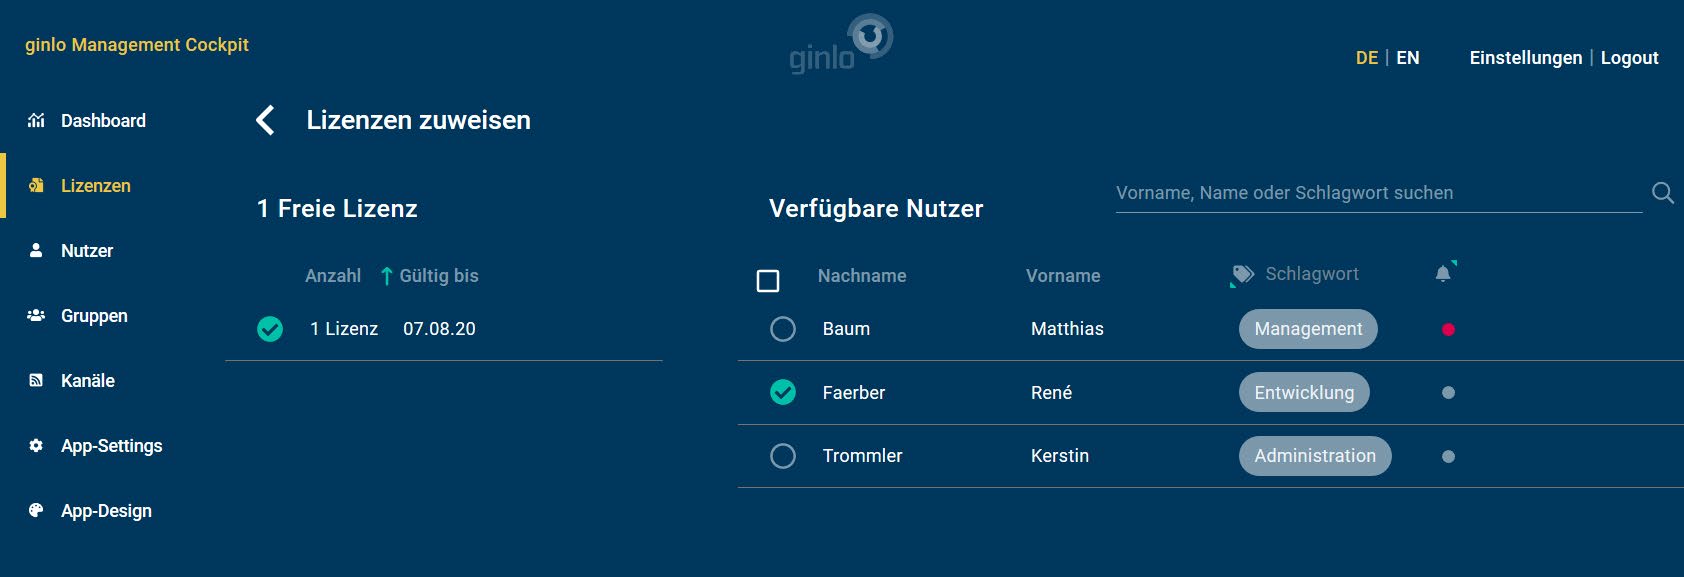
Important
As soon as you assign a license, created user will be automatically invited to ginlo Business.
Status is visible in the overview changes from grey (user created) to yellow (license assigned).
Users with email address will receive an email with corresponding download link and further information. Users created with mobile phone number only will receive an invitation via SMS.
Make sure that all preparations for rollout have been made at the time the license is assigned.
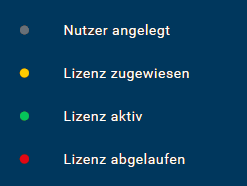
After downloading ginlo Business app from Apple App Store or Google Play Store, the user registers with the respective e-mail address or mobile phone number.
Alternatively, users can also register via ginlo Desktop as an additional device or ginlo Web Messenger as an additional device.
Important
In all cases, a second device should be set up immediately for security reasons!
During registration, an invitation to join the company’s ginlo Business team will appear. This allows the administrator to manage the App.
After the user accepts the invitation, the users status in the license overview changes to green (license active). After a user’s license expires, the status in the overview changes from green to red (license expired).
You can also revoke a user’s license. To do this, click on the three blue dots in the user’s row on the right in the license overview and select withdraw license.
After you have confirmed with remove license* in the dialog that opens, the license becomes available again for another user. The previous user will not be deleted with his data, but his Messenger will be locked until a new license has been assigned.
Shortly before the end of a license period, the user and administrator will receive a notice about the upcoming end date:
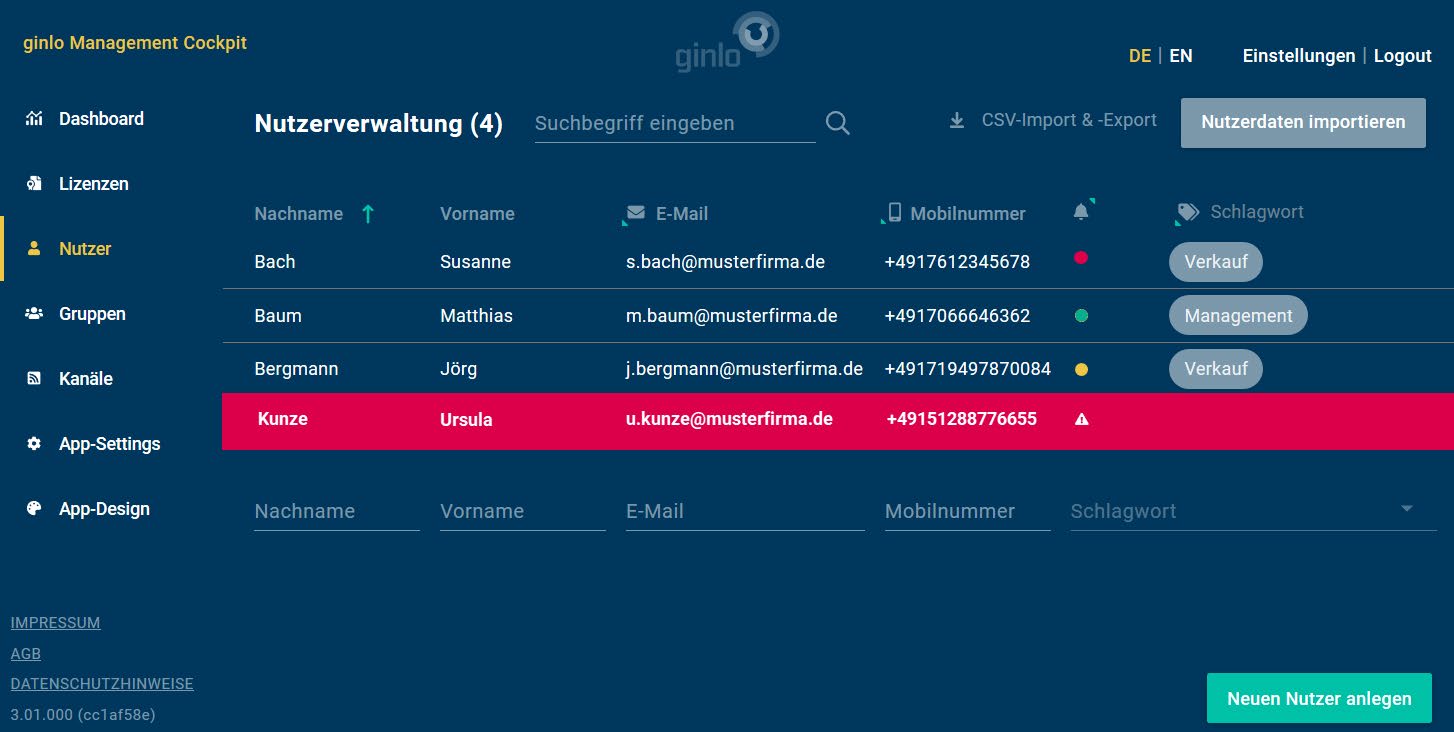
In ginlo Management Cockpit a change is indicated in the respective line of a user by a colored hint and a warning triangle at the user status.
You can revoke, extend or delete a user’s license in the license overview. To do this, click on the three blue dots at the right end of the user’s line and select an option from the pop-up.
In the further pop-up that now opens, you can, for example, select the desired license and initiate a renewal. If no further licenses are available, you can request as many licenses as you like by clicking the gray Order new licenses button in the top right-hand corner against invoicing. The licenses are immediately activated for use after the order has been carried out.
In the settings of your account you will also find the corresponding Order history to your orders at the end of the list.
9.3.2.5. Groups
An essential part of Messenger communication is the exchange of employees in group chats. Facilitate efficient and fast collaboration in departments and teams by setting up groups for your users via the ginlo Management Cockpit to bring them together.
Users assigned to a group by an administrator automatically receive a group invitation, which they can accept or decline. Especially for new employees, you can speed up the onboarding process and bring them together with the right colleagues.
Use groups tab and the green Create new group button at the bottom right to start a new group. Here, define the group name - e.g. Sales & Marketing - and optionally a corresponding group picture, which will be displayed to the members of the group.
Then you can select the members of the group from the created users. In the right area of the window, you can search for users by name or keyword and select the desired users using the corresponding checkboxes.
Note
A group can have up to 100 members.
Then save the new group by clicking the green Save button at the bottom right. As the administrator of the group, you can edit the group at any time and also add or delete users. However, you cannot read the contents of the group’s communication or send messages!
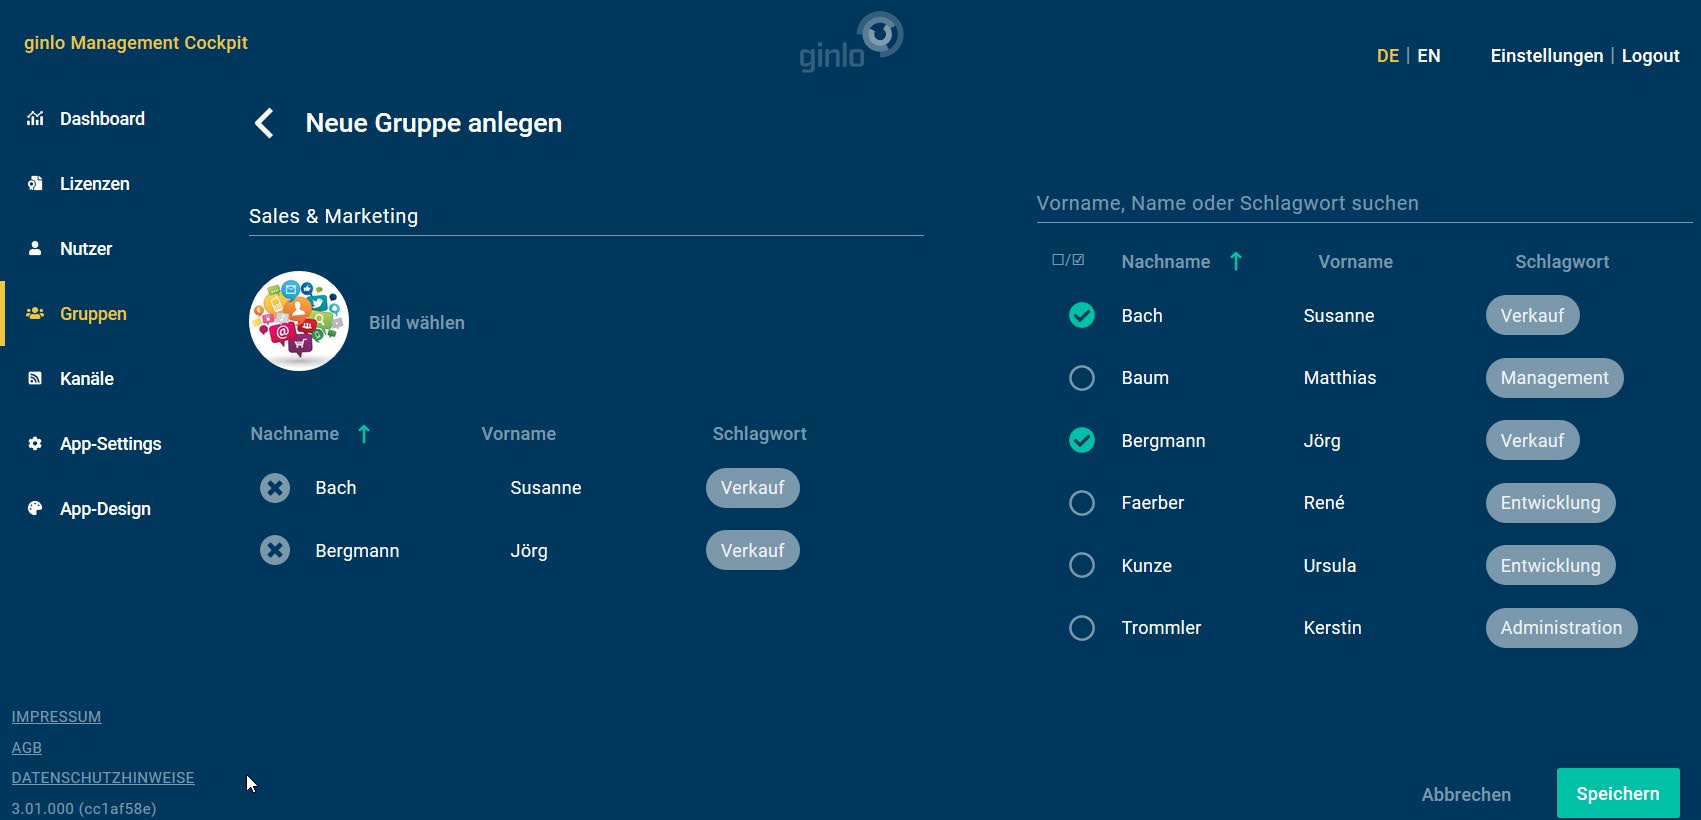
Important
As soon as you add newly created users to a group, they are automatically invited to register a ginlo Business account and assigned to the group.
Changes to group name and image are immediately visible to all members.
If you want to communicate central content to users, please use the channels for this.
9.3.2.6. Channels
Via channels you can centrally send news, images and files to a defined group of recipients and inform up to 1,000 employees quickly and across the company about news. External RSS sources can also be integrated into channels.
To create a channel, select the Create new channel button in the channels tab and, analogous to Groups, assign a name and optionally an image for the channel as well as the users who are to receive the channel.
Optionally you can assign a write permission for single users. This will give these users the right to send messages to the channel as authors via the app, which will also be displayed in the ginlo Management Cockpit. All other users can not write in a channel.
Once you have saved the new channel via the green save button in the bottom right corner, invitations will be automatically sent to all defined users.
In the next step, create a new message by clicking on the line of the desired channel in the channel overview. Now enter a message text and add an image via the gray Select image or file button if necessary. In the preview on the right side you will see the message as users will receive it later. Texts and images will be displayed in the same message.
You can also attach locally stored files, but these cannot be combined with a text message. They must be sent as a separate message.
When specifying links, you should use the full URL in the format https://www.[full page name] to avoid interpretation problems on the smartphone.
The blue edit channel link in the top navigation bar can be used to edit the name and image of the channel, add new users, delete or give write permissions to existing users, or delete the entire channel.
Once you have created your message, you can either send it immediately or define a time using the dropdown menu below the image selection. To do this, select an appropriate date and time and click on the green Send button.
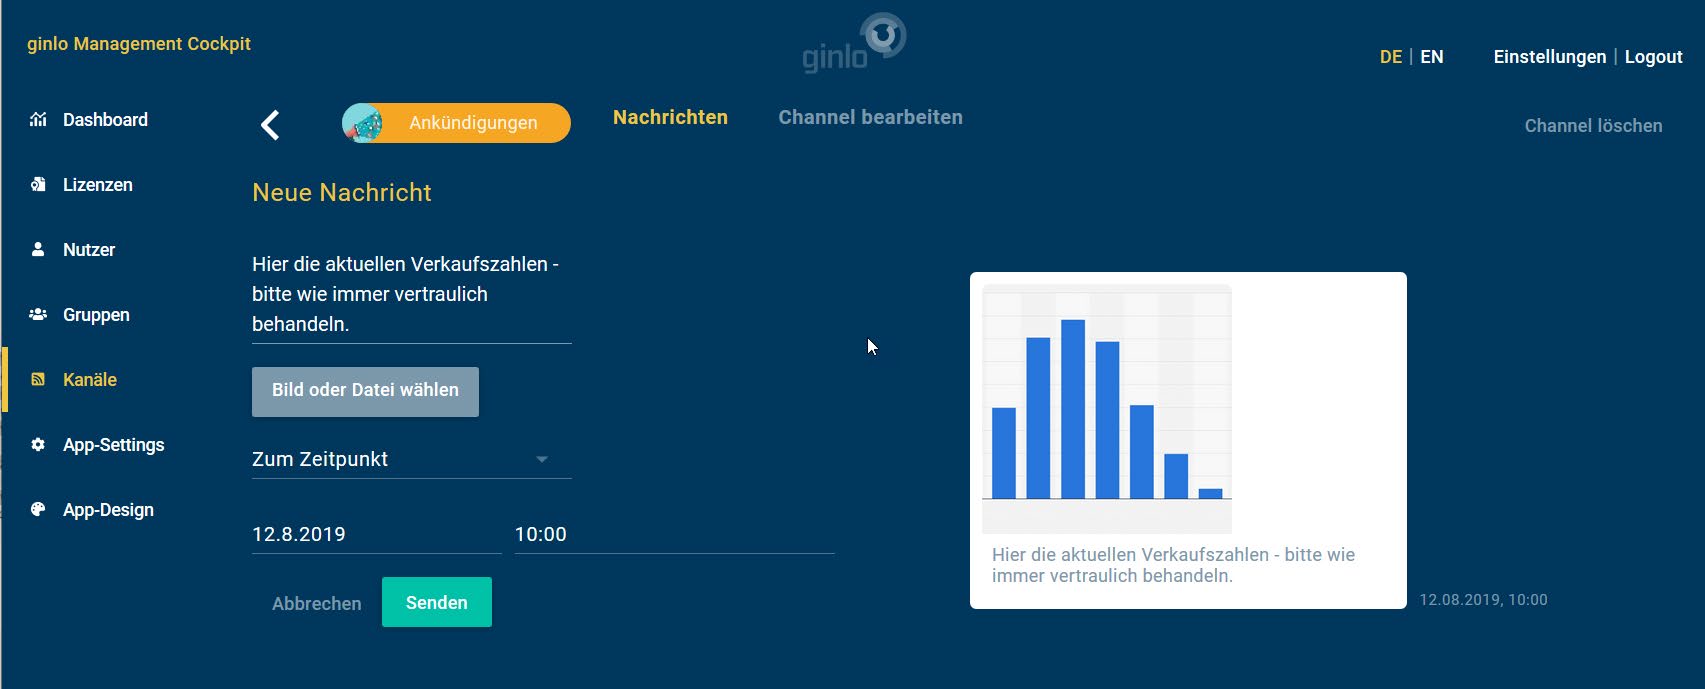
Messages with a time will not be delivered immediately, but delayed. Technically, the message is already transmitted to the server, but it is not delivered to the users until the respective point in time is reached.
In this way, you can create messages in the course of a week and have them delivered only at the weekend as part of a simple editorial plan. The time of delivery is displayed next to the delayed messages.
You also have the option here to delete messages that have already been transmitted to the server but have not yet been delivered. However, this only applies to messages from the ginlo Management Cockpit that are to be sent with a time delay!
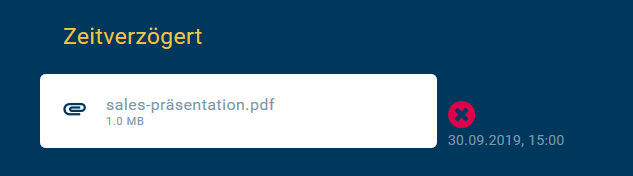
In the channel overview you can see all created channels and the status of the invited users:

Users who have already registered an account and accepted the team invitation are automatically considered joined. Users who have not yet completed registration or accepted the team invitation are considered pending.
This ensures that no unauthorized users have access to confidential channel communication content.
In addition to manual messaging, RSS sources can also be included, the content of which is then sent automatically. In this way, external content providers (e.g. publishers, websites) but also internal content sources (e.g. HR news, IT alerts, intranet messages) can be integrated directly into the messenger.
To do this, create a new channel, assign a name and an image, and enter the external RSS source as a full URL in the format https://[RSS feed address].
In the next step, click the Check button next to the URL entry to check the functionality of the RSS feed. RSS feeds are supported according to the 2.0 specifications. The check imports the last content of the feed and displays it in the preview of the channel. Users can then be assigned as usual and will receive an automatic invitation to the channel.
For confidential content from internal RSS sources - e.g. for alerts - VPN/IP filtering can be used to ensure that only your employees can access the content. To do this, contact us at b2b-support@ginlo.net, keyword Set up internal RSS feeds. You should check the display method and frequency of messages in the Messenger app before rolling out an RSS channel to all users.
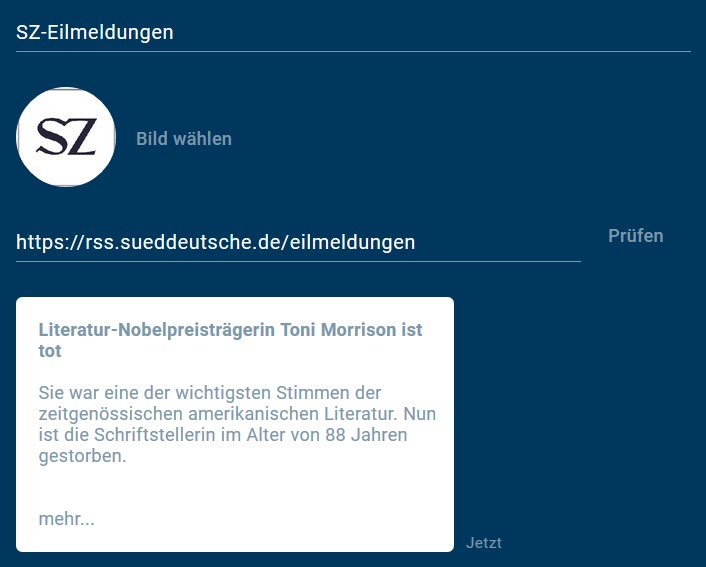
9.3.3. Dashboard
For effective control of ginlo Management Cockpit, dashboard tab provides clear reporting based on anonymized data and creates transparency about the use of the messenger. Here you will find information about the activities of the users in your company, details about the administrated groups and channels as well as a final overview of the message composition.
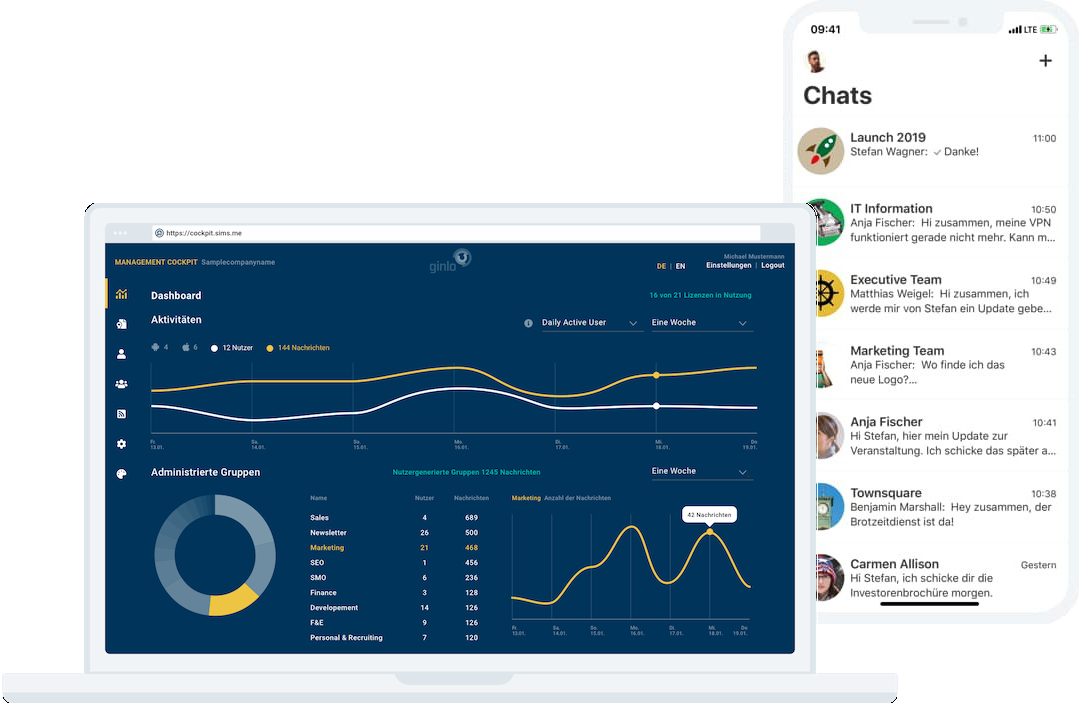
Use the drop-down menu in the upper right corner to switch between Daily active users and Monthly active users and select a period of one week, one month or the total period at the right border. The activities of the last day or the last 31 days are displayed. The data up to the previous day is always evaluated.
Under Activities you will first find the number of active users (user status license active), their distribution between the two operating systems Google Android and Apple iOS and the total number of messages sent by them.
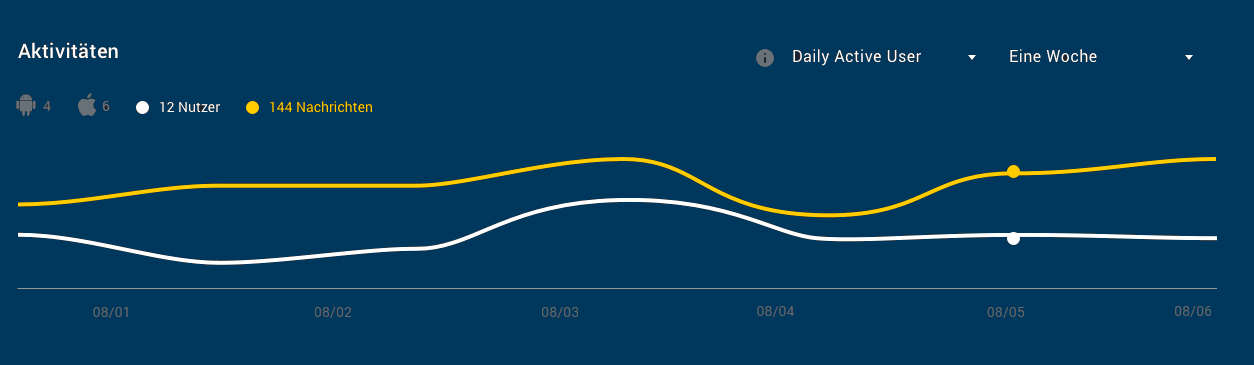
The graphs show you the curve of the number of active users (yellow) and the number of sent messages (white).
In the area Administrated groups all groups created by the administrator are shown in a list with group name, number of users and number of messages in the reporting period.
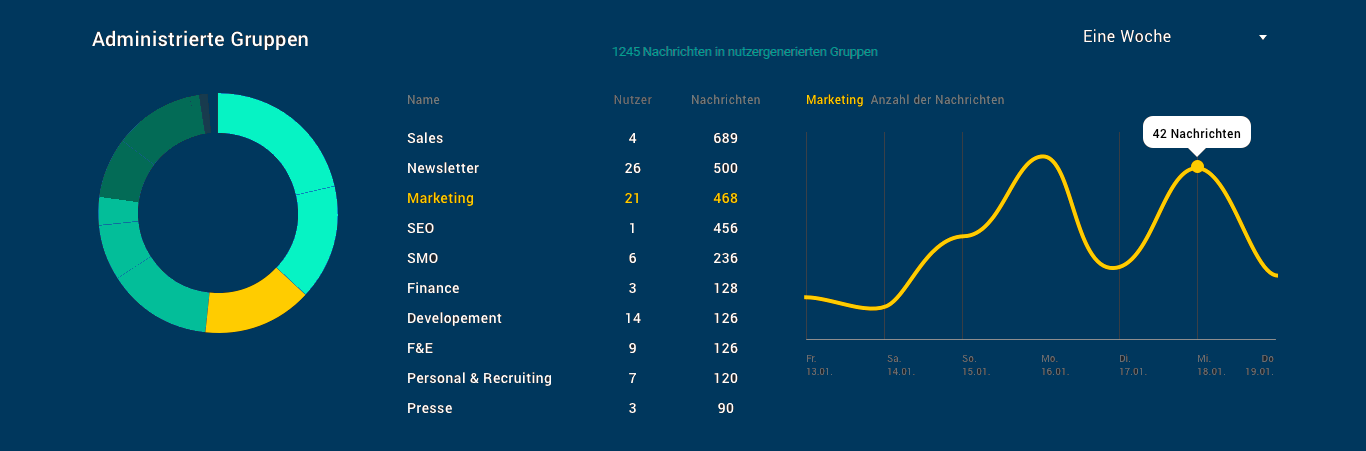
When clicking on a single group, the size of the respective group (yellow) is shown in a pie chart on the left side of the group list, based on the number of messages compared to all administered groups. The groups generated by the users are shown with the number of messages in the same period. To the right of the list, a curve diagram is displayed with the overview of the messages in the group over the selected period.
Information about group names and number of participants is not available due to private encryption.
Analogous to the groups, under Channels you will find a listing of all channels with users and messages as well as a relative distribution in a pie chart.
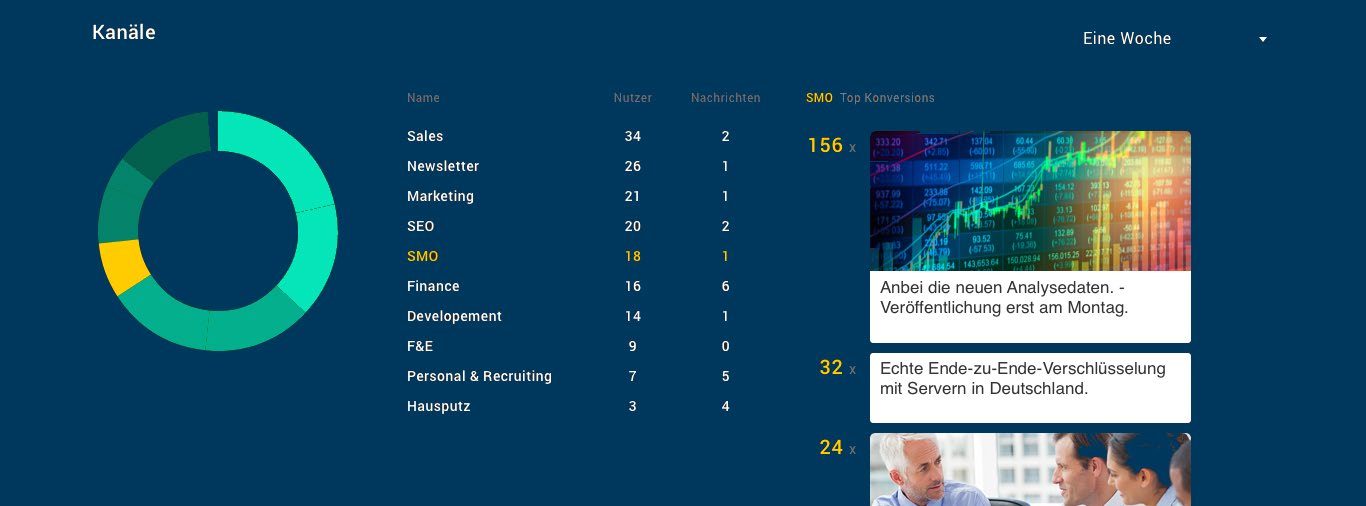
Additionally you have the possibility to display the Top 5 of the sent messages by clicking on a channel. The ranking is based on the conversion, i.e. how many users opened an image or file or clicked on a link.
Finally, you will find the number of total messages in the reporting period under Message composition. This is the sum of the individual messages, the messages in groups and in channels.
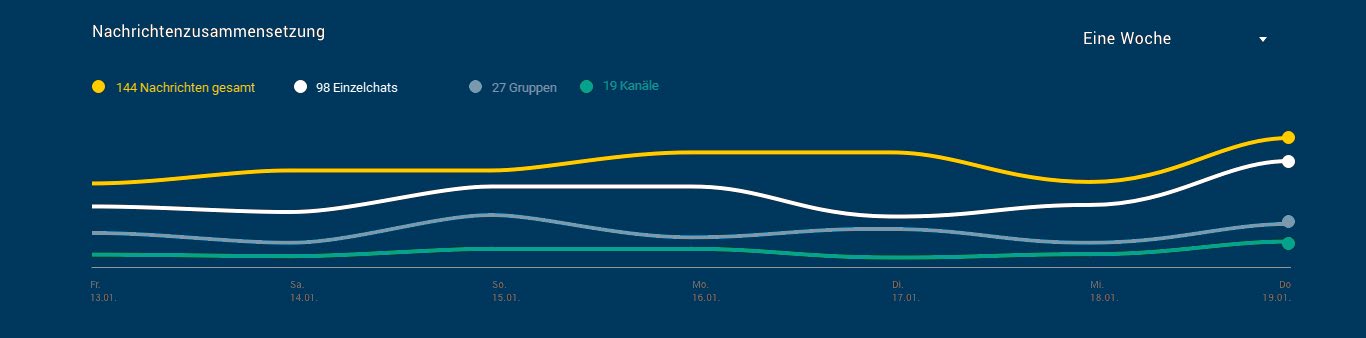
9.4. Tips & tricks
9.4.1. App management
In order for accounts to be managed by the administrator, users must give their consent. As soon as a license is assigned to a user, automatic processes for onboarding the account start in the background. Depending on the user data, an invitation is sent either by e-mail or SMS.
After registration, a pop-up prompts the user to accept the invitation to join the company’s team, thereby authorizing the administrator to manage the account. If the user is already using Messenger, the request will appear at the time of license assignment. Upon clicking Accept, the user status in the ginlo Management Cockpit changes to License active, and the administrator can manage the account.
From this point on, changes to the app settings and app design for the account take effect, and the user automatically receives the invitations to groups and channels assigned to him in each case. Now the channels can also receive messages from the ginlo Management Cockpit.
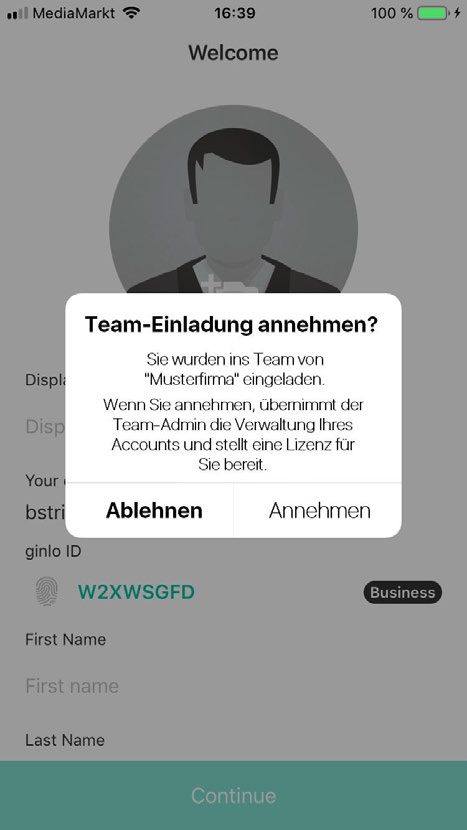
If the user declines the team invitation, the account remains outside the app management and a warning triangle appears next to the user status license assigned. The administrator can then manually repeat their management request via Edit User. To do this, click Resubmit Request* and the pop-up will appear again to the user. Finally, for security reasons, the user must actively agree to the app management request in order for their account to be managed by the administrator.

Important
Once a user is managed via app management, the administrator can - e.g. if the employee leaves the company - delete the account including the communication data. In this case, the application is reset to the registration.
9.4.2. Devices
As an administrator, you can get an overview of which devices your users are using ginlo Business on at any time. For this purpose you can export a CSV file with the following information:
Device name
petrol:ginlo Business version
First name, last name and ginlo ID of the user
To export the CSV file, click CSV Import & Export in the User tab in the upper right corner.
Afterwards click in the area Select data for export on Export all used devices to a CSV file.
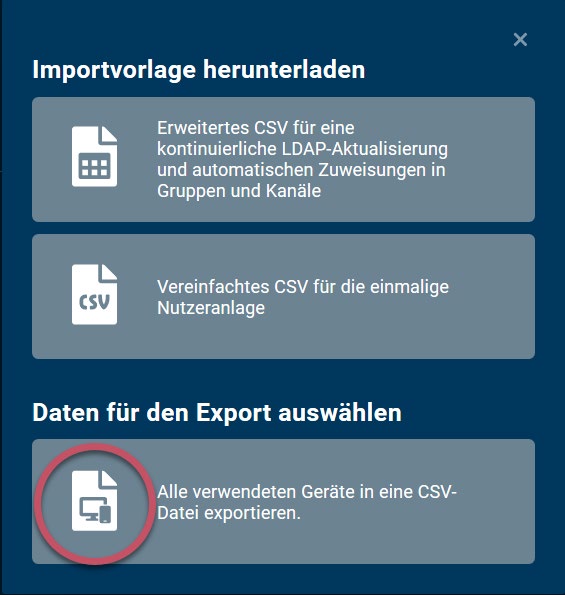
9.4.3. Contacts
ginlo Business offers extensive functions to manage contacts in a convenient and privacy compliant way.
In general, there are three different contact directories that can be used to find colleagues and business partners:
Address Book Contacts
This directory is based on the contacts stored in the smartphone’s local address book. After registration, users are free to decide whether ginlo is allowed to access these contacts.
If access is allowed, hash values are formed from the contact data (email address and / or cell phone number) and compared with the data in the ginlo database, which is also encrypted as a hash value. In the event of a match, the users concerned are informed of this. Synchronization of contacts can only be done in Android phones or iPhones and should be done there regularly.
Hint
It is impossible for us to read the hash values. Any storage or sharing of contacts beyond this does not take place!
Additionally, users can be found manually via email address, cell phone number or ginlo-ID.
The administrator can prevent access to the address book contacts by selecting the 3rd Enable Closed User Group option in the Contacts Policy.
If the user refuses access, the following two directory types can be used.
e-mail directory
The email directory can be used if the user has stored and verified his business email address in his profile. This directory contains all users from the same verified email domain.
Company directory
As soon as a user is managed, the company directory with all contacts in the respective ginlo Management Cockpit is activated for him. This contains all users of the company that are under management. The prerequisite is that the users have an account.
New users are automatically updated in the company directory of colleagues. They are marked as internal with a green label and are considered trustworthy. All information maintained by the administrator (surname, first name, cell phone number, e-mail address, department) can be viewed via the user profiles. The name of the company directory can be changed via the Contacts policy and can be individualized.
In addition, communication can be restricted to users of this company directory only via the Enable closed user group option. Communication with external ginlo users is then no longer possible.
Existing chats (with contacts outside the company directory) are deactivated, i.e. users can no longer send or receive messages to or from outside.

Favoriten (D)
In the ginlo Desktop you can additionally create a favorites directory from the contacts. To do this, move the mouse over the desired contact in one of the three tabs and click on the green star at the end of the line. You remove a favorite by pointing to it in the favorites directory with the mouse and clicking on the green star again.
Hint
For more information on contacts, see the Desktop description under Manage Contacts.
9.4.4. Recovery Code
If a ginlo Business user forgets his device password once, it is possible to unlock the messenger via the recovery code in the self-service. However, this only works if item 10 in the Password policies has not been activated!
By default, the self-service is enabled. This allows the user to automatically receive the recovery code via email or SMS in Messenger via Forgot device password.
Alternatively, you can use item 11 of Password Policies to force manual release by the administrator:
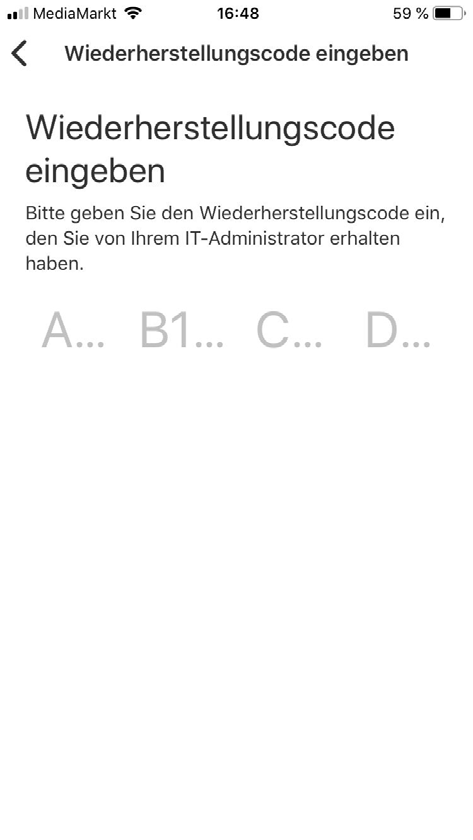
If the force recovery code via admin feature is enabled, the administrator will receive an email with the user’s request. At the same time, a warning triangle next to the user status in ginlo Management Cockpit signals that the administrator’s attention is needed.
Important
If the recovery code is not enabled and the user forgets his device password, then the information stored on the device is irretrievably lost, as the cryptographic key material is protected with the device password and recovery code.
This setting can be useful to ensure that administrators cannot access content even if they have access to the device and the ginlo Management Cockpit.
Via edit user further steps can be initiated: For users with a verified email address, the code can be sent automatically from ginlo Management Cockpit. To do this, click on Send recovery code*.
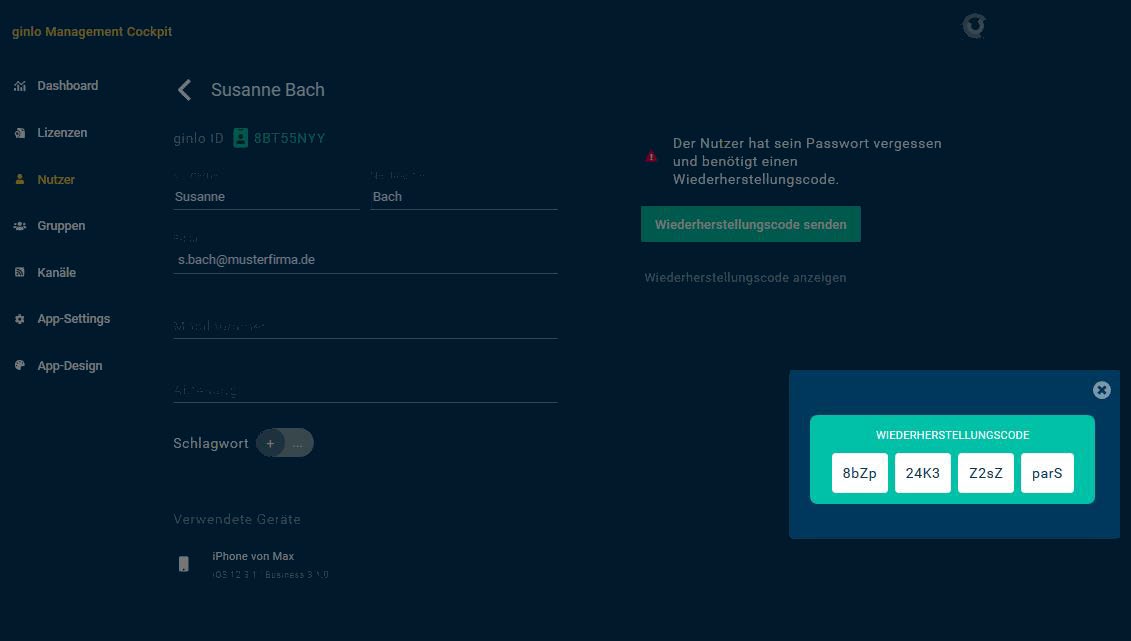
For users without a verified email address, the administrator can display the code to communicate it to the user, e.g. by phone. In Messenger, the recovery code must be entered by the user and then a new personal device password must be assigned. The password complexity criteria stored in the App Settings will then apply. After assigning a new password, the user is returned to the chat overview and can use the messenger as usual.
Hint
If a second device has already been set up, it can be used to reinstall and synchronize ginlo Business on the device with the forgotten device password.