7. User manual for ginlo Desktop
Note
ginlo Desktop is available for ginlo Business users running Windows, Mac OS and Debian Linux in our download area in the GINLO BUSINESS area.
Download the appropriate file for your operating system to your PC or laptop and follow the installation instructions.
If you do not have a ginlo Business account yet and want to use the ginlo Desktop as your first device, first read the section ginlo Desktop setup.
If you already have a ginlo Business account and want to set up the ginlo Desktop as an additional device, follow the instructions for Second Devices.
This chapter explains each of the menu items and the features found within them.
On ginlo Desktop you will find four main menus that will take you to other submenus:
Sidebar menu is located on the left and has a dark blue color.
Menu “Chat overview” is located in the middle.
Menu “In chat” can be seen on the right.
Menu bar is located above the sidebar at the top of the window.
7.1. Sidebar menu
You can show and hide the Sidebar left menu. To do this, click on the arrow at the very top left. Below you will find the following submenus:
At the bottom of the left sidebar you can check the connection to the ginlo server.
7.1.1. Profil
Clicking on the avatar will take you to your profile. In your profile you can add an avatar, change your display name and status, view business details, view your ginlo ID, use a QR code or delete your account.
To edit your profile, click the arrow in the upper right corner and then click edit.
All changes will only take effect when you click Apply changes at the bottom of the screen.
Whether and which changes are possible depends on the settings selected by your administrator.
Without saving, you leave this submenu by clicking on the cross at the top left.
7.1.1.1. Avatar
With an Avatar you show your counterpart who you are. You have the option of selecting an image from your files or taking a current photo - this requires a camera on your PC or laptop that ginlo is allowed to access.
In edit mode, click on the Avatar or Browse and select an image file stored locally on your device.
Alternatively, click Take photo and follow the further instructions. By clicking Cancel you will exit this menu.
Clicking Delete will delete the current avatar.
7.1.1.2. Display name
You can change the display name selected during the initial setup. To do so, click on the name and edit it.
7.1.1.3. Status
As status you can enter your own text and use an emoji.
7.1.1.4. First name, last name, department, cell phone number, e-mail address
This data can only be changed by your administrator.
7.1.1.5. ginlo ID and account type
Your ginlo ID was generated automatically during your registration and consists of 8 characters (letters and numbers). It is a unique identifier and cannot be changed. The ginlo ID can be used as search function in your contacts. Give your ginlo ID to friends and acquaintances so that you can communicate with them via ginlo. This way, contacting or searching is possible even without giving out a mobile number or email address.
In addition, it is indicated at this point that it is a business account.
7.1.1.6. QR code
As an alternative to the above contacting methods, you can have your counterpart scan the displayed QR code - the safest and most convenient way to confirm your identity.
If you are not in edit mode, you also have the option of sending your QR code to invite other contacts, e.g. by e-mail. To do so, click the Copy as invitation button at the bottom of the page.
7.1.1.7. Delete account
A red button can be found at the bottom of this menu.
Warning
CAUTION!
Use this option only if you are absolutely sure that you do not want to use ginlo anymore. This function cannot be undone! If you confirm delete account, you will lose your ginlo account and all content forever!
Even a synchronized second device will not help in this case - it will delete the data on all connected devices!
7.1.2. Chats
Here you always get to the menu Chat overview.
7.1.3. Contacts
In this section you manage your ginlo contacts. You can also start a new single or group chat and search for users.
Click the Contacts icon in the navigation bar on the left.
The contacts section consists of the following tabs:
Tabs |
Data type |
Who is displayed here? |
|---|---|---|
|
Favorites |
Contacts that you have manually marked as favorites |
|
Contacts from the same company |
Users with email addresses from your company |
|
Contacts from your team |
Users invited by your company
|
|
Users with whom you have private chats |
Users from your device address book, if you have given the app access.
|


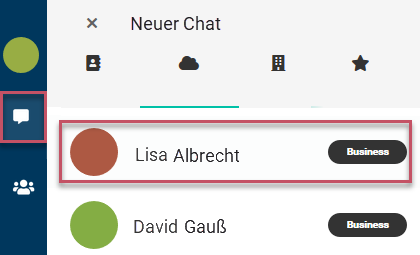
An avatar, the name and the account type (PRIVATE or BUSINESS) are displayed per contact.
(A comprehensive sorting option of the contacts is planned).
The avatars of your chat partners are color-coded. You can read their meaning here.
7.1.3.1. Manage contacts
Click on the contact you want to manage. Profile of the contact will open. To edit it, click on the small arrow in the upper right corner.
A submenu will open. There you can mark the contact as a favorite, share it with others, edit it or even block it.
7.1.3.1.1. Add to favorites
Hint
This function is only available on ginlo Desktop!
In order to find certain users faster, they can be marked as favorites.
To do this, move the mouse over the desired contact in one of the three tabs and click on the green star. By clicking on the green star again, you remove the contact from the one favorites list.
Alternatively, click on the desired contact and then click add to favorites in the submenu that opens. Conversely, to delete the contact from the list, click on remove from favorites.
7.1.3.1.3. Edit
Similar to your own profile you can edit the profile of your chat partner. Click on edit in the submenu.
In another menu the profile of your chat partner will be displayed. You can, for example, edit, create or delete the avatar. In addition, you can also mute the contact at this point.
Hint
It is possible that not all editing options will be displayed to you. This depends on the cockpit settings of your administrator.
Click on save contact at the bottom of the screen to save your changes. Clicking the cross at the top left will take you back.
7.1.3.1.4. Block
There are good reasons to block one of your contacts temporarily or even permanently. During this time he can’t communicate with you - but you can’t write to him either! Click block in the submenu.
To unblock, click on the crossed out circle under the avatar.
7.1.3.1.5. Mute
Sometimes you don’t want to be disturbed by acoustic notifications and therefore you can mute each chat individually.
To do this, click mute at the bottom of the profile - a window will appear. Select from the list
15 minutes
1 hour
8 hours
24 hours
permanent
and confirm your selection by clicking save at the bottom of the screen. The remaining time is displayed in the menu.
You can end the interruption by clicking mute and unmute again.
7.1.3.2. Search function
You can find an existing contact or chat by clicking in the empty field next to the magnifying glass at the top. Enter the first letters of the contact you are looking for from your address book. A short time later you will be shown a selection. Now select the contact you want to chat with. To do so, click on the message icon below the avatar.
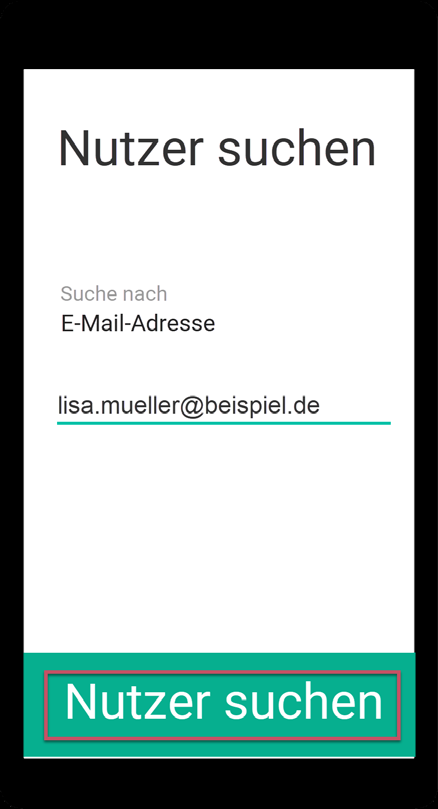
Alternatively, click on the green plus in the upper right corner to Search user and search specifically for a cell phone number, email address or ginlo ID.
In case of a hit, the contact will be displayed to you. Now you can optionally add personal data of your contact. Save the record by clicking save contact at the bottom of the screen.
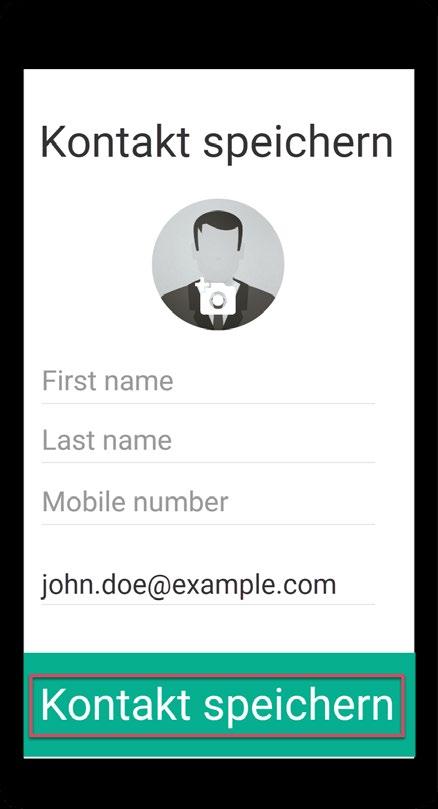
Done! Your new contact is now saved in the contacts of your address book.
Click on the green write message button at the bottom. The chat window will open and you can start your Chat.
To return directly to the address book overview, remove the search letters you entered.
Alternatively, after pressing the green plus in the upper right corner, you can also create a new Start chat, a new Group or a Announce group.
7.1.4. Files
In an overview your media files (photos, videos, voice messages) and documents are displayed separately. By clicking on a file you can view photos or documents, videos and voice messages will be played.
To delete files, first click the arrow in the upper right corner and then click Edit. Selected files are marked by a cross in red box. Now you can click the delete button at the bottom of the screen to delete these files immediately; Cancel will undo your selection.
7.1.4.1. Media
Photos
They are displayed and can be forwarded, saved locally or deleted. To do this, use the symbols at the top right.
Videos
They are played and can be forwarded, saved or deleted. Use the symbols in the upper right corner.
Voice messages
They are played and can be deleted.
7.1.4.2. Documents
Documents are displayed and can be forwarded, saved locally or deleted. To do this, use the symbols at the top right.
7.1.5. Settings (cog)
Clicking the cog will take you to the global settings. Here you can also access your profile, edit your devices, change your device password, view your blocked contacts, make notification settings, and read up on legal and privacy related things.
7.1.5.1. Profile
Here you can also access and edit your own profile, as we have already described in the Profile section.
7.1.5.2. Devices
All your linked devices on which ginlo Business is installed and kept in sync are displayed. In the upper right corner, you can see the number of devices that have been shared for this purpose. You can pair a maximum of 10 devices.
In detail, the device name, the ginlo software used on it and the date of last use are displayed. Your currently used device is marked with Active.
Remove devices that are no longer in use by clicking on the relevant entry and then clicking on delete device. You will be prompted to enter the device password of your current device.
To mount a new device, proceed as described in Second device.
7.1.5.3. Change device password
Device password is the password that secures your ginlo account on the various devices. Since ginlo can be used on several devices in the business area, a device password must be assigned for each integrated device.
Device password is used to encrypt all ginlo content on the respective device. The private key generated in the process is always located only on the device in question - no one but you has access to it!
In this menu you can change your current device password.
To enter the password menu, you will be asked for your current device password for security reasons.
Assign a new password that you will use to log in to your ginlo account on this device in the future and that will later be used to encrypt all contents of your account.
Your device password should consist of at least 8 upper and lower case letters, numbers and special characters. You can see how secure your chosen device password is by the colored dots: All green? That’s perfect!
Repeat your input. Click back to cancel this process or save. Your new password will be applied immediately.
7.1.5.4. Blocked contacts
If you have blocked contacts from your address book, you can unblock them here. Click on blocked contacts and then on the garbage can icon to unblock them.
Hint
Re-blocking is possible in the chat in question after clicking on the avatar or directly in the Contacts.
7.1.5.5. Messages available on server
As a hint, here you can see how long your messages are available on our servers for synchronization. The number of days can be set by your administrator.
7.1.5.6. Read receipt
Under this item you set whether your counterpart should receive a Read confirmation. To do this, press the switch.
7.1.5.7. Online status
Under this item you can set whether your online status should be displayed. To do this, press the button.
7.1.5.8. Password forgotten
With this switch you determine whether you can receive a recovery code in case of loss of your device password. For this purpose the switch must be set to Off!
Warning
When this switch is on, it increases the security for your account - but in case of password loss, you will have to delete this application completely, reinstall it and mount it as second device. This assumes that you already have ginlo installed on another device and have access to it. For Android and also iOS users there is a description for this.
7.1.5.9. Notifications
Under this item you can specify whether you want notifications to be displayed on the desktop, whether you want to be informed acoustically or visually about the arrival of new messages. To do this, click the relevant buttons.
7.1.5.10. Legal & Privacy
In this section we provide information about security-related topics, direct you to our privacy policy, general terms and conditions, give an overview of the licensed software we use, show our imprint and provide contact information for ginlo support.
7.1.5.10.1. About ginlo Business
In the following some points about security of your communication are explained.
7.1.5.10.1.1. Encryption in ginlo
ginlo encrypts all your messages on your devices, during transport and on the receiving devices. That’s why we rightly talk about actual full encryption. The private keys for this are generated automatically by each user himself with the assignment of a device password per end device. Since these keys are only located on the device of the respective user, neither ginlo.net GmbH nor any third party has access to them.
Of course, we offer a number of other features to make your communication as secure as possible:
7.1.5.10.1.2. This is how secure your communication is
Depending on how you and your chat partners have exchanged your contacts, your chats in the overview and your address book entries are marked with a color code on the left side of the screen.
You can additionally recognize this status by the colored rings around the avatars:
Green
All contacts are marked that are very safe - you have met in person and exchanged your QR codes or were invited by the administrator (B).
Yellow
All contacts are marked that have already been communicated with several times.
Red
All contacts are marked, with which no communication took place yet - ask or send a message!
7.1.5.10.1.3. Transmission status
So that you also know whether your message has been sent, has arrived at the target device and has been read, your messages are marked with small gray or blue ticks. This has the following meaning:
1 gray tick
The message has been sent and has arrived on the ginlo servers.
2 gray ticks
The message has been transferred to the recipient and has arrived there.
2 blue ticks
The message has been read by all (!) recipients.
7.1.5.10.2. Privacy
Compliance with data protection is an absolute priority at ginlo.net GmbH. We therefore collect a minimum of personal data and attach great importance to secure communication in order to protect your privacy.
How we handle your data in detail and what security precautions we take in the process, as well as what rights you have in the processing of your data, can be found in our Data Protection Notice. If you have any questions, please feel free to contact us by e-mail at Datenschutz@ginlo.net .
7.1.5.10.3. Terms and Conditions
In our General Terms and Conditions (GT&C) you will find important information on the terms and conditions, rights and obligations, warranty, liability and term of the contract in connection with the use of the ginlo Business app. If you have any questions, please feel free to contact us by e-mail at contact@ginlo.net .
7.1.5.10.4. FAQ
Customer satisfaction is very important to us. We welcome your inquiries, comments or constructive criticism.
You can access our detailed ginlo manual directly from the app in your web browser.
In addition to this help, you can also receive individual support:
Use our B2B Support Form, select ginlo Business and click on Contact at the bottom of the page or write to b2b-support@ginlo.net .
7.1.5.10.5. Licenses
ginlo also uses copyrighted software, fonts, characters, etc. to provide the service and lists them under Licenses.
7.1.5.10.6. Imprint
In imprint you will find all necessary information about the operator of ginlo website.
7.1.5.11. ginlo business license
7.1.5.12. Version
The used ginlo version is shown here. This information is important if you want to contact our support department.
Hint
Make sure that you always use a current ginlo version. Find out about this regularly on our download page in the GINLO BUSINESS section.
The reason for this is on the one hand the security aspect and on the other hand the fact that you can only use the latest ginlo features with up-to-date software.
For business use, updates are partially controlled centrally by the administrator and on a time-delayed basis.
7.1.5.13. Close
Click on the cross in the upper left corner to close the settings menu.
7.1.6. Server status
By clicking on the menu item with the sympolized WLAN you will get information about your connection to the ginlo server. Everything in the green area? Wonderful! If not: First check your internet connection, in case of doubt contact your administrator.
7.2. “Chat overview” menu
You can reach this menu by clicking on the chat icon in the Sidebar. Now your chats will be listed. Your activity determines the order displayed, i.e. the chat you were last active in is at the top. Click on a chat to open it. Then proceed as described in the section In Chat.
There is also a search function and another submenu “+” where you can start a new chat, create a new group or search for users.
7.2.1. Search function
In Search field above the chat overview you can search for (group) chats and contacts. Enter at least two characters. You will see the number of chats or contacts found, and the chats or contacts will be listed.
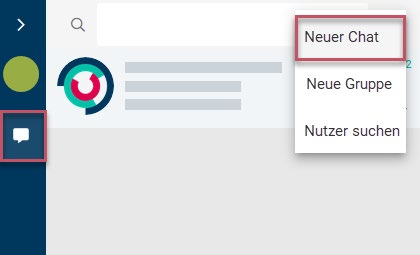
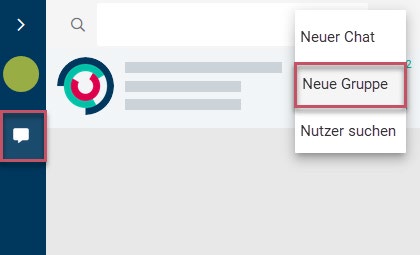
7.2.2. Menu „+“
You can find this menu item in your chat overview on the top right. A submenu will open where you can organize your chats:
7.2.2.1. New chat
Click new chat, your ginlo contacts will open. Select a contact. For further explanation of the input options, see In chat.
Now you can compose your message.
7.2.2.2. New group
If you want to communicate in a group, you must first create a group. To do this, first tap the + at the bottom right in the chat overview and then on new group - overview page for managing groups will open.
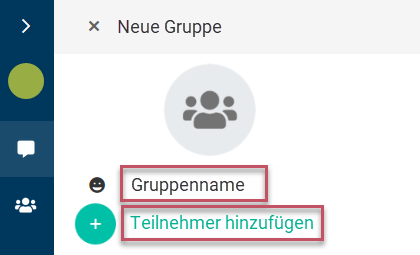
Optionally choose an avatar.
Make sure that announcement group has the switch set to Off - unless you actually want to create such a group.
Assign a group name.
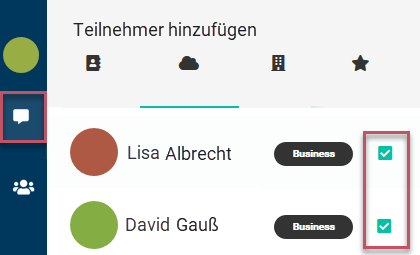
Click on add participants - your ginlo contacts will open. Now click on the contacts you want to add to the group. Your selection will cause a green checkmark to appear at the end of the contact entry. Clicking on a contact again will cancel this selection. Confirm your selection by clicking the Save button at the very bottom.
You can remove group members by clicking on the green cross. Confirm your change by clicking the create group button at the very bottom.
Optionally, you can designate additional administrators. To do this, click manage administrators. The list of your group members is displayed. Now click on the contacts that you want to set as administrators. Your selection will cause a green check mark to appear at the end of the contact entry. Clicking on a contact again will cancel this selection. Confirm your selection by clicking the Save button at the very bottom.
You can remove administrators by clicking on the green cross.
Hint
Administrators you designate can invite or delete other group members, but they cannot edit administrators.
Finally, click create group at the very bottom.
Now you can compose your message. All participants will receive invitations and can join your group.
If you want to leave a group as a member, select the relevant group chat in the chat overview, click on the small arrow at the top right and then on edit group. At the bottom of the screen you will find the green leave group button. In another pop-up you will be asked for confirmation or you can cancel the process.
If a group is no longer needed, click on the small hook to the right of the chat in question in the chat overview and click on edit group in the pop-up. Now the group overview opens and you can click on delete group at the very bottom. In another pop-up you will be asked to confirm this action. At this point you can also revise your decision - click cancel.
7.2.2.3. New announcement group (B)
In contrast to the group described above, here you have the possibility to send information to your group members without them being able to reply to it. You can give administrator rights to certain group members so that they can also write and add or remove other members.
Hint
The creation of such groups is only available to ginlo Business users. However, ginlo Private users can also be invited and even appointed as administrators.
To create an announcement group, click + in the upper right corner of the chat overview and then on new announcement group - overview page for managing announcement groups will open.
Optionally choose an avatar.
Click on add participants - your ginlo contacts will open. Now click on the contacts you want to add to the group. Your selection will cause a green checkmark to appear in the contact’s avatar. Clicking on a contact again will cancel this selection. Confirm your selection by clicking the checkmark in the upper right corner.
You can remove group members by clicking on remove participant and then clicking on the contact you want to remove. To confirm, the avatar will be displayed as a red dot with a white cross. Confirm your change by clicking again on the checkmark in the upper right corner.
Assign a group name.
Optionally, you can designate additional administrators. To do so, click on manage administrators. The list of your group members will be displayed. Now click on contacts you want to set as administrators. Your selection will cause a green checkmark to appear in the contact’s avatar. Confirm your selection by clicking the checkmark in the upper right corner.
You can remove administrators by clicking on manage administrators again. To confirm, the green checkmark in the avatar will disappear. Confirm your change by clicking the hook in the upper right corner again.
Hint
Administrators you designate can invite or delete other group members. You can even add or delete administrators.
Finally, click on done in the upper right corner.
Now you can compose your message. All participants will receive invitations and can join your announcement group.
If you want to leave a group as a member, select the relevant group chat in the chat overview, click on the small arrow at the top right and then on edit group. At the bottom of the screen you will find the green leave group button. In another pop-up you will be asked for confirmation or you can cancel the process.
If an announcement group is no longer needed, click on the group name in the Chat overview and then click on delete group at the bottom. A pop-up will ask you to confirm this action. At this point you can also revise your decision - click cancel.
7.2.2.4. Search users
Click search user, a window will pop up. You can search by cell phone number, business email address or ginlo ID. After selecting, enter the data you are looking for and now click on search user at the very bottom.
In case of a hit, the contact will be displayed to you. Now you can optionally add personal data of your contact. Save the record by clicking Save contact at the very bottom.
Click at the very bottom on Write message. The chat window will open and you can start your chat.
7.2.3. Chat selection
Click on a chat in the chat overview to open.
Single chat
In the single chat you can empty or delete chat. To do this, click on the small arrow at the bottom right of the relevant individual chat in the overview.
Group chat
In the group chat, you can empty chat or edit group. To do this, click on the small arrow at the bottom right of the relevant group chat in the overview.