8. Audio Video Calls
With ginlo Audio Video Call (AVC), location-independent video calls or video conferences can be made tap-proof and GDPR compliant. The servers are located in certified data centers in Germany, and the signals are transmitted using transport encryption.
8.1. Requirements
In order for ginlo Audio Video Call to be conducted, the following must be ensured:
All participants must already be ginlo users or have been explicitly invited by the moderator to participate.
For scheduled group discussions, participants should be recorded in a group.
Devices used must meet certain minimum requirements.
Stable Internet connection (ideally broadband) is mandatory to achieve the best possible quality.
Therefore, avoid switching between access points during a conference, e.g. in buildings (hotels), while driving in the car, but also at home if WLAN repeaters are in use.
8.1.1. Participants
In order to make a ginlo Audio Video Call, all scheduled participants must be owners of a ginlo account. It does not matter whether it is a ginlo Private Account or a ginlo Business Account. Every ginlo user can participate in a ginlo Audio Video Call with any ginlo user.
Search for the relevant call partners in your ginlo contacts or invite colleagues, friends or acquaintances to create a ginlo account. For information on how to do this, see the contacts sections of the user guides under Android, iOS or for the ginlo Desktop.
As a moderator, you can additionally invite external guests. Information on this can be found under Invite person.
For a scheduled group call, create a group with the desired participants. For information on how to do this, see Menu plus sections of user guides for Android, iOS or for ginlo Desktop.
8.1.2. Technical Requirements
ginlo Audio Video Calls are possible via all devices technically equipped for this purpose (smartphone, PC); however, these must meet certain minimum requirements:
Since picture-in-picture function is required, ginlo AVC is possible on devices from Android 8 or iOS 12. Use only current, tested and stable running operating systems - unfortunately this is not always guaranteed with the latest versions!
Large amounts of data are transferred during an AVC. If transmission is also fully encrypted, as in case of ginlo Audio Video Call, a lot of processes are running in the background, which are connected with an enormous technical effort. Only high-performance devices such as smartphones of the latest generation can cope with this. Older models or models with little working memory capacity (CPU performance) can take longer to establish a connection, and there may be “jerks” or even disconnections.
Satisfactory transmission is equally dependent on the internet connection used. Public WLANs often do not meet these requirements! Even on train or as a passenger in a car, stable Internet connection is not (yet) guaranteed everywhere.
AVC also requires increased battery power; therefore, ideally operate your smartphone on the charger.
PC must be equipped with camera (for video calls), microphone and loudspeaker. Headset can be used as an alternative.
Access to the required hardware must be granted to ginlo in all cases.
Hint
For administrators or firewall users:
In general, the following TCP ports should be enabled in the firewall:
TCP: Outgoing to destination port
88 (SSL certificate verification)
443 (access to STUN/TURN server to determine public IP addresses of users)
UDP: outgoing to destination port
3479 (Connection via audio/video in the meetings)
Your firewall must allow HTTPS traffic (between the clients and our servers) to pass unhindered!
Inform any IT service providers you may use about these settings and notes!
8.2. Start conversation
8.2.1. 1:1 conversation
Start ginlo and go into an existing chat with desired conversation partner or start a new chat. To do this, select on
Android phone
top right the green handset for a phone call or the camera for a video call;
iPhone
the phone handset at the top of the screen and then either make audio call or make video call;
ginlo Desktop or WebClient (B)
the phone icon or the camera icon at the top of the chat window.
After that, a connection is established.
Read further under Conduct conversation.
8.2.2. Group conversation
Start ginlo and go to the desired group chat. Select on
Android phone
top right the green handset for a phone call or the camera for a video call;
iPhone
the phone handset at the top of the screen and then either make audio call or make video call;
ginlo Desktop or Webclient (B)
the phone icon or the camera icon at the top of the chat window.
After that, a connection is established.
Hint
For ginlo Private users up to 5 persons can join a video chat.
For ginlo Business users number of participants is unlimited, but depends on technical circumstances.
Read more under Conduct conversation.
8.3. Accept call
As with every incoming telephone call, you will also be informed acoustically and visually about a ginlo Audio Video call. Prerequisite for this is the device you are using has a loudspeaker and it is switched on.
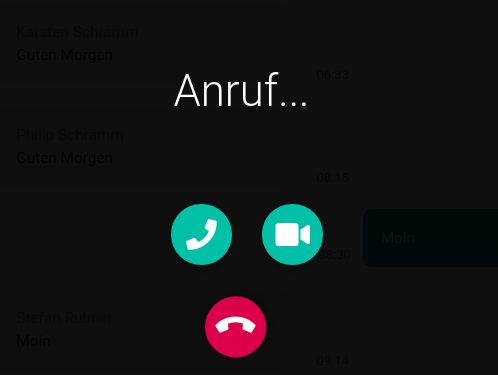
Hint
If bandwidth is too low, you can alternatively accept only the voice call at first and switch on your camera manually later. To do this, click on phone handset during an incoming call.
Within approx. 30 minutes, it is possible to participate in the conversation subsequently or repeatedly. If you move the mouse pointer over an AVC message - it is marked by a telephone receiver - a clickable small arrow appears on the right above the message. A pop-up opens with icons with the following options (from left):
Info - Handset - Camera - Trashcan
Click on the iconized Listener (Accept Audio) or the Camera (Accept Video) to join the conference.
Info is only displayed on the caller.
Click on the trash can icon to delete the AVC message.
8.4. Conduct conversation
After starting a call, you will briefly see the message A connection to your meeting is being established and an external window will open. If you have not already done so, you will be asked to agree to access your camera and microphone. Confirm by clicking Agree. If you decline, you will not be able to participate in the meeting!
Hint
The message Only you are in this meeting only means that no other participant has joined the AVC yet. As soon as another caller joins, this message will disappear and instead you will see the avatar of the called person and a short time later also his picture. This process can take up to one minute! Please have a little patience.
8.5. End call
To end the call, simply tap the red handset at the bottom of the application. To do this, swipe up on your smartphone or guide the mouse into this area on the desktop.
Hint
You can dial in again to join the conversation again. To do so, go to the chat in question. The call is marked with a phone handset or call. Tap on the call* again on your smartphone or move the mouse into this field on the desktop and click on the arrow at the top right. Now click on either handset or camera icon. For ginlo Business users the dial-in is possible on all logged in devices!
8.6. Explanation of buttons
After accepting a call, you will see - depending on whether you are using ginlo Business or ginlo Private and are a moderator (M) or a subscriber and which device you are using - different icons, the meaning of which is explained below.
8.6.1. Android
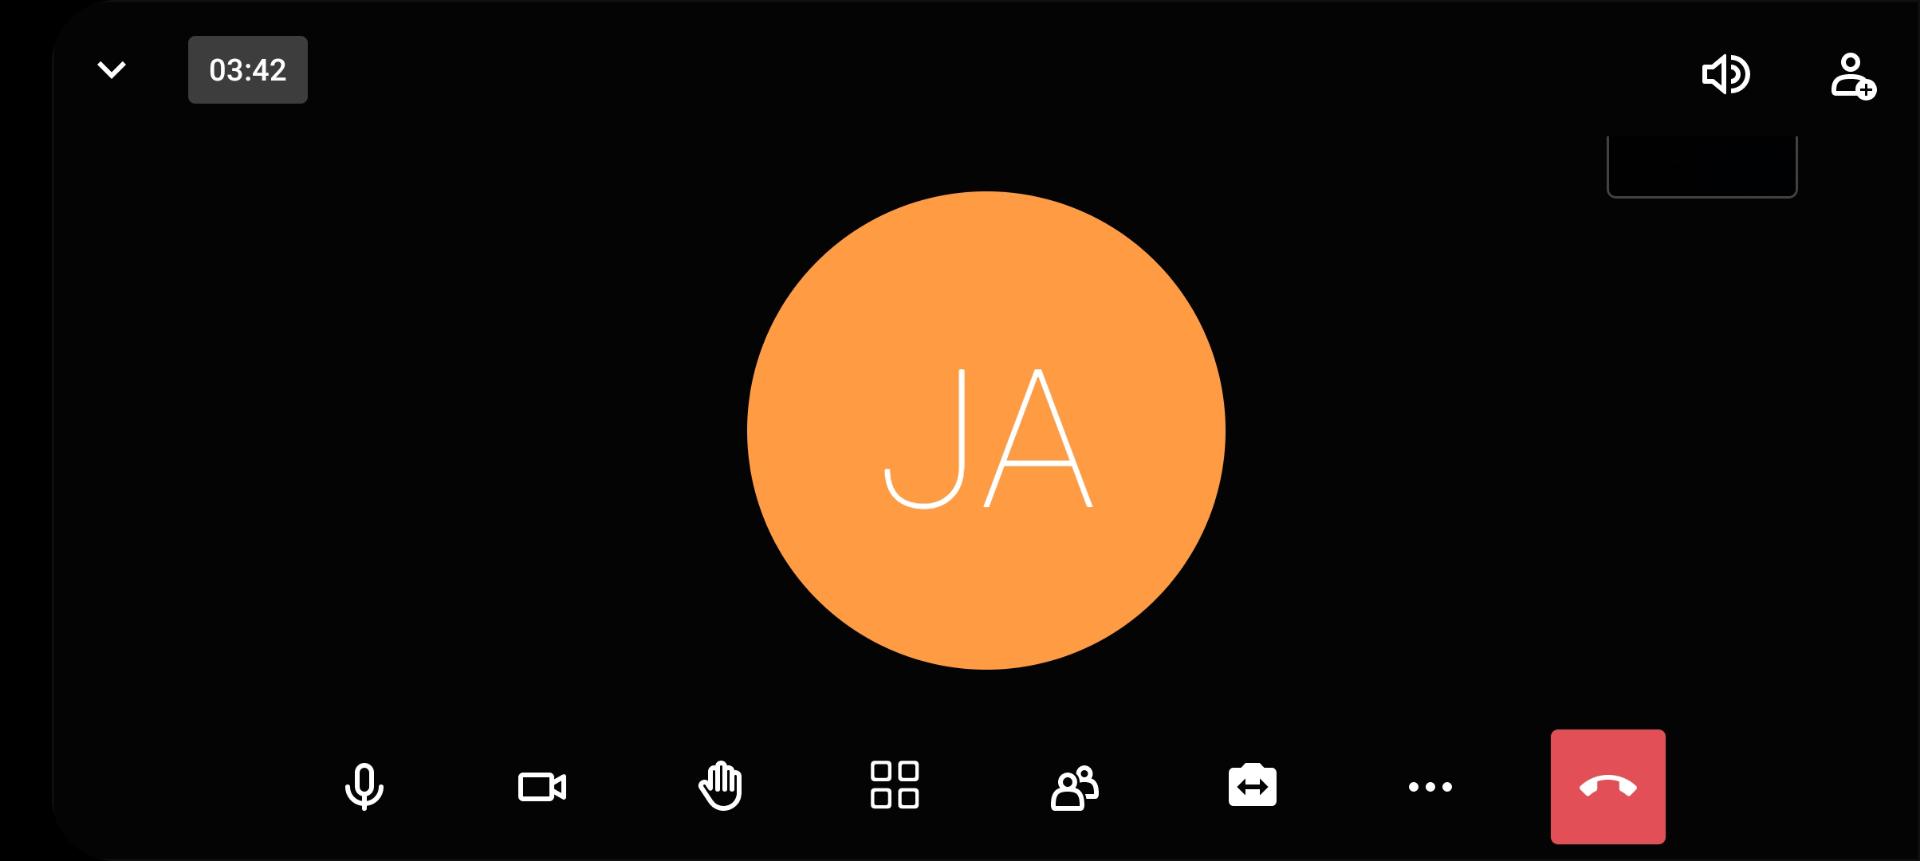
On Android phones, the following icons are located when using the cross format. To do this, touch the display:
Microphone - Camera - Report - View - Attendees - Switch camera - More settings - Handset.
Hint
The order or arrangement changes when using the portrait format!
8.6.1.1. Microphone
Tapping the microphone turns it off or on.
Hint
During a conference with several participants, the microphone should only be switched on when you want to speak yourself. This avoids disturbing background noise as far as possible.
8.6.1.2. Camera
Tapping the camera icon will turn your camera off or on. Deactivating the camera is recommended when connection conditions are not optimal (weak internet).
Hint
Disabling the camera is recommended in case of less than optimal connection conditions (weak internet).
8.6.1.3. Report
This option is useful for conferences with several participants: you can signal that you want to speak. Such messages are marked in color and a number is added. Remember to lower your hand again after your contribution…
In addition, if approved by the moderator, various emojis can be generated (interactions).
8.6.1.4. View
Here you can switch between individual and overall view (tile view) of the participants.
8.6.1.5. Attendees
The number of people present is displayed.
If you tap on this display, another menu opens:
You can search for attendees, invite people as a moderator, view and edit attendee status, set up a breakout room (second room), and mute all attendees, turn off their cameras, or give permission to turn on cameras individually.
8.6.1.5.1. Invite person (M)
Using this button will generate an invitation link that you can send via social media or email. Clicking this link will open an AVC in a new browser window. In order to participate in the conference, access to the microphone or camera must be allowed. This currently only works on desktops! On smartphones you will get a corresponding hint.
8.6.1.5.2. Search function
In larger call groups it is sometimes necessary to search for people attendees. Enter some letters - the result will be displayed.
8.6.1.5.3. Status (M)
You can see whether a participant’s camera or microphone is switched on or off to the right of their name in the participant list.
If you tap on a participant, you can
call up connection information;
show the participant in the foreground;
give moderation rights;
remove the participant from the room;
mute all other participants;
ask the participant to unmute.
8.6.1.5.4. Breakout Room (M)
For group work, additional rooms can be set up, which can be joined individually or to which the moderator assigns specific persons. These persons can leave the respective side room again and return to the main room.
If you tap a Side room longer, you can remove it again.
8.6.1.5.5. More settings (M)
At the bottom of the screen there are further setting options. With these you can
mute all;
turn off all cameras;
allow those attendees to unmute their own or turn on their camera.
8.6.1.5.6. Cross
By tapping the cross in the upper left corner, you close this menu and return to the conference.
8.6.1.6. Change camera
With the camera switched on, you can switch to the second built-in camera to show the participants your surroundings or a specific document, for example.
8.6.1.7. Other settings (3 dots)
In Highlight mode, depending on whether you are a moderator (M) or a participant, a pop-up opens with the following options (from top):
Attendees - Car Mode - Activate Audio Only Mode - Security Options (M) - Start Livestream (M) - Share Video (M) - Screen Sharing - Talk Statistics (M) - Switch Camera - View - Report.
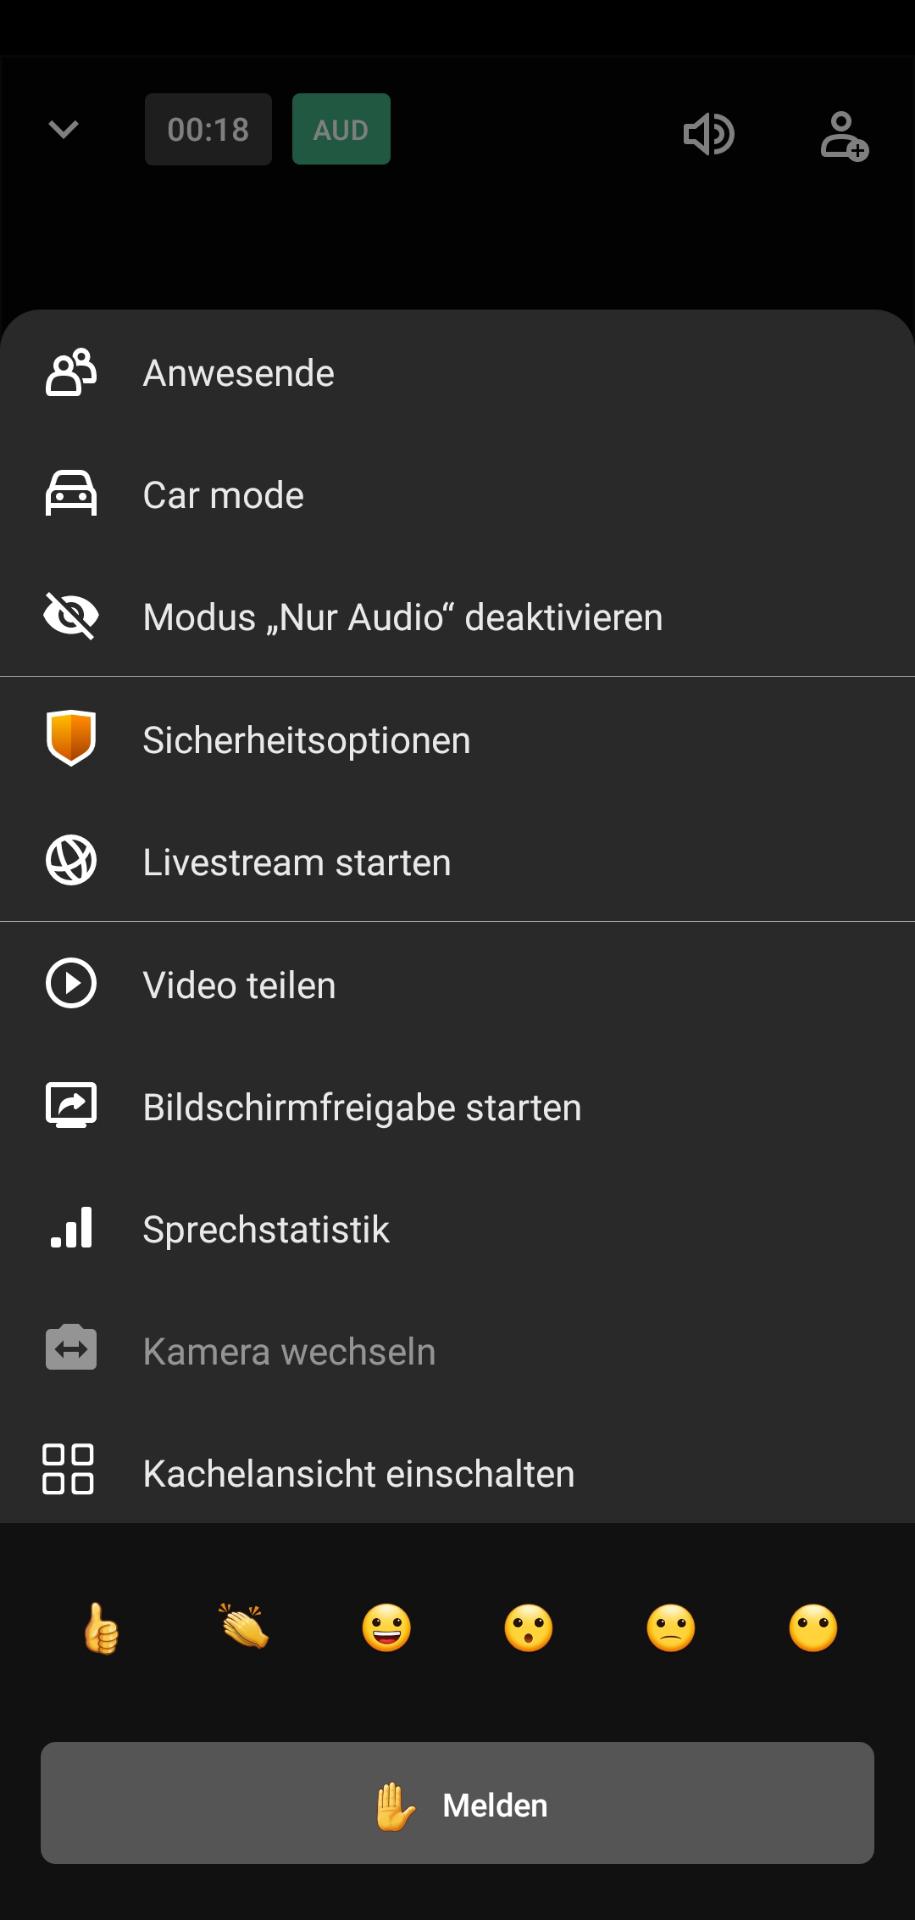
In the following only the possibilities not described so far are explained:
8.6.1.7.1. Attendees
Description see above.
8.6.1.7.2. Car Mode
During the car ride you can participate in the meeting undisturbed, the camera is switched off. Select a device for audio output by tapping Select Sound Device.
At this point you can also end your participation in the conference. To do this, tap on Leave Meeting.
By tapping the Cross in the upper left corner, you close this menu and return to the AVC.
8.6.1.7.3. Mode “Audio only”
This allows you to turn the camera off or on. Disabling the camera is recommended when connection conditions are not optimal (weak Internet).
8.6.1.7.4. Security options (M)
For security reasons, you can assign a password to participate in a conference, which must be used by every participant.
8.6.1.7.5. Start live stream (M)
A pop-up will open. Enter the Internet address of the desired live stream and start it.
For information you will find the following links:
What is it?
YouTube Terms of Use
Google Privacy Policy
Clicking the Cancel button will close the pop-up.
8.6.1.7.8. Speech statistics (M)
In this menu you can see the speaking times of the individual participants. You can search for a specific participant.
8.6.1.7.9. Change camera
Description see above
8.6.1.7.10. View
Description see above
8.6.1.7.11. Report
Description see above
8.6.1.8. Handset
By tapping the red handset you end the call. You will return to the chat.
8.6.2. iOS
On iOS phones, the following icons are located. To do this, touch the Display:
Microphone - Handset - Camera - More settings
8.6.2.1. Microphone
Tapping the microphone turns it off or on.
Hint
During a conference with several participants, the microphone should only be switched on when you want to speak yourself. This avoids disturbing background noise as far as possible.
8.6.2.2. Handset
By tapping the red handset you end the call. You will return to the chat.
8.6.2.3. Camera
Tapping the camera icon turns your camera off or on.
… hint:
Deactivating the camera is recommended in case of less than optimal connection conditions (weak internet).
8.6.2.4. Settings (3 points)
A pop-up will open with the following options (from the top):
Select audio device - Enable Audio Only mode - Report - More options
8.6.2.4.1. Select audio device
You reach the selection between handset, loudspeaker (listen loudly) and - if used - headset.
8.6.2.4.2. Mode “Audio only”
This allows you to turn the camera off or on. Deactivating the camera is recommended in case of less than optimal connection conditions (weak internet).
8.6.2.4.3. Report
This option is useful in conferences with several participants: you can signal that you want to speak. Such messages are marked with a color and a number. Remember to lower your hand again after your contribution…
In addition, if approved by the moderator, various emojies can be generated (interactions).
8.6.2.4.4. More options
By tapping this option you will see additional setting options:
Switch camera - Share YouTube video - Mute all.
8.6.2.4.4.1. Change camera
With the camera on, you can switch to the second built-in camera to show participants your surroundings or a specific document, for example.
8.6.2.4.4.3. Mute All (M)
Use this menu to mute all participants except yourself. If needed, each participant must turn their microphone back on themselves.
8.6.3. ginlo Desktop or ginlo Web Messenger (B)
For users of the ginlo Desktop application, various setting options or displays are available in the lower, upper and right screen areas. Bottom and top bar are visible for 5 seconds each and can be displayed by moving the mouse. The bar on the right side of the screen can be shown or hidden. To do this, click on the arrow in the middle.
The setting options are analogous for ginlo Web Messenger.
8.6.3.1. Bottom bar
Depending on whether you are a moderator or a participant, you will see the following icons (from left):
Microphone - Camera - Screen sharing - Reporting - moderator - View - Avatar - Performance - More settings - Listener.
8.6.3.1.1. Microphone
Clicking on the microphone turns it off or on.
Hint
During a conference with several participants, the microphone should only be switched on when you want to speak yourself. This avoids disturbing background noises as far as possible.
After clicking the small arrow a pop-up opens where you can select your available hardware for speaking and listening. Usually the automatically detected default settings are sufficient.
8.6.3.1.2. Camera
Clicking the camera icon will turn your camera off or on.
Hint
Deactivating the camera is recommended in case of less than optimal connection conditions (weak internet).
After clicking the small arrow a pop-up window opens, where you can select your available hardware. Usually the automatically detected default settings are sufficient.
8.6.3.1.3. Share screen
With this function files or presentations can be made accessible to all conference participants. You can choose whether your entire screen or only a specific window should be displayed.
With a click on Share (on iOS or Linux) or Allow (on Windows) all participants will see your made selection. By Cancel you terminate this function.
In Share mode, if the camera is switched on, your image in the bottom right area is also transmitted. You terminate the Share screen function by clicking again on the Screen icon at the bottom left.
8.6.3.1.4. Report
This option is useful for conferences with several participants: you can signal that you want to speak. Such messages are marked with a color and a number. Remember to lower your hand again after your contribution….
In addition, if approved by the moderator, various emojis can be generated (interactions).
8.6.3.1.5. View
Hint
This button is only visible after the first participant has dialed in.
Here you can switch between individual and overall view (tile view) of the participants.
8.6.3.1.6. Avatar (M)
You will see your name and ginlo ID.
8.6.3.1.7. Performance
With a click on this menu item you can set the transmission quality of your camera. A pop-up will open. You can choose between Best performance and Highest quality. The default setting is always Highest quality.
Use the slider to select a suitable resolution. Click on the cross to apply the selected setting for this connection and close the window.
Hint
There is no permanent storage of this setting!
8.6.3.1.8. Other settings (3 dots)
Clicking on the three dots opens a pop-up with the following options (from top):
Full screen mode - Security options (M) - Livestream (M) - Share video - Speech statistics - Settings - Shortcuts.
8.6.3.1.8.1. Full screen mode
You switch to full screen mode and back in your screen window.
8.6.3.1.8.2. Security options (M)
As a moderator, you can assign a password to participate in a conference, which must be used by each participant.
8.6.3.1.8.3. Start Livestream (M)
A pop-up will open. Enter the Internet address of the desired livestream and start it.
For information you will find the following links:
What is it?
YouTube Terms of Use
Google Privacy Policy
Click the Cancel button to close the pop-up.
8.6.3.1.8.5. Talking Statistics (M)
In this menu, as a moderator, you can see the speaking times of each participant. You can search for a specific participant.
8.6.3.1.8.6. Settings
Devices
Here you can select the hardware installed on your PC (camera, microphone and loudspeaker) and play a test tone.
Moderation
You can set the following as moderator:
All persons join muted
All persons join without video
FollowMe for all persons
Suppress interactions for all
More
Enable or disable notification for chat messages
Enable / disable keyboard shortcuts
Show or hide self-view
Set screen language
Set frame rate for screen sharing
OK / Cancel
With the OK button you save your selection, with Cancel you leave this menu and return to the AVC.
8.6.3.1.8.7. Show shortcuts
The following keyboard shortcuts allow you to control your ginlo AVC via keyboard:
F |
Switch video thumbnail view on or off |
M |
Enable or disable mute |
V |
Start or stop camera |
A |
Manage call quality |
D |
Switch between camera and screen sharing |
R |
Raise hand |
S |
Enable or disable full screen mode |
W |
Enable/disable tile view |
ALT+T |
Thumbs up |
ALT+C |
Clap hands |
ALT+L |
Smiling face |
ALT+O |
Surprised face |
ALT+B |
Serious face |
ALT+S |
Silent face |
? |
Show or hide keyboard shortcuts |
|
Push-to-Talk (talk key) * |
T |
Show speaker statistics |
By permanently pressing the space button (space bar) your microphone is switched on and you can actively participate in the conversation during this time.
Via the close button you end this display.
8.6.3.1.9. Handset
Click on the red handset to pause or end your participation in the conference.
8.6.3.2. Top bar
Using the icons that can be displayed at the top of the screen, you can see the total duration of the conference, the number of participants, view the speech statistics and go directly to the performance setting. To do this, click on the desired icon.